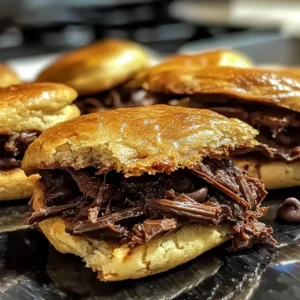
The moment I pulled those Cheesy Baked Italian Grinder Sliders from the oven, my kitchen was filled with an irresistible blend of savory and buttery aromas. Picture golden Hawaiian rolls cradling layers of melty provolone, savory ham, and a spicy kick from zesty banana peppers — it felt like a warm hug on a plate! This recipe is not just easy to whip up but is also perfect for game days or cozy family dinners, striking the ideal balance between gourmet taste and delightful comfort food. The best part? With a gluten-free option available, everyone can indulge in this delectable treat. So, are you ready to embark on this mouthwatering journey?

Why are these sliders a must-try?
Irresistible Aroma: The moment you bake these sliders, your kitchen will be enveloped in a warm, savory fragrance that is simply inviting.
Gourmet Comfort: Soft Hawaiian rolls come together with layers of rich, melty provolone and delicious deli meats, providing a touch of indulgence that feels gourmet.
Easy to Prepare: With straightforward steps, even novice chefs can whip up these Cheesy Baked Italian Grinder Sliders in no time, making them ideal for busy weeknights or game day gatherings.
Crowd-Pleasing Flavor: Perfectly balanced flavors with a hint of zesty banana peppers guarantee that these sliders will disappear fast at any get-together, leaving everyone asking for more.
Customizable Options: Want it gluten-free? No problem! You can easily swap in gluten-free rolls. Plus, there’s room for creativity—try adding sautéed mushrooms or great alternative meats for a twist.
Serve these sliders with a fresh side salad or some crunchy pickles for a complete meal that even includes a fantastic Cheesy Crack Breakfast to start your day right!
Cheesy Baked Italian Grinder Sliders Ingredients
-
For the Sliders
-
Hawaiian Sweet Rolls – The soft base of these sliders; gluten-free rolls work great for a gluten-free option.
-
Deli Ham – Provides a savory flavor that complements the rest of the ingredients.
-
Genoa Salami – Adds richness and a touch of complexity; can swap for other cured meats if desired.
-
Pepperoni – Offers a spicy kick; consider using turkey pepperoni for a lighter choice.
-
Provolone Cheese – Melts beautifully for that cheesy goodness; mozzarella is a suitable substitute.
-
Banana Peppers – Brings a zesty flavor; feel free to use sliced jalapeños if you prefer more heat.
-
For the Sauce
-
Mayonnaise – Adds delightful creaminess that binds all flavors together.
-
Red Wine Vinegar – Delivers a nice acidity; white wine vinegar can be used as a substitute.
-
Italian Seasoning – Enhances the taste profile; mix in fresh herbs for an alternative flair.
-
For the Topping
-
Unsalted Butter – Infuses richness and helps create the delectable buttery top.
-
Garlic Powder – Elevates savory notes; feel free to use fresh minced garlic for an added punch.
-
Dried Parsley – Adds a touch of color and mild flavor; fresh parsley works well, too.
-
Grated Parmesan Cheese – Introduces a nutty flavor and contributes to the sliders’ crispness.
These Cheesy Baked Italian Grinder Sliders are more than just a meal; they’re a comforting delight that will transform your gatherings into memorable occasions!
Step‑by‑Step Instructions for Cheesy Baked Italian Grinder Sliders
Step 1: Preheat the Oven
Begin by preheating your oven to 350°F (175°C). While the oven warms, grease a 9×13-inch baking dish with a little cooking spray or butter to prevent sticking. This step is crucial for achieving a beautifully baked top crust that holds all the delicious flavors of your Cheesy Baked Italian Grinder Sliders.
Step 2: Prepare the Rolls
Carefully slice the Hawaiian rolls in half horizontally, creating a top and bottom section. Make sure to keep the rolls connected at the seams for easy assembly. Lay the bottom halves in your greased baking dish, ready to be filled with savory ingredients that will make these sliders irresistible.
Step 3: Mix and Spread the Sauce
In a small bowl, combine mayonnaise, red wine vinegar, and Italian seasoning. Mix well until all ingredients are thoroughly blended. Spread this creamy mixture generously over the bottom halves of the Hawaiian rolls, ensuring an even coating that will enhance the overall flavor of your Cheesy Baked Italian Grinder Sliders.
Step 4: Layer the Meats
Next, layer the deli ham, Genoa salami, and pepperoni evenly over the mayo mixture on the bottom rolls. As you stack each meat, consider a systematic approach to ensure every slider packs a flavorful punch. This combination of meats creates a savory delight that’s sure to please a crowd.
Step 5: Add Cheese and Peppers
Now it’s time to layer on the provolone cheese slices, distributing them evenly over the deli meats. Follow this by scattering zesty banana peppers on top of the cheese for that signature kick. This step is pivotal in making your Cheesy Baked Italian Grinder Sliders ooze with flavor and melt in your mouth.
Step 6: Top with the Roll Halves
Once your sliders are fully assembled, carefully place the top halves of the Hawaiian rolls over the meat and cheese filling. Gently press down to secure the layers together. This will help hold everything in place once baked, ensuring each slider maintains its delicious structure throughout the cooking process.
Step 7: Prepare the Topping
In a separate bowl, melt unsalted butter and mix in garlic powder, dried parsley, and grated Parmesan cheese. Stir until well combined. With a pastry brush, generously brush this buttery mixture over the top of the roll halves. This step not only adds rich flavor but also promotes a golden, crispy finish to your Cheesy Baked Italian Grinder Sliders.
Step 8: Bake the Sliders
Cover your baking dish tightly with foil and place it in the preheated oven, baking for 15 minutes. After this time, carefully remove the foil to allow the tops to brown. Continue baking for an additional 5 to 10 minutes until the tops are golden brown and the aroma of melted cheese fills your kitchen—an irresistible sign that your Cheesy Baked Italian Grinder Sliders are nearly ready!

What to Serve with Cheesy Baked Italian Grinder Sliders
Pair your indulgent sliders with these delightful sides to create the perfect comfort food feast.
- Crunchy Pickles: Their tangy bite contrasts beautifully with the rich flavors of the sliders, offering a refreshing palate cleanse.
- Crispy Potato Chips: The satisfying crunch and salty goodness of potato chips complement the gooey sliders, making them a classic combo.
- Zesty Coleslaw: A creamy, tangy coleslaw adds a crunchy texture and bright flavor, balancing the savory richness of the sliders nicely.
- Fresh Garden Salad: Light and refreshing, a simple garden salad with a zesty vinaigrette brings freshness and color to your meal.
- Sweet Potato Fries: Their natural sweetness pairs wonderfully with the savory and spicy notes of the sliders for a well-rounded dish.
- Garlic Bread: Oozing with buttery, garlicky goodness, garlic bread is a complimentary choice that takes the flavors to a whole new level.
- Sangria: A fruity, refreshing sangria will elevate your gathering, adding a splash of vibrancy to your slider feast.
Expert Tips for Cheesy Baked Italian Grinder Sliders
-
Rest Time: Allow the assembled sliders to sit for 15 minutes before baking; this enhances the blending of flavors and ensures a more delicious outcome.
-
Even Distribution: Make sure to evenly layer your fillings; this prevents some sliders from being overloaded while others miss out on delicious flavors.
-
Foil First, Then Brown: Cover with foil during the first baking period. This method steams the rolls, creating a softer texture before achieving that golden brown crust.
-
Watch the Browning: Keep an eye on the sliders in the final baking minutes. If they brown too quickly, loosely cover them again with foil to avoid burning.
-
Don’t Skimp on Seasoning: Ensure ample seasoning in the sauce and toppings of your Cheesy Baked Italian Grinder Sliders to elevate the flavors and keep every bite exciting!
Make Ahead Options
These Cheesy Baked Italian Grinder Sliders are perfect for meal prep enthusiasts! You can assemble the sliders up to 24 hours in advance by following the initial steps, then covering them tightly with foil and refrigerating. Make sure to brush the buttery topping right before baking to maintain its golden, crispy texture. Alternatively, you can prepare the sauce and layer the meats and cheeses separately, storing them in the refrigerator for up to 3 days. When you’re ready to serve, reassemble and bake as instructed for delicious, hassle-free sliders that taste just as good as if made fresh!
Cheesy Baked Italian Grinder Sliders Variations
Feel free to get creative with your Cheesy Baked Italian Grinder Sliders, enhancing flavors and accommodating dietary preferences!
-
Vegetarian: Swap the deli meats for a mixture of grilled zucchini, bell peppers, and roasted mushrooms. This adds a rich savoriness without compromising flavor.
-
Spicy Kick: Add sliced jalapeños or pepper jack cheese for a heat boost. Your sliders will take on a whole new layer of mouthwatering flavor!
-
Cheese Variety: Experiment with different cheeses like sharp cheddar or a blend of Italian cheeses for an exciting twist. Each cheese brings its own unique flavor to the dish.
-
Herb Infusion: Incorporate fresh herbs like basil or oregano into the mayonnaise mix for an aromatic kick. This simple swap elevates the overall taste profile significantly.
-
Gluten-Free: Use gluten-free Hawaiian rolls to make these sliders accessible for everyone without sacrificing taste. They’ll still deliver the same delicious experience!
-
Mushroom Medley: Add sautéed mushrooms for an earthy, umami flavor that complements the richness of the cheese and meats. This addition offers an unexpected depth to every bite.
-
Sweet & Savory: Include a layer of caramelized onions for a touch of sweetness that balances the savory elements beautifully. This flavor combination is simply delightful!
For more ideas on delightful combinations, you could check out our delectable Healthy Cheesy Baked recipes that cater to a variety of tastes and dietary needs!
Storage Tips for Cheesy Baked Italian Grinder Sliders
Fridge: Store leftovers in an airtight container for up to 3 days. This keeps your Cheesy Baked Italian Grinder Sliders fresh and prevents them from drying out.
Freezer: Wrap sliders securely in plastic wrap and then in foil to freeze for up to 2 months. This will preserve their flavor and texture, making them perfect for future cravings.
Reheating: When you’re ready to indulge again, reheat in the oven at 350°F (175°C) for about 10-15 minutes until warmed through and the tops are crispy. Enjoy the same delightful flavors again!

Cheesy Baked Italian Grinder Sliders Recipe FAQs
How do I select ripe ingredients for my Cheesy Baked Italian Grinder Sliders?
Absolutely! Choosing ripe ingredients adds to the flavor of your sliders. For fresh banana peppers, look for peppers that are firm and brightly colored, avoiding any that have dark spots or become soft. The deli meats should be fresh and well within their sell-by dates for safety and taste. Opt for slices of provolone cheese that are rich and creamy; avoiding cheese that is too dry ensures a gooey melt!
Advertisement
How should I store leftover Cheesy Baked Italian Grinder Sliders?
Very! To keep your sliders fresh, store any leftovers in an airtight container in the refrigerator. They can be enjoyed for up to 3 days. Alternatively, if you want to keep them for a longer period, you can freeze them. Just wrap each slider securely in plastic wrap and then in foil to prevent freezer burn; they’ll stay delicious for up to 2 months.
Can I freeze Cheesy Baked Italian Grinder Sliders?
Absolutely! Begin by allowing the sliders to cool completely after baking. Then, wrap them individually in plastic wrap to maintain freshness. Next, wrap the bundles in aluminum foil, which further protects against freezer burn. When ready to enjoy, thaw in the fridge overnight and reheat in the oven at 350°F (175°C) for about 10-15 minutes until warmed through.
What should I do if my sliders are soggy after baking?
No worries! If your sliders turn out soggy, it’s often due to excess moisture from the ingredients. To remedy this, ensure that your mayonnaise and vinegar mixture isn’t overly runny; you could also slightly reduce the amount or use less wet ingredients in the filling. Additionally, allowing the assembled sliders to rest before baking encourages better flavor melding without excess moisture pooling.
Are Cheesy Baked Italian Grinder Sliders suitable for my gluten-free friends?
Yes, indeed! You can easily make these sliders gluten-free by substituting the Hawaiian rolls with gluten-free varieties. Be sure to check that your deli meats, cheese, and any sauces or seasonings are labeled gluten-free as well, to accommodate any dietary restrictions. Gather everyone around these delicious sliders without worry!
How can I add more flavors to my Cheesy Baked Italian Grinder Sliders?
Absolutely! To boost the flavor even more, consider adding sautéed mushrooms or artichoke hearts for additional depth. You might also want to experiment with different cheeses like cheddar or pepper jack for a kick of heat. Fresh basil or oregano mixed into the mayonnaise can enhance the Italian flavor profile beautifully, making your sliders even more delectable!

Cheesy Baked Italian Grinder Sliders for Cozy Game Nights
Ingredients
Equipment
Method
- Preheat the oven to 350°F (175°C) and grease a 9x13-inch baking dish.
- Slice the Hawaiian rolls in half horizontally, keeping them connected at the seams.
- Mix mayonnaise, red wine vinegar, and Italian seasoning in a bowl. Spread over the bottom halves of the rolls.
- Layer deli ham, Genoa salami, and pepperoni over the mayo mixture.
- Add provolone cheese slices and scatter banana peppers over the top.
- Place the top halves of the rolls over the fillings and press down gently.
- Mix melted butter with garlic powder, dried parsley, and grated Parmesan. Brush over the tops of the rolls.
- Cover with foil and bake for 15 minutes. Remove foil and bake for an additional 5-10 minutes until golden brown.