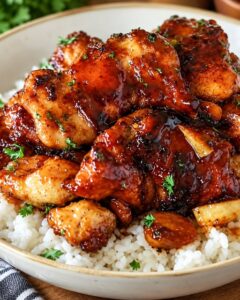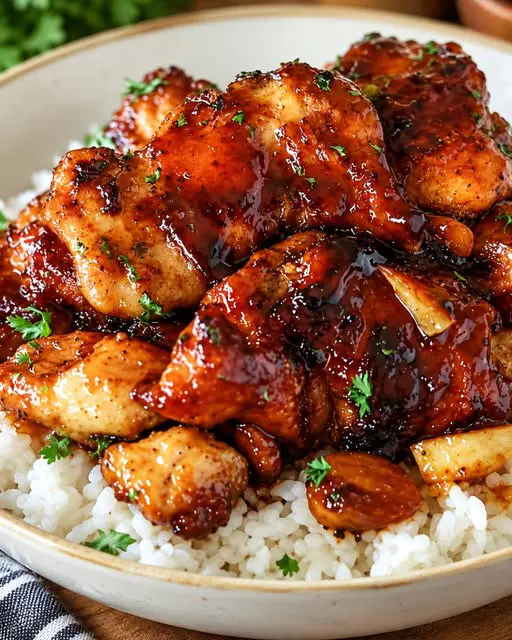
Introduction to Sweet Baby Ray’s Sticky Chicken
There’s something magical about a dish that brings everyone together, and Sweet Baby Ray’s Sticky Chicken does just that.
This recipe is a delightful blend of sweet and tangy flavors, perfect for a busy weeknight or a weekend gathering.
I remember the first time I made it; the aroma filled my kitchen, and my family couldn’t wait to dig in.
With just a handful of ingredients and minimal prep time, this sticky chicken is a quick solution for those hectic days when you want to impress without the fuss.
Trust me, your taste buds will thank you!
Why You’ll Love This Sweet Baby Ray’s Sticky Chicken
This Sweet Baby Ray’s Sticky Chicken is a game-changer for any home cook.
It’s incredibly easy to whip up, making it perfect for those busy evenings when time is tight.
The combination of sweet barbecue sauce and honey creates a flavor explosion that will have your family asking for seconds.
Plus, it’s versatile enough to pair with any side dish, making it a go-to recipe for any occasion.
Ingredients for Sweet Baby Ray’s Sticky Chicken
Gathering the right ingredients is the first step to culinary success.
For this Sweet Baby Ray’s Sticky Chicken, you’ll need:
- Boneless, skinless chicken thighs: These are juicy and tender, perfect for soaking up that sticky sauce.
- Olive oil: A little fat helps the seasonings stick and adds flavor.
- Garlic powder: This brings a savory depth without the hassle of fresh garlic.
- Smoked paprika: Adds a subtle smokiness that elevates the dish.
- Onion powder: A great way to infuse onion flavor without the chopping.
- Salt and black pepper: Essential for enhancing all the flavors in the dish.
- Sweet Baby Ray’s Original Barbecue Sauce: The star of the show, this sauce is sweet, tangy, and oh-so-delicious.
- Honey: Adds extra sweetness and helps create that sticky glaze.
- Brown sugar: For a deeper sweetness and caramelization.
- Soy sauce: A touch of umami that balances the sweetness.
- Apple cider vinegar: This adds a bit of acidity to cut through the richness.
- Worcestershire sauce: A complex flavor booster that rounds out the sauce.
- Minced garlic: Fresh garlic gives a punch of flavor that complements the powder.
- Red pepper flakes (optional): For those who like a little heat, these can spice things up!
You can find all the exact measurements at the bottom of the article, ready for printing.
Feel free to mix and match or substitute ingredients based on what you have on hand.
Cooking should be fun and flexible!
How to Make Sweet Baby Ray’s Sticky Chicken
Creating Sweet Baby Ray’s Sticky Chicken is a straightforward process that yields mouthwatering results.
Let’s dive into the steps that will transform your kitchen into a flavor-packed haven.
Step 1: Preheat the Oven
Start by preheating your oven to 400°F.
This step is crucial because it ensures even cooking and helps the chicken develop that beautiful caramelized exterior.
While the oven heats up, lightly grease a 9×13-inch baking dish or line a baking sheet with foil for easy cleanup.
Step 2: Season the Chicken
Next, pat the boneless, skinless chicken thighs dry with paper towels.
This helps the seasonings stick better.
In a large bowl, toss the chicken with olive oil, garlic powder, smoked paprika, onion powder, salt, and black pepper.
Make sure every piece is coated evenly for maximum flavor.
Step 3: Make the Sticky Sauce
Now, let’s whip up that sticky sauce!
In a separate bowl, whisk together Sweet Baby Ray’s barbecue sauce, honey, brown sugar, soy sauce, apple cider vinegar, Worcestershire sauce, minced garlic, smoked paprika, and red pepper flakes if you’re feeling adventurous.
This sauce is the heart of the dish, so mix it well until everything is combined.
Step 4: Coat the Chicken
Place the seasoned chicken in your prepared baking dish.
Using a brush or spoon, generously coat the chicken with about half of the sticky sauce.
This initial layer will infuse the chicken with flavor as it bakes.
Step 5: Bake the Chicken
Slide the baking dish into the preheated oven and bake uncovered for 20 minutes.
This allows the chicken to start cooking through.
To check for doneness, use a meat thermometer; the internal temperature should reach 165°F.
Step 6: Add More Sauce
After 20 minutes, remove the chicken from the oven.
Brush the remaining sauce over the chicken for an extra layer of flavor.
This step is key to achieving that sticky, glossy finish we all love.
Step 7: Finish Cooking
Return the chicken to the oven for another 10–15 minutes.
Keep an eye on it, ensuring the sauce thickens and caramelizes around the edges.
The aroma will be irresistible!
Step 8: Caramelize
For those extra-sticky edges, turn on the broiler for 1–2 minutes at the end.
Watch closely, as the honey and brown sugar can burn quickly.
This step adds a delightful crunch to the outside of the chicken.
Step 9: Rest and Serve
Once done, let the chicken rest for about 5 minutes.
This allows the juices to redistribute, keeping the meat tender.
Before serving, spoon any extra sticky sauce from the pan over the chicken for that final touch of deliciousness.
Tips for Success
- Always pat the chicken dry before seasoning for better flavor absorption.
- Use a meat thermometer to ensure the chicken is cooked perfectly.
- Reserve some sauce for serving to avoid cross-contamination.
- Feel free to adjust the spice level by adding more or fewer red pepper flakes.
- Let the chicken rest before serving to keep it juicy and tender.
Equipment Needed
- Baking dish: A 9×13-inch dish works best, but any oven-safe dish will do.
- Mixing bowls: Use two bowls—one for the chicken and one for the sauce.
- Meat thermometer: Essential for checking doneness; a simple kitchen thermometer works too.
- Basting brush: Great for applying sauce; a spoon can work in a pinch.
Variations
- Spicy Sweet Baby Ray’s Sticky Chicken: Add more red pepper flakes or a splash of your favorite hot sauce for a kick.
- Honey Mustard Twist: Substitute half of the barbecue sauce with honey mustard for a tangy flavor profile.
- Grilled Version: Marinate the chicken in the sauce and grill it for a smoky, charred taste.
- Vegetarian Option: Use firm tofu or tempeh instead of chicken for a plant-based alternative.
- Low-Carb Adaptation: Replace honey and brown sugar with a sugar substitute to reduce carbs.
Serving Suggestions
- Classic Coleslaw: A refreshing side that balances the sweetness of the chicken.
- Garlic Bread: Perfect for soaking up any extra sauce on your plate.
- Cold Beer: A crisp lager pairs wonderfully with the sticky flavors.
- Presentation: Serve on a wooden board with fresh herbs for a rustic touch.
FAQs about Sweet Baby Ray’s Sticky Chicken
Can I use chicken breasts instead of thighs?
Absolutely! While chicken thighs are juicier, chicken breasts can work too. Just be mindful of the cooking time, as they may cook faster.
How do I store leftovers?
Store any leftover Sweet Baby Ray’s Sticky Chicken in an airtight container in the fridge for up to 3 days. Reheat in the oven or microwave before serving.
Can I make this dish ahead of time?
Yes! You can marinate the chicken in the sauce a day in advance. Just bake it when you’re ready to serve for a quick meal.
What can I serve with Sweet Baby Ray’s Sticky Chicken?
This dish pairs well with sides like coleslaw, garlic bread, or roasted vegetables. The options are endless!
Is this recipe gluten-free?
Yes, as long as you use gluten-free soy sauce, this Sweet Baby Ray’s Sticky Chicken is gluten-free and perfect for those with dietary restrictions.
Final Thoughts
Cooking Sweet Baby Ray’s Sticky Chicken is more than just preparing a meal; it’s about creating memories.
Advertisement
The joy of gathering around the table, sharing laughter, and savoring that sticky, sweet goodness is what makes this dish special.
Whether it’s a weeknight dinner or a weekend feast, this recipe brings comfort and satisfaction.
I love how it transforms simple ingredients into something extraordinary.
So, roll up your sleeves, embrace the mess, and enjoy the process.
Your family will appreciate the effort, and your taste buds will be dancing with delight!
PrintSweet Baby Ray’s Sticky Chicken Recipe to Enjoy Tonight
A delicious recipe for Sweet Baby Ray’s Sticky Chicken, featuring tender chicken thighs coated in a sweet and tangy sticky sauce.
- Prep Time: 15 minutes
- Cook Time: 30 minutes
- Total Time: 45 minutes
- Yield: 4 servings 1x
- Category: Main Dish
- Method: Baking
- Cuisine: American
- Diet: Gluten Free
Ingredients
- 2 lb boneless, skinless chicken thighs
- 1 tbsp olive oil
- 1 tsp garlic powder
- 1 tsp smoked paprika
- ½ tsp onion powder
- ½ tsp salt
- ½ tsp black pepper
- 1 cup Sweet Baby Ray’s Original Barbecue Sauce
- ¼ cup honey
- 2 tbsp brown sugar
- 2 tbsp soy sauce
- 1 tbsp apple cider vinegar
- 1 tbsp Worcestershire sauce
- 2 cloves garlic, minced
- ½ tsp smoked paprika
- ¼ tsp red pepper flakes, optional
Instructions
- Preheat the oven: Heat oven to 400°F. Lightly grease a 9×13-inch baking dish or line a baking sheet with foil.
- Season the chicken: Pat the chicken thighs dry. Toss with olive oil, garlic powder, smoked paprika, onion powder, salt, and black pepper.
- Make the sticky sauce: In a bowl, whisk together Sweet Baby Ray’s barbecue sauce, honey, brown sugar, soy sauce, apple cider vinegar, Worcestershire sauce, garlic, smoked paprika, and red pepper flakes.
- Coat the chicken: Place the chicken in the prepared baking dish and brush generously with about half of the sauce.
- Bake: Bake uncovered for 20 minutes.
- Add more sauce: Remove from the oven and brush generously with the remaining sauce.
- Finish cooking: Return to the oven for another 10–15 minutes, or until the chicken reaches an internal temperature of 165°F and the sauce is thick, glossy, and caramelized around the edges.
- Caramelize: For extra-sticky edges, broil for 1–2 minutes, watching carefully so the sauce doesn’t burn.
- Rest and serve: Let the chicken rest for about 5 minutes. Spoon the extra sticky sauce from the pan over the chicken before serving.
Notes
- Chicken thighs stay especially juicy, but chicken breasts can also be used.
- Reserve some sauce separately for serving rather than using sauce that has touched raw chicken.
- Keep a close eye on the chicken under the broiler because the honey and brown sugar can caramelize quickly.
- For a spicy-sweet version, add extra red pepper flakes or a splash of hot sauce.
Nutrition
- Serving Size: 1 serving
- Calories: 350
- Sugar: 20g
- Sodium: 800mg
- Fat: 10g
- Saturated Fat: 2g
- Unsaturated Fat: 8g
- Trans Fat: 0g
- Carbohydrates: 40g
- Fiber: 1g
- Protein: 25g
- Cholesterol: 100mg