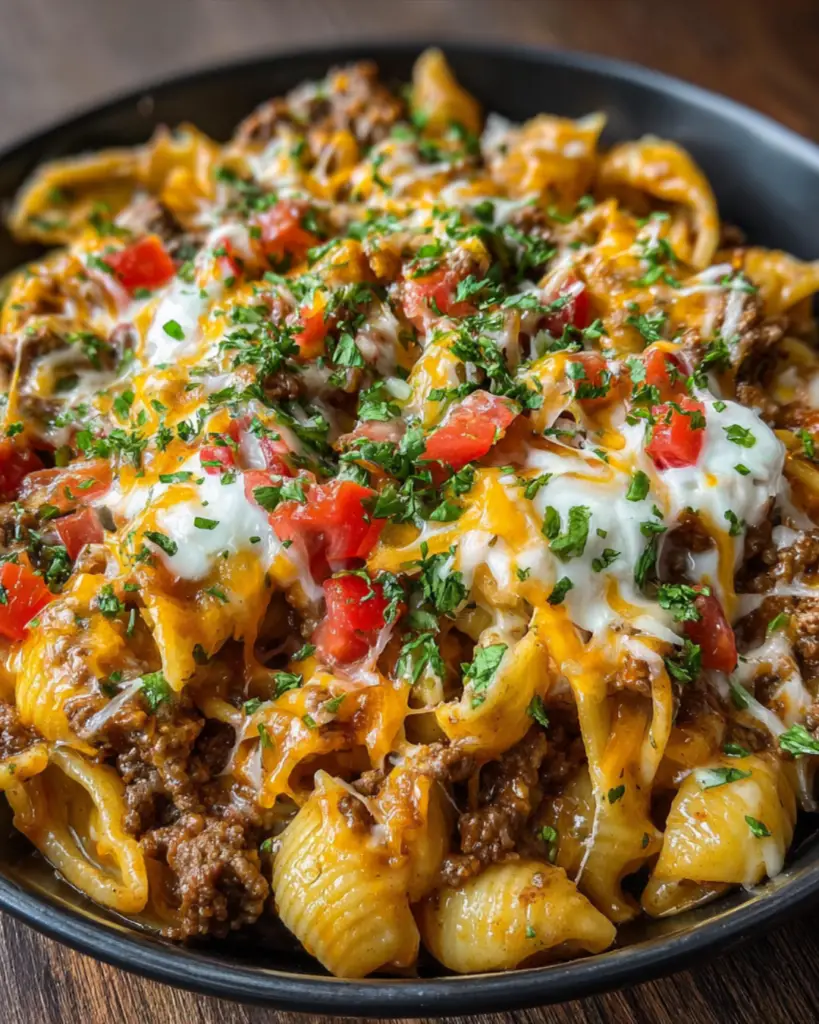
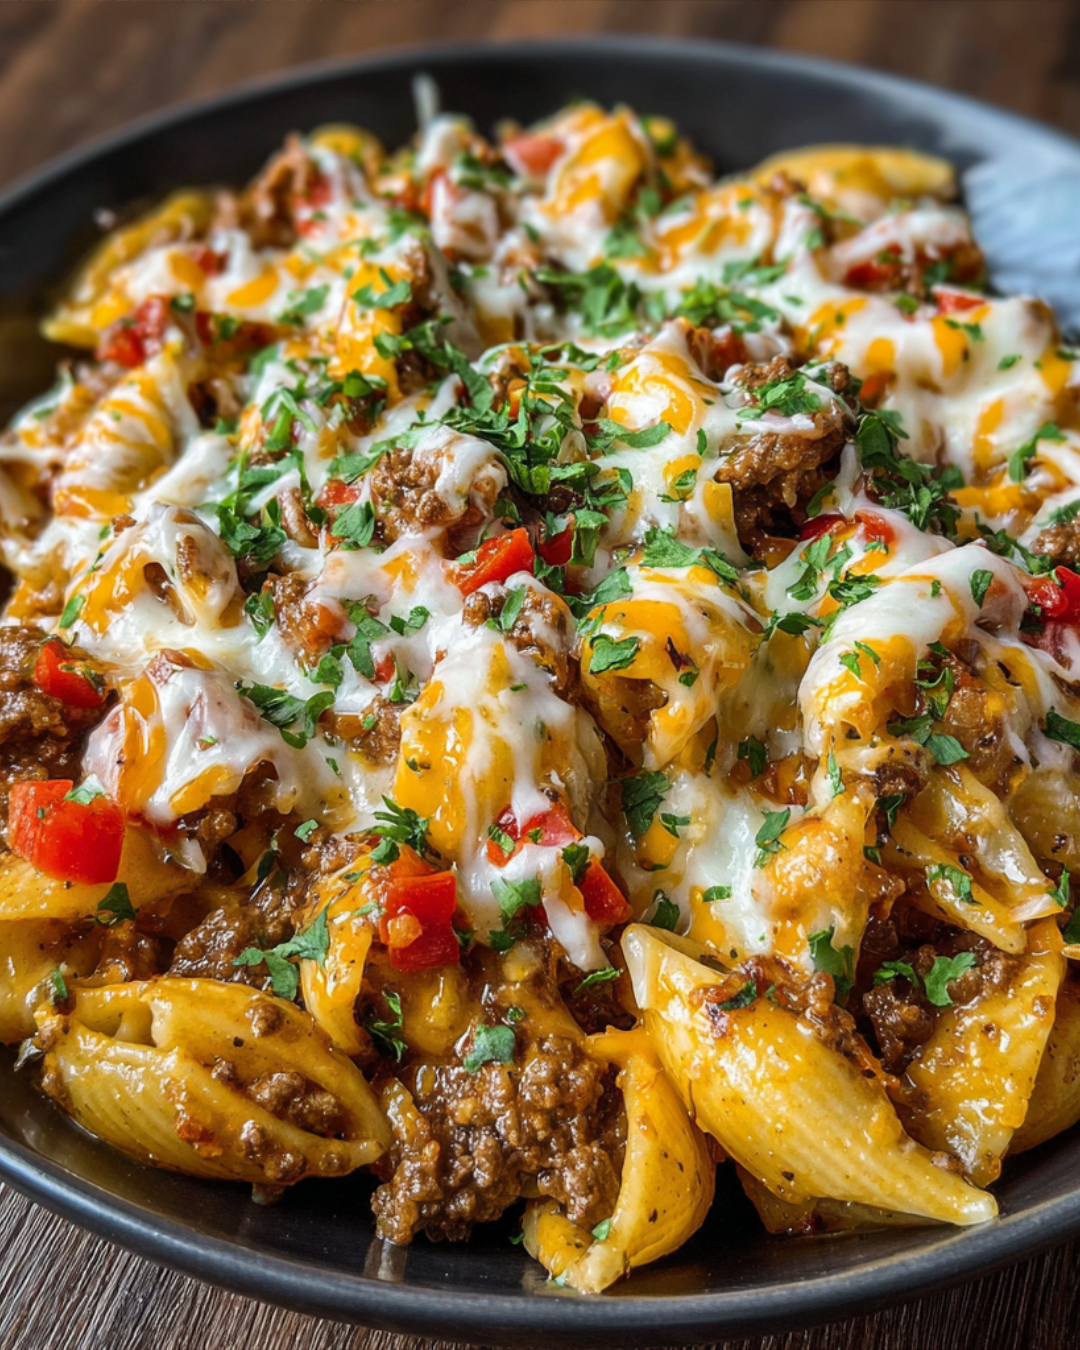
Introduction to Loaded Cheesy Beef Pasta
There’s something undeniably comforting about a big bowl of Loaded Cheesy Beef Pasta.
It takes me back to family dinners where laughter filled the air, and everyone gathered around the table, eager to dig in.
This dish is not just a meal; it’s a quick solution for those busy weeknights when you want to impress your loved ones without spending hours in the kitchen.
With its creamy, cheesy goodness and hearty beef, it’s a surefire way to bring smiles to the dinner table.
Let’s dive into this delicious recipe that’s sure to become a family favorite!
Why You’ll Love This Loaded Cheesy Beef Pasta
This Loaded Cheesy Beef Pasta is a game-changer for busy nights.
It’s not just quick to whip up; it’s also packed with flavor that’ll have everyone asking for seconds.
The creamy cheese melds perfectly with the savory beef, creating a dish that feels indulgent yet simple.
Plus, it’s a one-pot wonder, making cleanup a breeze.
Trust me, this recipe will quickly become your go-to for satisfying family meals!
Ingredients for Loaded Cheesy Beef Pasta
To create this mouthwatering Loaded Cheesy Beef Pasta, you’ll need a handful of simple ingredients that pack a punch of flavor.
Here’s what you’ll gather:
- Ground Beef: The star of the show! It adds richness and protein, making this dish hearty.
- Elbow Macaroni: These little pasta shapes hold onto the cheesy sauce beautifully, making every bite satisfying.
- Shredded Cheddar Cheese: This cheese brings a sharp, tangy flavor that melts perfectly into the dish.
- Shredded Mozzarella Cheese: For that gooey, stretchy texture that everyone loves.
- Diced Tomatoes with Green Chilies: They add a zesty kick and a touch of sweetness, enhancing the overall flavor.
- Onion: Chopped onion provides a savory base, adding depth to the dish.
- Garlic: Freshly minced garlic infuses the dish with aromatic goodness.
- Beef Broth: This adds moisture and a rich beefy flavor, making the sauce luscious.
- Milk: Creaminess is key! Milk helps create that velvety texture in the sauce.
- Olive Oil: A splash of olive oil is perfect for sautéing the aromatics and beef.
- Paprika: This spice adds a subtle smokiness and a pop of color.
- Italian Seasoning: A blend of herbs that brings a touch of the Mediterranean to your plate.
- Salt and Pepper: Essential for seasoning, enhancing all the flavors in the dish.
- Optional Garnish: Chopped parsley or green onions can brighten up the dish and add a fresh touch.
For exact measurements, check the bottom of the article where you can find everything you need for printing.
Feel free to get creative with your ingredients! You can swap in ground turkey for a leaner option or add in some veggies like bell peppers or spinach for extra nutrition.
How to Make Loaded Cheesy Beef Pasta
Creating this Loaded Cheesy Beef Pasta is a breeze!
Follow these simple steps, and you’ll have a delicious meal ready in no time.
Step 1: Cook the Pasta
Start by bringing a large pot of salted water to a boil.
Once boiling, add the elbow macaroni and cook according to the package instructions.
This usually takes about 7-8 minutes.
Make sure to stir occasionally to prevent sticking.
When done, drain the pasta and set it aside.
This step is crucial for that perfect pasta texture!
Step 2: Sauté the Aromatics
In a large skillet, heat a tablespoon of olive oil over medium heat.
Add the chopped onion and sauté for about 3-4 minutes until it’s soft and translucent.
Then, toss in the minced garlic and cook for another minute.
The aroma will be heavenly!
This step builds a flavorful base for your Loaded Cheesy Beef Pasta.
Step 3: Brown the Beef
Next, add the ground beef to the skillet.
Cook it until it’s browned, breaking it apart with a spatula as it cooks.
This should take about 5-7 minutes.
Once browned, drain any excess fat.
This keeps your dish from being too greasy while still rich in flavor.
Step 4: Combine Ingredients
Now, stir in the can of diced tomatoes (with juice), beef broth, and milk.
Add the paprika, Italian seasoning, salt, and pepper.
Let this simmer for about 5-7 minutes.
This allows all those flavors to meld beautifully.
Afterward, add the cooked macaroni to the skillet and mix everything well.
Step 5: Add Cheese and Serve
Finally, it’s time for the star of the show—cheese!
Stir in the shredded cheddar and mozzarella until they melt and create a creamy sauce.
Taste and adjust the seasoning if needed.
For a pop of color, garnish with chopped parsley or green onions.
Serve hot, and watch everyone dig in with delight!
Tips for Success
- Don’t overcook the pasta; it should be al dente for the best texture.
- Feel free to customize the cheese—mix in your favorites for a unique twist.
- For extra flavor, let the dish sit for a few minutes before serving.
- Keep an eye on the heat to prevent the sauce from sticking to the skillet.
- Make it ahead of time and reheat for an easy weeknight meal!
Equipment Needed
- Large Pot: For boiling the pasta. A Dutch oven works well too.
- Skillet: A large skillet is essential for sautéing and combining ingredients.
- Colander: To drain the pasta. A slotted spoon can be a handy alternative.
- Spatula: For stirring and breaking up the beef.
Variations
- Spicy Kick: Use spicy diced tomatoes or add a dash of hot sauce for an extra kick.
- Vegetarian Option: Substitute ground beef with lentils or a plant-based meat alternative for a meatless meal.
- Cheesy Delight: Experiment with different cheeses like pepper jack or gouda for unique flavors.
- Veggie Boost: Toss in some chopped bell peppers, spinach, or zucchini for added nutrition and color.
- Gluten-Free: Swap elbow macaroni with gluten-free pasta to accommodate dietary needs.
Serving Suggestions
- Garlic Bread: Serve with warm, buttery garlic bread for a classic pairing.
- Side Salad: A fresh green salad with a tangy vinaigrette complements the richness of the pasta.
- Drink Pairing: Enjoy with a cold beer or a glass of red wine for a delightful meal.
- Presentation: Serve in a large bowl, garnished with parsley for a pop of color.
FAQs about Loaded Cheesy Beef Pasta
Can I make Loaded Cheesy Beef Pasta ahead of time?
Absolutely! This dish is perfect for meal prep. You can make it ahead and store it in the fridge for up to three days. Just reheat it on the stovetop or in the microwave when you’re ready to enjoy.
What can I substitute for ground beef?
If you’re looking for alternatives, ground turkey or chicken works well. For a vegetarian option, try using lentils or a plant-based meat substitute. Both options will still give you that hearty feel!
How can I make this dish spicier?
For a spicy twist, use spicy diced tomatoes or add a few dashes of your favorite hot sauce. You can also sprinkle in some crushed red pepper flakes while cooking for an extra kick.
Can I add vegetables to this recipe?
Definitely! Feel free to toss in some chopped bell peppers, spinach, or even zucchini. They’ll add color and nutrition without compromising the delicious flavor of the Loaded Cheesy Beef Pasta.
Is this dish gluten-free?
To make this Loaded Cheesy Beef Pasta gluten-free, simply swap the elbow macaroni for a gluten-free pasta option. It’s an easy way to accommodate dietary needs while still enjoying this comforting meal!
Final Thoughts
Cooking Loaded Cheesy Beef Pasta is more than just preparing a meal; it’s about creating memories.
Advertisement
The aroma wafting through your kitchen will draw everyone in, sparking conversations and laughter.
Each bite is a warm hug, combining cheesy goodness with hearty beef that satisfies the soul.
Whether it’s a weeknight dinner or a gathering with friends, this dish brings people together.
I hope you enjoy making it as much as I do.
So grab your ingredients, roll up your sleeves, and let the joy of cooking fill your home with love and deliciousness!
PrintLoaded Cheesy Beef Pasta: A Comforting Recipe You’ll Love!
A comforting and cheesy pasta dish loaded with ground beef, perfect for a family meal.
- Prep Time: 10 minutes
- Cook Time: 20 minutes
- Total Time: 30 minutes
- Yield: 4 servings 1x
- Category: Main Dish
- Method: Stovetop
- Cuisine: American
- Diet: Gluten Free
Ingredients
- 1 pound ground beef
- 12 ounces elbow macaroni
- 2 cups shredded cheddar cheese
- 1 cup shredded mozzarella cheese
- 1 can (15 oz) diced tomatoes with green chilies (undrained)
- 1 small onion, chopped
- 3 cloves garlic, minced
- 1 cup beef broth
- 1 cup milk
- 1 tbsp olive oil
- 1 tsp paprika
- 1 tsp Italian seasoning
- Salt and pepper to taste
- Optional: chopped parsley or green onions for garnish
Instructions
- Bring a large pot of salted water to a boil. Cook elbow macaroni according to package instructions. Drain and set aside.
- Heat olive oil in a large skillet over medium heat. Add chopped onion and cook until soft (about 3–4 minutes). Add garlic and cook for 1 minute. Add ground beef and cook until browned. Drain excess fat.
- Stir in diced tomatoes (with juice), beef broth, milk, paprika, Italian seasoning, salt, and pepper. Simmer for about 5–7 minutes to let flavors blend.
- Add the cooked macaroni to the skillet and mix well. Stir in cheddar and mozzarella cheese until melted and creamy.
- Taste and adjust seasoning if needed. Garnish with parsley or green onions if desired. Serve hot.
Notes
- For a spicier version, use spicy diced tomatoes.
- This dish can be made ahead and reheated for easy meals.
- Feel free to add vegetables like bell peppers or spinach for extra nutrition.
Nutrition
- Serving Size: 1 serving
- Calories: 600
- Sugar: 4g
- Sodium: 800mg
- Fat: 30g
- Saturated Fat: 15g
- Unsaturated Fat: 10g
- Trans Fat: 0g
- Carbohydrates: 50g
- Fiber: 3g
- Protein: 35g
- Cholesterol: 100mg