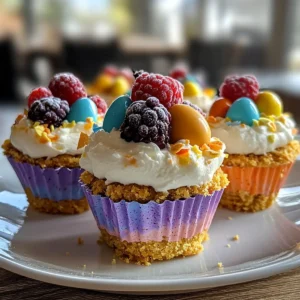
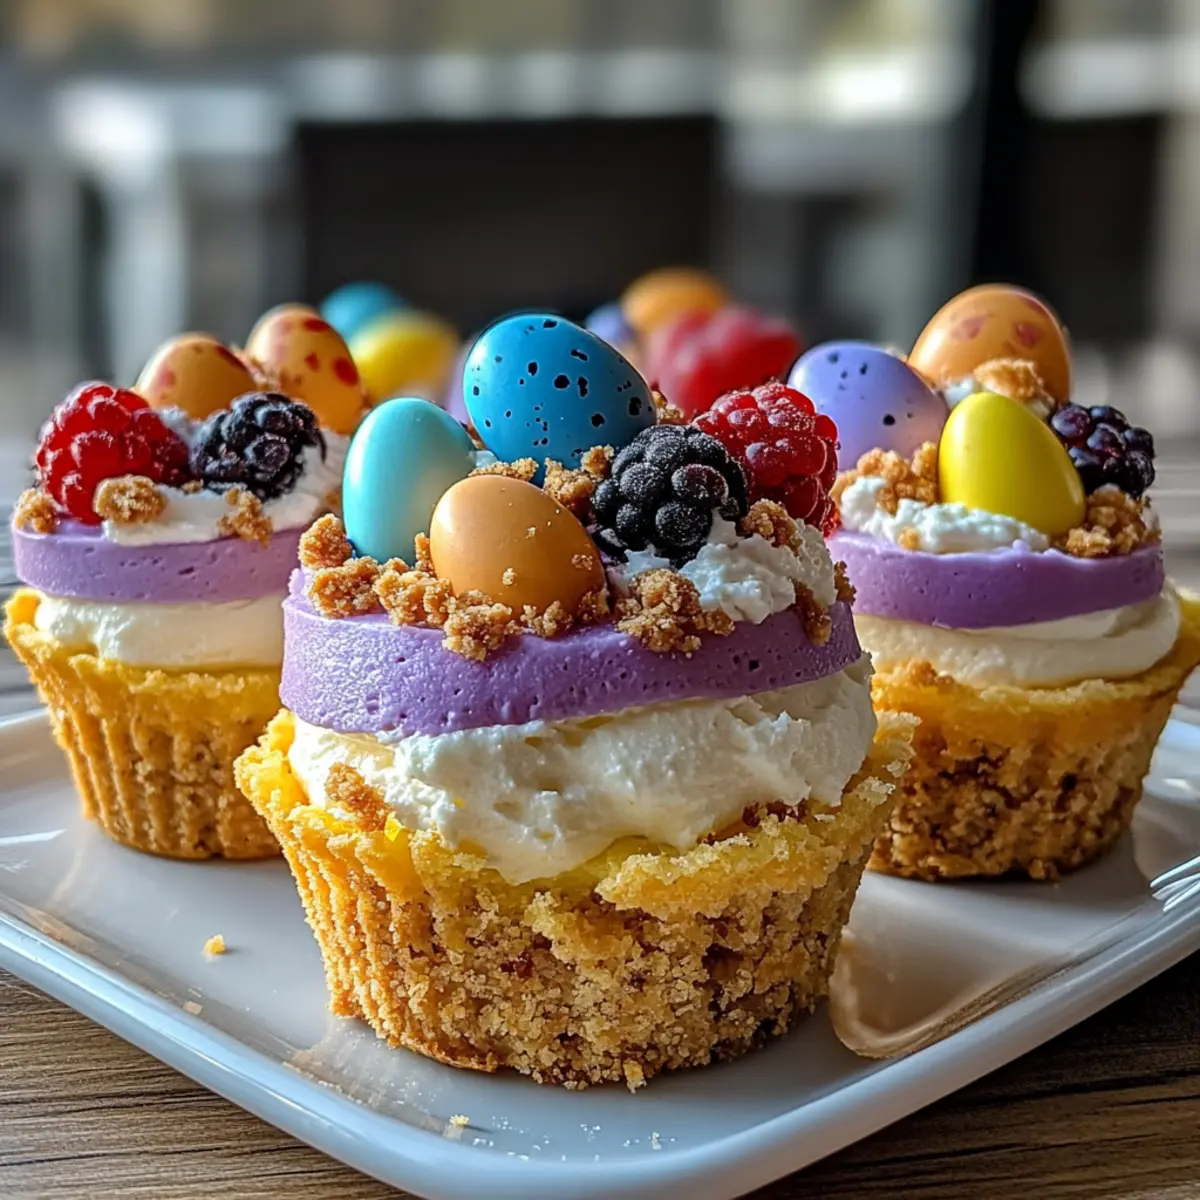
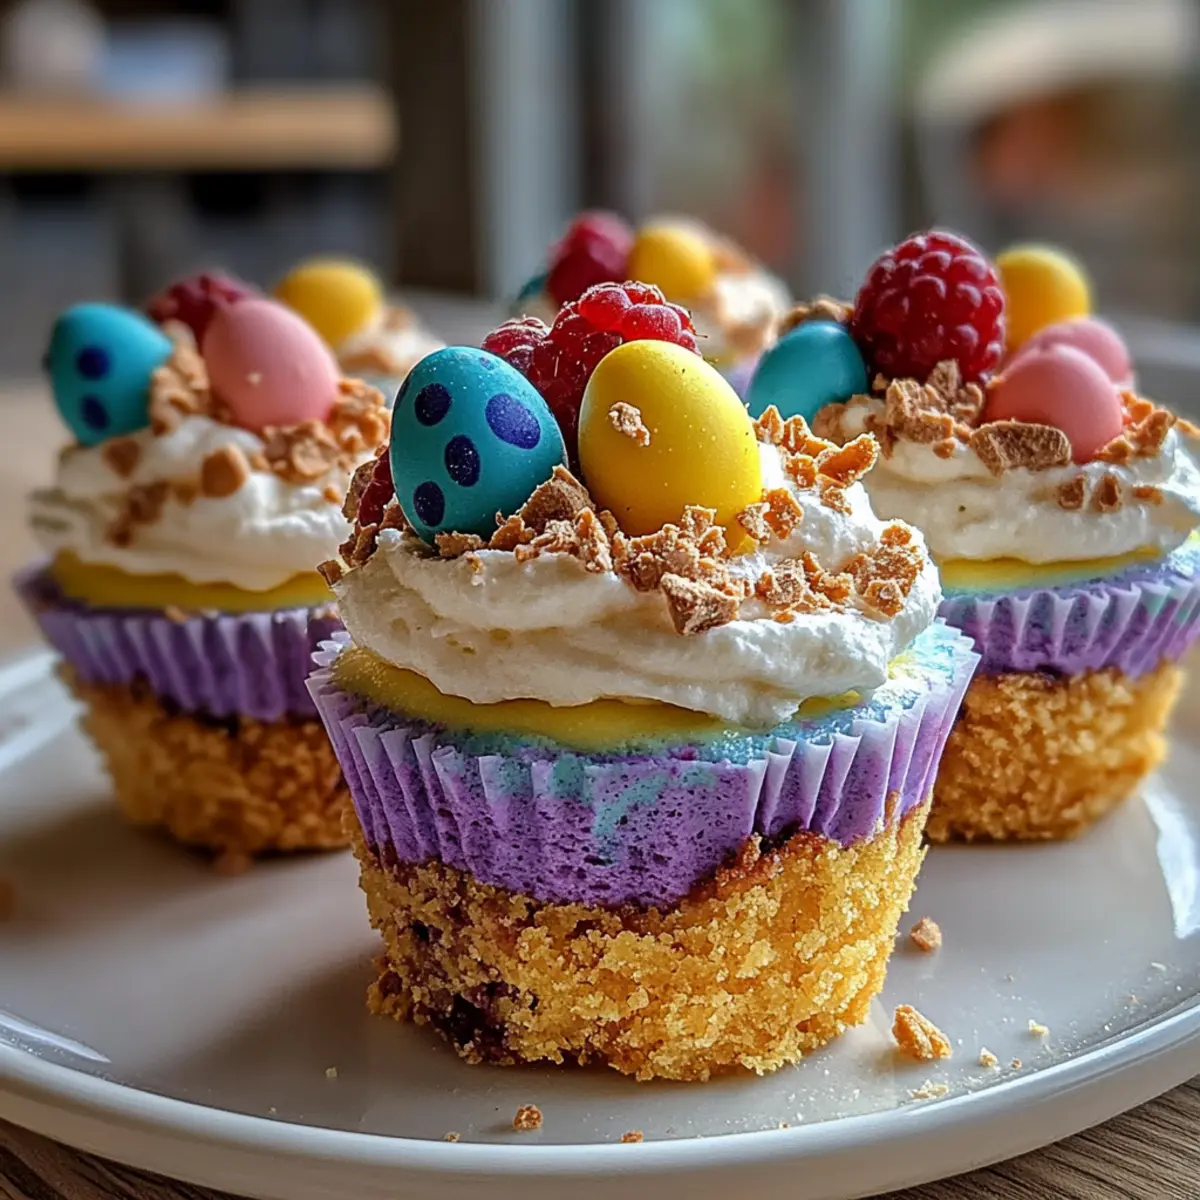
As the blossoms of spring start to bloom, I find myself craving the simple joys of celebration—especially sweet treats that bring loved ones together. Enter my Easter No-Bake Mini Cheesecakes, a delightful solution to satisfy your dessert dreams without the fuss of baking. These charming little bites combine a smooth and creamy filling with a satisfying crunch from the graham cracker crust, making them the perfect centerpiece for any festive gathering. Plus, they come together effortlessly, freeing up your time for the laughter and fun that truly matter during spring festivities. With options to customize each mini cheesecake, whether with a zesty lemon twist or chocolate chip crust, you can craft the ultimate crowd-pleaser. Curious how to whip up this easy and elegant dessert? Let’s dive in!
Why Are These Cheesecakes a Must-Try?
Simplicity at its core: No-bake means less stress in the kitchen!
Creamy, dreamy filling whip up effortlessly for delightful bites.
Versatile options await: Add a zesty lemon twist or a chocolate cookie crust for a unique spin!
Perfect for spring gatherings, these festive mini treats impress without the fuss.
Time-saving delight: Chill them ahead of time, so you can focus on celebration!
Whether hosting a picnic or an Easter brunch, these cheesecakes will surely steal the show—just like my Easter Egg Cheesecake Cups or Mint Mini Cheesecakes!
Easter No-Bake Mini Cheesecakes Ingredients
-
For the Cheesecake Filling
-
Cream Cheese – Provides a rich, creamy base for the cheesecake filling. Substitution: Mascarpone can be used, but adjust sweetness due to its richness.
-
Whipped Topping – Adds lightness and airy texture to the filling. Substitution: Store-bought whipped topping can replace homemade whipped cream for convenience.
-
Confectioners’ Sugar – Sweetens the cheesecake filling. Note: Adjust sweetness to taste if using richer cheese like mascarpone.
-
Vanilla Extract – Enhances the flavor of the cheesecake. Note: Pure vanilla extract is preferable for the best flavor.
-
For the Crust
-
Graham Crackers – Form the crunchy crust. Substitution: Digestive biscuits or any sweet, plain cookie can work as alternatives.
-
Optional Toppings
-
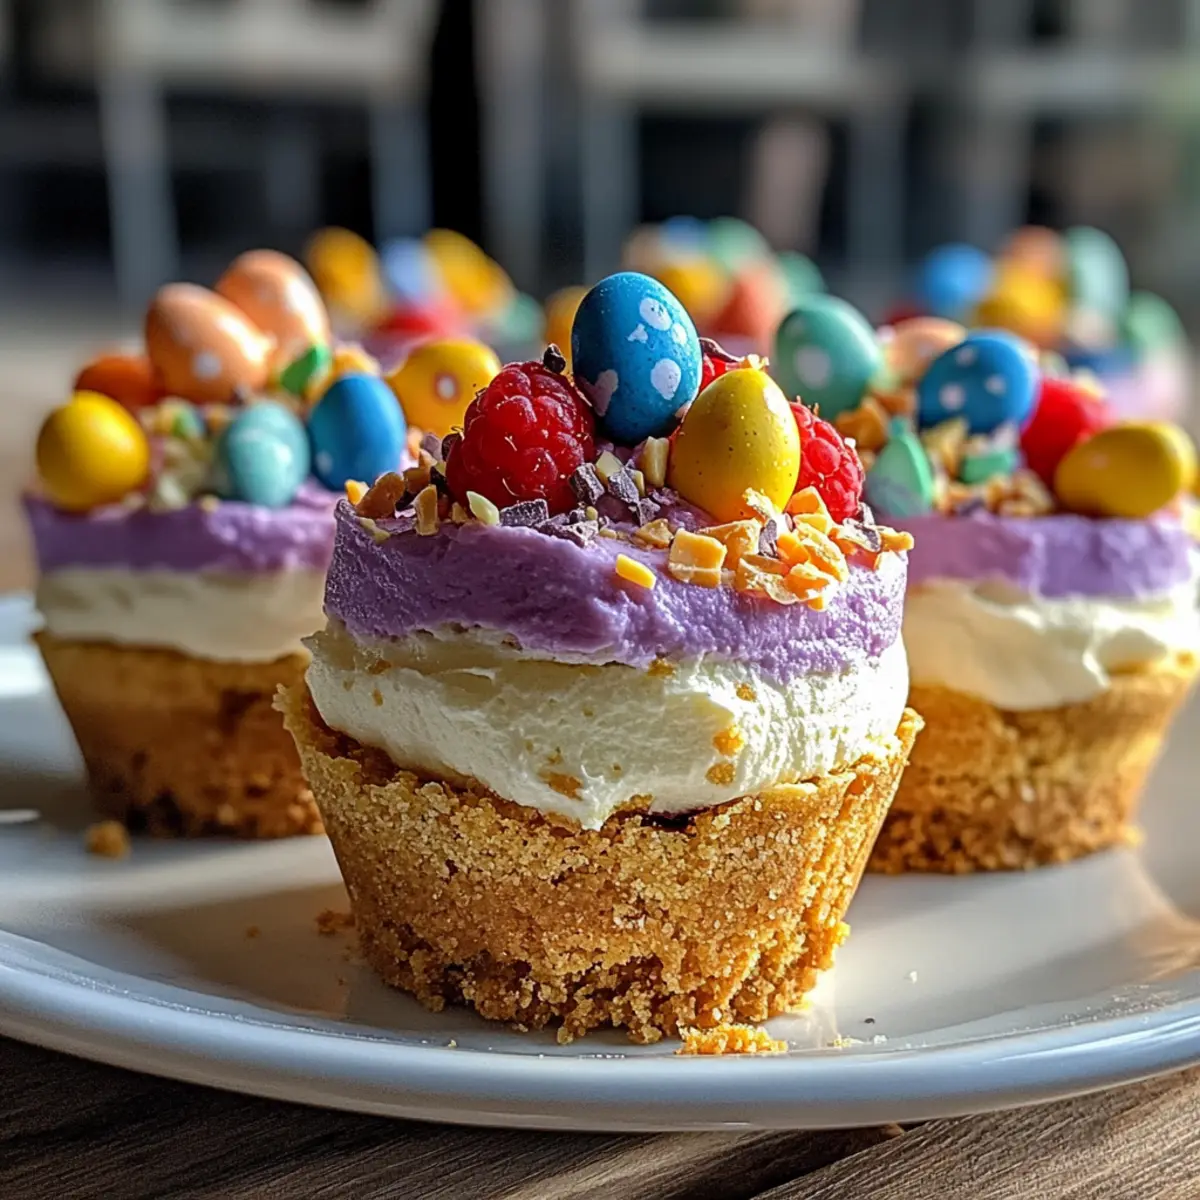
Mini Chocolate Eggs – Adds a festive touch and visual appeal to the mini cheesecakes.
-
Fresh Berries – Offers a burst of freshness and flavor contrast to the finished dessert.
Add these simple ingredients to your shopping list and get ready for a delightful spring celebration with these Easter No-Bake Mini Cheesecakes!
Step‑by‑Step Instructions for Easter No-Bake Mini Cheesecakes
Step 1: Prepare the Crust
Start by crushing graham crackers into fine crumbs using a food processor or a zip-top bag and rolling pin. In a bowl, mix the crumbs with melted butter until well combined. Spoon about a tablespoon of the mixture into each muffin cup, pressing down firmly to create an even layer at the bottom. The crust should feel packed and slightly crumbly.
Step 2: Make the Filling
In a mixing bowl, beat softened cream cheese with an electric mixer on medium speed until it becomes smooth and creamy, about 2-3 minutes. Gradually add confectioners’ sugar and vanilla extract, continuing to mix until the sugar dissolves and the mixture is velvety. Gently fold in the whipped topping until fully incorporated, ensuring the filling is light and airy.
Step 3: Assemble the Cheesecakes
Spoon the luscious cheesecake filling over the prepared crusts in each muffin cup, using a spatula to smooth the tops evenly. Aim for a generous layer of filling that slightly overflows the crust. For an aesthetic touch, ensure the tops are level and neat, creating a lovely surface for your optional toppings.
Step 4: Chill the Mini Cheesecakes
Refrigerate the assembled Easter No-Bake Mini Cheesecakes for at least 4 hours, or until they are fully set. This is a crucial step for achieving the perfect texture—look for the filling to be firm to the touch and retain its shape. Cover with plastic wrap or a lid if needed to prevent any fridge odors from impacting the flavor.
Step 5: Serve and Garnish
Once chilled and set, carefully remove the mini cheesecakes from the muffin tin. Top each one with your choice of decorations, such as mini chocolate eggs or fresh berries, for a festive touch. These delightful mini cheesecakes are now ready to impress your guests and add a sweet note to your spring celebrations!
What to Serve with Easter No-Bake Mini Cheesecakes?
As you gather with loved ones to celebrate spring, these delightful mini desserts can be accompanied by a variety of tasty treats that enhance the festive experience.
-
Fresh Fruit Salad: A mix of seasonal berries and citrus complements the rich, creamy cheesecake with a refreshing burst of flavor.
-
Minty Lemonade: The bright, zesty drink adds a bubbly contrast, refreshing your palate between bites of cheesecake. Plus, the mint hints at spring!
-
Vanilla Ice Cream: Serve a scoop alongside your cheesecakes for a creamy, indulgent mix that’s simply irresistible. The combination of textures will delight every guest.
-
Light Pasta Salad: A simple, vibrant salad made with pasta, cherry tomatoes, and basil provides a savory contrast to the sweet desserts, balancing your table beautifully.
-
Chocolate Covered Strawberries: These elegant bites not only look stunning but also bring a rich chocolate flavor that pairs perfectly with the lightness of the cheesecakes.
-
Chilled Sparkling Wine: For an adult touch, a glass of sparkling wine elevates the celebration, its bubbles mirroring the joyous occasion while complementing the buttery crust of the mini cheesecakes.
How to Store and Freeze Easter No-Bake Mini Cheesecakes
Fridge: Keep the mini cheesecakes covered in the fridge for up to 3 days. For best results, consume within 48 hours to enjoy the fresh texture of the crust.
Freezer: If you wish to freeze, wrap each cheesecake tightly in plastic wrap and store in an airtight container. They can last up to 2 months, but be cautious as the crust may soften upon thawing.
Reheating: These mini cheesecakes are best served cold. No reheating is needed; just remove from the fridge or freezer and allow to sit at room temperature for about 15 minutes before serving.
Serving Suggestions: Top with fresh berries or chocolate eggs just before serving to maintain their vibrant appearance and flavors, ensuring your Easter No-Bake Mini Cheesecakes look as delightful as they taste!
Make Ahead Options
These Easter No-Bake Mini Cheesecakes are a fantastic choice for meal prep, saving you precious time when entertaining! You can prepare the crusts up to 24 hours in advance, storing them in the refrigerator to keep them fresh. The cheesecake filling can also be made ahead and refrigerated for up to 3 days before serving—just ensure it’s covered tightly to maintain its creamy texture. When you’re ready to serve, simply fill the crusts with the chilled filling and add your favorite toppings, like fresh berries or chocolate eggs, for a festive touch. With this prep, you’ll enjoy restaurant-quality mini cheesecakes with minimal last-minute effort!
Expert Tips for Perfect Mini Cheesecakes
-
Soften Cream Cheese: Ensure your cream cheese is softened properly to avoid lumps. Microwave it for 20 seconds if needed for a smoother filling.
-
Check Filling Consistency: The filling should be thick but not runny. If it’s too thin, whip it a bit longer or add more whipped topping for better texture.
-
Don’t Rush the Chill: Skipping or shortening the chilling time can lead to a filling that doesn’t set properly. Allow at least 4 hours in the fridge for the best Easter No-Bake Mini Cheesecakes.
-
Variations Galore: Experiment with flavor twists! Lemon zest adds brightness, while chocolate cookie crusts can bring a rich, decadent taste.
-
Presentation Matters: Decorate with fresh berries or mini chocolate eggs to elevate the look and flavor of your mini cheesecakes for your spring celebrations.
Easter No-Bake Mini Cheesecakes Variations
Feel free to get creative with these mini cheesecakes—there’s a world of flavor waiting for you!
- Lemon Zest: Add a teaspoon of zest for a refreshing citrus twist that brightens the filling.
- Chocolate Crust: Substitute graham crackers with crushed chocolate cookies for a rich and decadent base.
- Fruit Swirl: Mix in a swirl of fruit preserves like raspberry or strawberry before chilling for an exciting surprise in each bite.
- Nutty Crunch: Incorporate crushed nuts like almonds or walnuts into the crust for added flavor and texture.
- Coconut Delight: Fold in shredded coconut to the filling for a tropical flair, perfect for spring celebrations.
- Spicy Kick: Add a dash of cayenne pepper to the filling for a surprising touch of heat that balances the sweetness.
- Dairy-Free: Replace cream cheese with cashew cream and use coconut whipped cream for a delicious vegan alternative.
- Seasonal Toppings: Experiment with various toppings such as caramel drizzle or seasonal fruit compote for a delightful finish.
These variations can elevate your Easter No-Bake Mini Cheesecakes, just like my Mini Creme Brulee Cheesecakes or No-Bake Pistachio Raspberry Cheesecake Domes. Dive into the fun and impress your guests with unique flavors!
Easter No-Bake Mini Cheesecakes Recipe FAQs
How do I select ripe ingredients for the filling?
Absolutely! For the best flavor in your Easter No-Bake Mini Cheesecakes, ensure your cream cheese is at room temperature before mixing; it should feel soft but not melted. This will help achieve a smooth filling without any lumps.
What’s the best way to store leftovers?
Very! Keep the mini cheesecakes covered in the fridge and they’ll stay fresh for up to 3 days. For the best texture and flavor, I recommend enjoying them within 48 hours as the crust can soften over time.
Advertisement
Can I freeze these mini cheesecakes?
Certainly! To freeze your Easter No-Bake Mini Cheesecakes, wrap each one tightly in plastic wrap and place them in an airtight container. They can be stored in the freezer for up to 2 months. When you’re ready to enjoy them, thaw in the refrigerator overnight, and allow them to sit at room temperature for about 15 minutes before serving for the best taste.
What should I do if my filling is too runny?
If your cheesecake filling ends up too runny, don’t worry! Here’s a quick fix: simply add more whipped topping to thicken it up. Beat the mixture until it is smooth and creamy again. Alternatively, add a bit more confectioners’ sugar to help absorb some moisture, but do so gradually to avoid making it too sweet.
Are there any dietary considerations for allergies?
Absolutely! If you’re serving these mini cheesecakes to guests with dietary restrictions, you can substitute the cream cheese with a dairy-free alternative like vegan cream cheese to suit lactose intolerant friends. Also, always check your graham crackers or cookie packaging for allergens, as variations can differ in ingredients.
How can I add a twist to the flavor?
Very! To customize your Easter No-Bake Mini Cheesecakes, consider adding a teaspoon of lemon zest for a vibrant kick or swirling in some fruit preserves for delightful fruity notes. You can also create a chocolate crust using crushed chocolate cookies instead of graham crackers for a rich twist.

Easter No-Bake Mini Cheesecakes for Effortless Spring Joy
Ingredients
Equipment
Method
- Prepare the crust by crushing graham crackers into fine crumbs and mixing with melted butter. Spoon into muffin cups and press down firmly.
- Make the filling by beating softened cream cheese, then add confectioners' sugar and vanilla. Fold in whipped topping until smooth.
- Assemble the cheesecakes by spooning the filling over the crusts, smoothing tops with a spatula.
- Chill the mini cheesecakes for at least 4 hours until set, ensuring they retain their shape.
- Serve by removing from the muffin tin and garnishing with mini chocolate eggs or fresh berries.