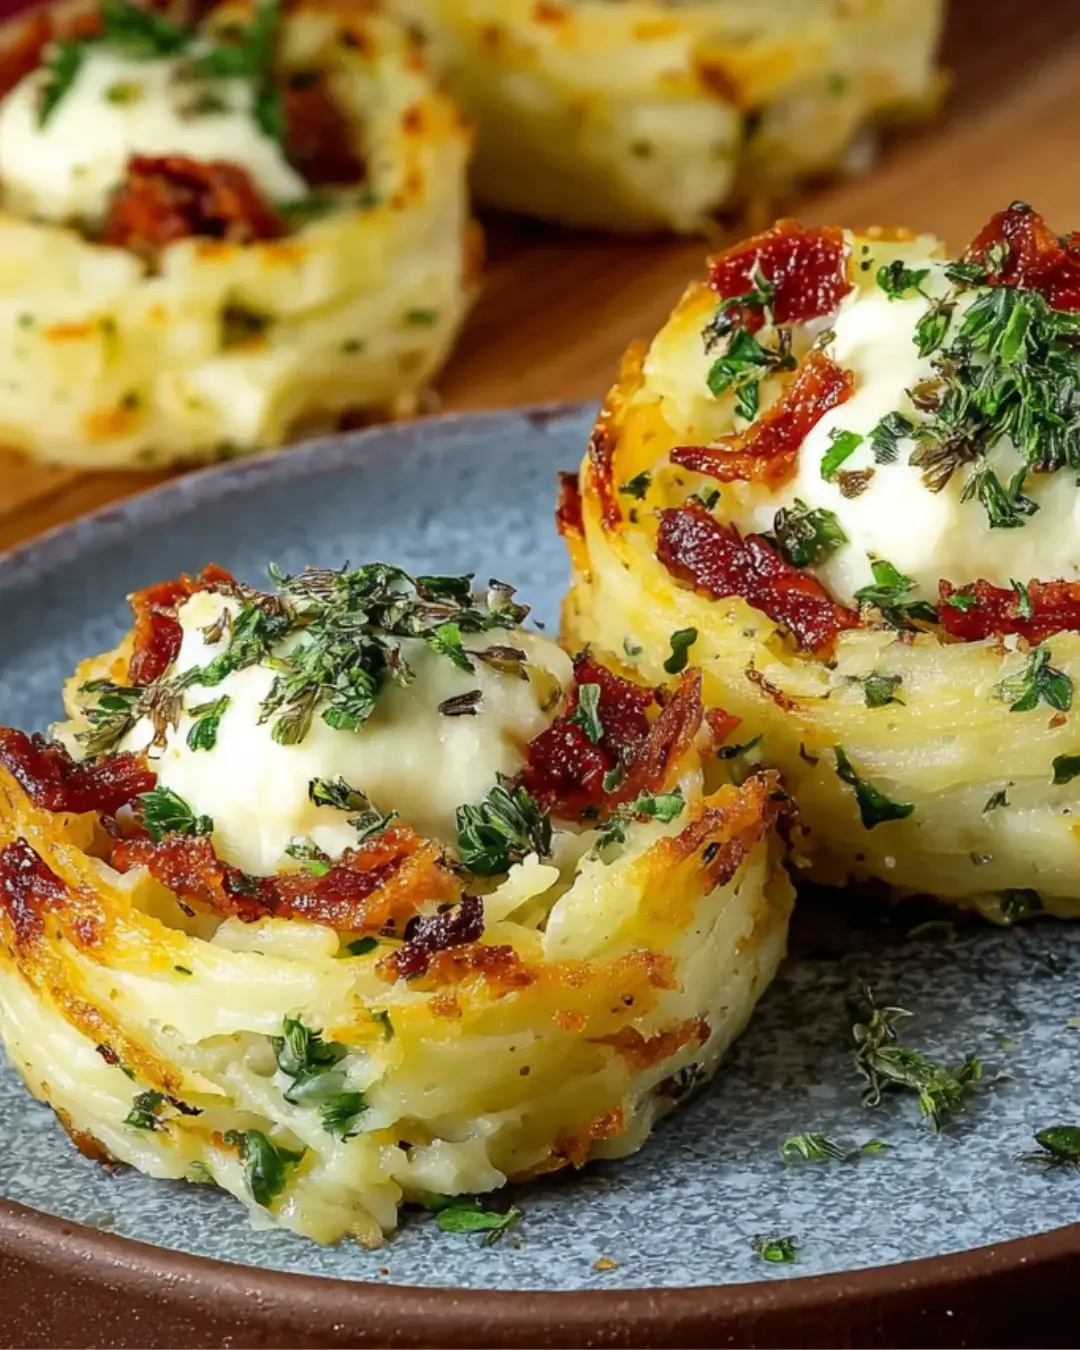
Introduction to Stuffed Mashed Potato Nests
There’s something undeniably comforting about mashed potatoes, isn’t there? Now, imagine taking that classic dish and transforming it into delightful stuffed mashed potato nests. These little wonders are not just a feast for the eyes; they’re a quick solution for a busy day or a fun way to impress your loved ones. With crispy edges and a cheesy, savory filling, they’re perfect for any occasion. Whether it’s a casual family dinner or a gathering with friends, these nests will have everyone coming back for seconds. Let’s dive into this delicious adventure together!
Why You’ll Love This Stuffed Mashed Potato Nests
These stuffed mashed potato nests are a game-changer in the kitchen. They’re incredibly easy to whip up, making them perfect for busy weeknights or last-minute gatherings. The combination of creamy potatoes, crispy bacon, and gooey cheese creates a flavor explosion that’s hard to resist. Plus, they’re customizable! You can switch up the fillings to suit your taste, ensuring everyone leaves the table satisfied. What’s not to love?
Ingredients for Stuffed Mashed Potato Nests
Gathering the right ingredients is the first step to creating these delightful stuffed mashed potato nests. Here’s what you’ll need:
- Russet potatoes: The star of the show! These starchy potatoes create a fluffy and creamy base.
- Milk: Adds creaminess to the mashed potatoes, making them smooth and rich.
- Unsalted butter: For that extra layer of flavor and a velvety texture.
- Garlic powder: A sprinkle of this brings a savory depth to the dish.
- Salt and pepper: Essential seasonings to enhance all the flavors.
- Shredded cheddar cheese: Melts beautifully, adding a gooey, cheesy goodness to each nest.
- Cooked bacon: Crumbled for a crispy, smoky flavor that pairs perfectly with the potatoes.
- Green onions: Chopped for a fresh, zesty finish that brightens up the dish.
- Sour cream: A dollop on top adds creaminess and a tangy kick.
Feel free to get creative! For a vegetarian option, swap out the bacon for sautéed mushrooms or spinach. You can also experiment with different cheeses like mozzarella or pepper jack for a spicy twist. Exact quantities for each ingredient are available at the bottom of the article for your convenience.
How to Make Stuffed Mashed Potato Nests
Creating these stuffed mashed potato nests is a fun and rewarding experience. Follow these simple steps, and you’ll have a delicious dish that’s sure to impress!
Step 1: Preheat the Oven
First things first, preheat your oven to 400°F. This ensures it’s hot and ready for baking those delightful nests. A well-preheated oven is key to achieving that perfect golden crust!
Step 2: Boil the Potatoes
Next, grab your cubed russet potatoes and toss them into a large pot of salted water. Boil them for about 15-20 minutes, or until they’re tender enough to easily pierce with a fork. Once done, drain the potatoes and return them to the pot. This step is crucial for getting that fluffy texture!
Step 3: Mash the Potatoes
Now, it’s time to add some flavor! Pour in the milk, softened butter, garlic powder, salt, and pepper. Mash everything together until it’s smooth and creamy. The aroma of garlic will fill your kitchen, making it hard to resist tasting!
Step 4: Prepare the Muffin Tin
Grab a muffin tin and grease it with cooking spray or butter. This will prevent your nests from sticking and make cleanup a breeze. Trust me, you don’t want to lose any of that deliciousness!
Step 5: Form the Nests
Take a scoop of your creamy mashed potatoes and press it into the bottom and up the sides of each muffin cup. You’re creating a nest shape here, so make sure the walls are thick enough to hold all the tasty fillings later. It’s like crafting little potato bowls!
Step 6: Bake the Nests
Pop the muffin tin into your preheated oven and bake the potato nests for about 20 minutes. You want them to be slightly golden and firm. The smell wafting through your kitchen will be irresistible!
Step 7: Fill the Nests
Once they’re baked, remove the nests from the oven. Now comes the fun part! Fill each nest with shredded cheddar cheese, crumbled bacon, and a dollop of sour cream. This is where the magic happens, and your taste buds will thank you!
Step 8: Final Bake
Return the muffin tin to the oven for an additional 5-7 minutes. You’re looking for that cheese to melt and bubble over the edges. It’s the kind of sight that makes your mouth water!
Step 9: Garnish and Serve
Finally, take the nests out of the oven and garnish them with chopped green onions. This adds a pop of color and a fresh flavor that complements the richness of the nests. Serve them warm, and watch everyone dig in!
Tips for Success
- Use a potato ricer for ultra-smooth mashed potatoes.
- Don’t over-mash; a few lumps add character!
- Let the nests cool slightly before removing them from the tin for easier handling.
- Experiment with different toppings like jalapeños or diced tomatoes for a twist.
- Make extra nests and freeze them for a quick meal later.
Equipment Needed
- Large pot: For boiling the potatoes. A Dutch oven works great too.
- Muffin tin: Essential for shaping the nests. A silicone mold can be a fun alternative.
- Potato masher: For mashing the potatoes. A fork can work in a pinch!
- Mixing spoon: To combine ingredients smoothly.
Variations of Stuffed Mashed Potato Nests
- Vegetarian Delight: Swap the bacon for sautéed mushrooms or spinach for a hearty, meat-free option.
- Spicy Kick: Use pepper jack cheese instead of cheddar for a zesty twist that adds heat.
- Herb Infusion: Mix in fresh herbs like chives or parsley into the mashed potatoes for an aromatic boost.
- Loaded Nests: Top with diced tomatoes, jalapeños, or avocado for a fresh, vibrant finish.
- Cheesy Trio: Combine different cheeses like mozzarella, gouda, and cheddar for a rich, cheesy experience.
Serving Suggestions for Stuffed Mashed Potato Nests
- Pair with a crisp green salad for a refreshing contrast.
- Serve alongside grilled chicken or steak for a hearty meal.
- Complement with a tangy dipping sauce like ranch or barbecue.
- For drinks, consider a light beer or a chilled white wine.
- Garnish with extra green onions for a pop of color.
FAQs about Stuffed Mashed Potato Nests
Can I make stuffed mashed potato nests ahead of time?
Absolutely! You can prepare the nests and fill them with toppings ahead of time. Just cover them and store in the fridge. When you’re ready to serve, pop them in the oven to heat through and melt the cheese.
What can I substitute for bacon in the recipe?
If you’re looking for a vegetarian option, sautéed mushrooms or spinach work wonderfully. You can also use smoked paprika for a hint of smokiness without the meat.
How do I store leftovers?
Leftover stuffed mashed potato nests can be stored in an airtight container in the fridge for up to three days. Reheat them in the oven for the best texture.
Can I freeze stuffed mashed potato nests?
Yes! These nests freeze well. Just make sure they are completely cooled before placing them in a freezer-safe container. When you’re ready to enjoy, thaw in the fridge and reheat in the oven.
What other toppings can I use for stuffed mashed potato nests?
The possibilities are endless! Try adding diced tomatoes, jalapeños, or even a drizzle of hot sauce for an extra kick. You can also mix in different cheeses for a unique flavor profile.
Final Thoughts
Stuffed mashed potato nests are more than just a dish; they’re a celebration of comfort and creativity in the kitchen. Each bite offers a delightful combination of flavors and textures that can turn any meal into a special occasion. Whether you’re sharing them with family or impressing friends at a gathering, these nests are sure to spark joy and laughter. Plus, the versatility of this recipe means you can adapt it to suit any palate. So roll up your sleeves, get cooking, and enjoy the delicious memories you’ll create with these delightful stuffed mashed potato nests!
Advertisement
Stuffed Mashed Potato Nests that Delight and Satisfy
Delicious stuffed mashed potato nests filled with cheese, bacon, and topped with green onions.
- Prep Time: 15 minutes
- Cook Time: 30 minutes
- Total Time: 45 minutes
- Yield: 6 servings 1x
- Category: Appetizer
- Method: Baking
- Cuisine: American
- Diet: Vegetarian
Ingredients
- 2 pounds russet potatoes, peeled and cubed
- 1/2 cup milk
- 1/4 cup unsalted butter, softened
- 1 teaspoon garlic powder
- Salt and pepper to taste
- 1 cup shredded cheddar cheese
- 1/2 cup cooked bacon, crumbled
- 1/4 cup green onions, chopped
- 1/2 cup sour cream
Instructions
- Preheat the oven to 400°F.
- Boil the cubed potatoes in a large pot of salted water for about 15-20 minutes or until tender. Drain and return to the pot.
- Add the milk, butter, garlic powder, salt, and pepper to the potatoes. Mash until smooth and creamy.
- Grease a muffin tin with cooking spray or butter.
- Take a scoop of mashed potatoes and press it into the bottom and up the sides of each muffin cup to form a nest shape.
- Bake the potato nests in the preheated oven for 20 minutes until slightly golden.
- Remove from the oven and fill each nest with shredded cheddar cheese, crumbled bacon, and a dollop of sour cream.
- Return to the oven and bake for an additional 5-7 minutes until the cheese is melted and bubbly.
- Garnish with chopped green onions before serving.
Notes
- For a vegetarian option, omit the bacon and add sautéed mushrooms or spinach instead.
- Experiment with different cheeses like mozzarella or pepper jack for a spicy kick.
Nutrition
- Serving Size: 1 nest
- Calories: 320
- Sugar: 2g
- Sodium: 500mg
- Fat: 18g
- Saturated Fat: 10g
- Unsaturated Fat: 8g
- Trans Fat: 0g
- Carbohydrates: 30g
- Fiber: 3g
- Protein: 10g
- Cholesterol: 40mg