Introduction to Salted Caramel Apple Pie Cheesecake
There’s something magical about desserts that combine our favorite flavors, and the Salted Caramel Apple Pie Cheesecake is no exception. This delightful treat brings together the rich creaminess of cheesecake, the warm spices of apple pie, and the indulgent sweetness of salted caramel. It’s perfect for those busy days when you want to impress your loved ones without spending hours in the kitchen. Whether it’s a family gathering or a cozy night in, this cheesecake is sure to be the star of the show, leaving everyone craving just one more slice.
Why You’ll Love This Salted Caramel Apple Pie Cheesecake
This Salted Caramel Apple Pie Cheesecake is a dessert lover’s dream come true. It’s incredibly easy to whip up, making it perfect for those who think they can’t bake. The flavors meld beautifully, creating a taste sensation that’s both comforting and indulgent. Plus, it’s a showstopper! Your friends and family will be raving about it long after the last crumb is gone. Trust me, this is a dessert you’ll want to make again and again.
Ingredients for Salted Caramel Apple Pie Cheesecake
Gathering the right ingredients is the first step to creating your Salted Caramel Apple Pie Cheesecake masterpiece. Here’s what you’ll need:
- Graham cracker crumbs: These form the base of your crust, adding a sweet crunch.
- Unsalted butter: Melted butter binds the crumbs together, giving the crust a rich flavor.
- Cream cheese: The star of the cheesecake filling, it provides that creamy texture we all love.
- Sugar: Sweetens the filling, balancing the tanginess of the cream cheese.
- Vanilla extract: A splash of vanilla enhances the overall flavor, making it more aromatic.
- Eggs: They help set the cheesecake, giving it that perfect, smooth consistency.
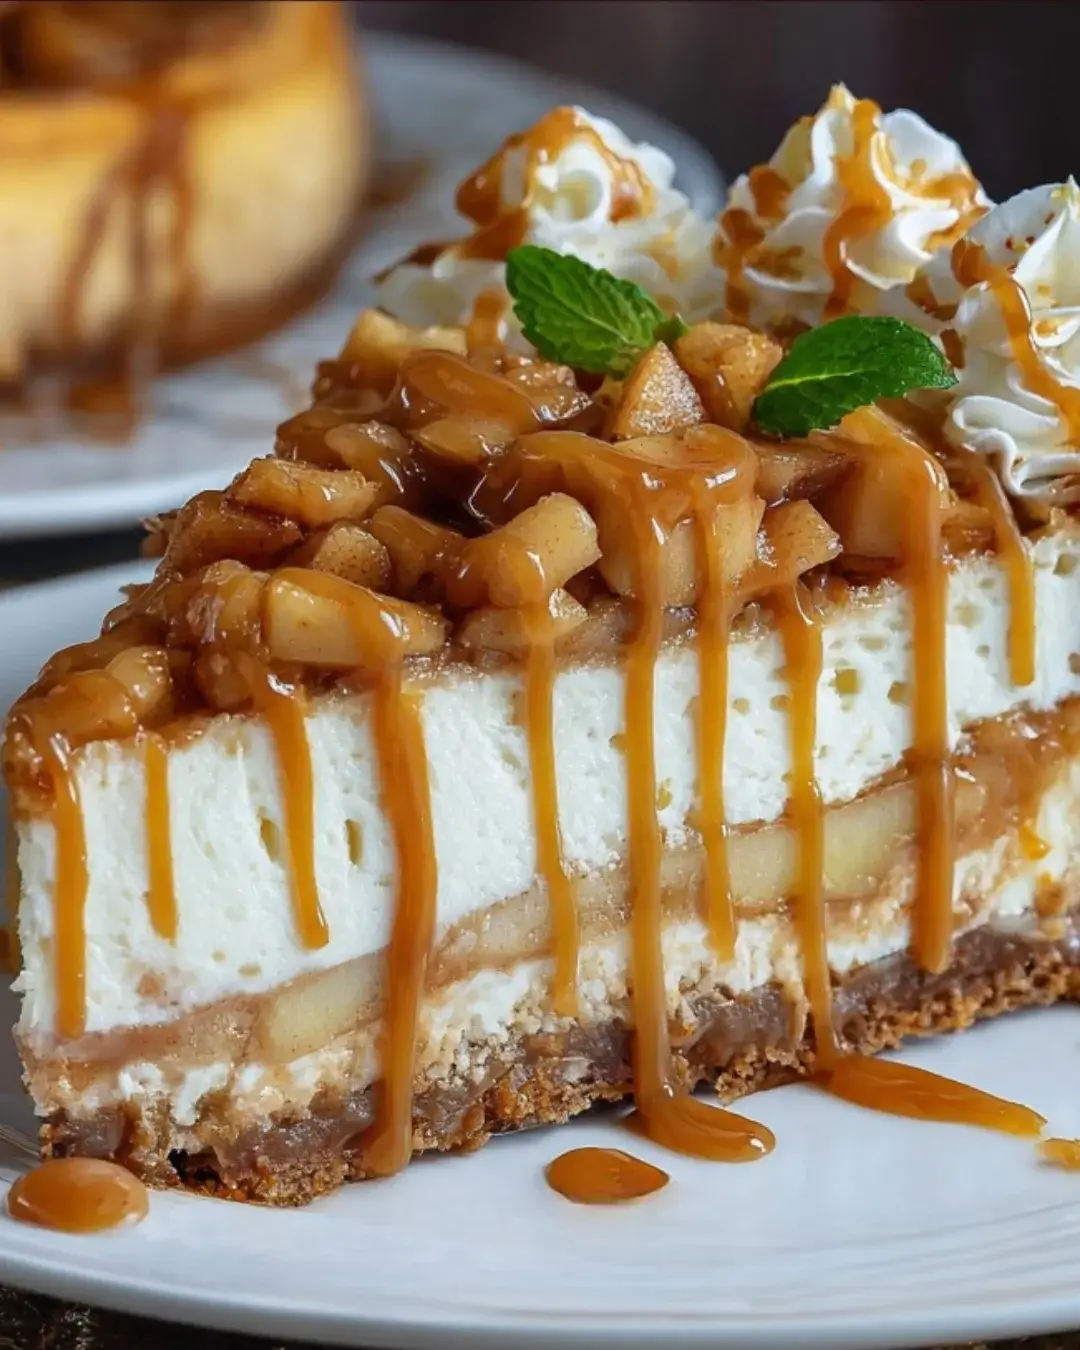
- Apple pie filling: This adds a fruity layer, bringing warmth and nostalgia to the dessert.
- Salted caramel sauce: Drizzled on top, it adds a decadent sweetness and a touch of saltiness.
- Optional toppings: Whipped cream or extra caramel can elevate your cheesecake presentation.
For exact measurements, check the bottom of the article where you can find everything you need for printing. Each ingredient plays a crucial role in creating a dessert that’s not just delicious but also memorable.
How to Make Salted Caramel Apple Pie Cheesecake
Creating your Salted Caramel Apple Pie Cheesecake is a delightful journey. Follow these simple steps, and you’ll have a dessert that’s sure to impress. Let’s dive in!
Step 1: Prepare the Crust
Start by preheating your oven to 350°F. In a mixing bowl, combine graham cracker crumbs and melted unsalted butter. Mix until the crumbs are evenly coated. This is the secret to a crust that holds together perfectly. Press the mixture firmly into the bottom of a springform pan. Make sure it’s compact; this will give you a sturdy base for your cheesecake.
Step 2: Make the Cheesecake Filling
In a large bowl, beat the cream cheese until it’s smooth and creamy. This step is crucial; a well-mixed filling ensures a velvety texture. Gradually add sugar and vanilla extract, mixing until combined. Then, add the eggs one at a time, mixing gently after each addition. Overmixing can lead to cracks, so be gentle! Your filling should be light and fluffy.
Step 3: Add the Apple Pie Layer
Now comes the fun part! Pour half of the cheesecake filling into the crust. Then, spoon the apple pie filling over it, spreading it evenly. This fruity layer adds a burst of flavor and nostalgia. Pour the remaining cheesecake filling on top, covering the apple pie layer completely. It’s like a delicious surprise waiting to be discovered!
Step 4: Drizzle with Salted Caramel
Before baking, drizzle a generous amount of salted caramel sauce over the top of the cheesecake. Use a knife or a toothpick to swirl it gently into the filling. This not only enhances the flavor but also creates a beautiful marbled effect. Presentation matters, and this step will make your cheesecake look irresistible!
Step 5: Bake and Cool
Place the cheesecake in the preheated oven and bake for about 50-60 minutes. You’ll know it’s done when the edges are set, but the center still has a slight jiggle. Once baked, turn off the oven and crack the door open, letting the cheesecake cool slowly. This helps prevent cracks. After about an hour, transfer it to the fridge to chill for at least four hours, or overnight if you can wait!
Tips for Success
- Use room temperature cream cheese for a smoother filling.
- Don’t skip the cooling step; it helps prevent cracks.
- For a richer flavor, try adding a pinch of cinnamon to the crust.
- Let the cheesecake chill overnight for the best texture.
- Drizzle extra salted caramel just before serving for a fresh look.
Equipment Needed
- Springform pan: Essential for easy removal; a regular cake pan works too, but be careful when serving.
- Mixing bowls: Use a large bowl for the filling and a smaller one for the crust.
- Electric mixer: A hand mixer is great, but a whisk can work if you’re feeling strong!
- Spatula: Perfect for spreading and smoothing the filling.
- Measuring cups and spoons: Accurate measurements ensure the best results.
Variations
- Gluten-Free Option: Use gluten-free graham cracker crumbs for the crust to make this dessert suitable for gluten-sensitive friends.
- Nutty Twist: Add crushed pecans or walnuts to the crust for an extra crunch and flavor.
- Spiced Up: Incorporate a teaspoon of cinnamon or nutmeg into the cheesecake filling for a warm, spiced flavor.
- Chocolate Lovers: Swirl in some melted chocolate or add chocolate chips to the cheesecake filling for a decadent twist.
- Vegan Version: Substitute cream cheese with a vegan alternative and use flax eggs to create a plant-based version of this cheesecake.
Serving Suggestions
- Pair with Coffee: A warm cup of coffee complements the sweetness perfectly.
- Top with Whipped Cream: A dollop of whipped cream adds a light touch.
- Fresh Fruit: Serve with sliced apples or berries for a refreshing contrast.
- Presentation: Drizzle extra salted caramel on the plate for an elegant touch.
FAQs about Salted Caramel Apple Pie Cheesecake
Can I make this cheesecake ahead of time?
Absolutely! In fact, making the Salted Caramel Apple Pie Cheesecake a day in advance allows the flavors to meld beautifully. Just keep it covered in the fridge until you’re ready to serve.
How do I store leftovers?
Store any leftover cheesecake in an airtight container in the refrigerator. It should stay fresh for up to five days, but trust me, it’s unlikely to last that long!
Can I freeze this cheesecake?
Yes, you can freeze the cheesecake! Wrap it tightly in plastic wrap and then in aluminum foil. It can be frozen for up to three months. Just thaw it in the fridge overnight before serving.
What can I use instead of cream cheese?
If you’re looking for a substitute, try using mascarpone cheese or a vegan cream cheese alternative. Both will give you a creamy texture, though the flavor may vary slightly.
How can I make the salted caramel sauce from scratch?
Making salted caramel sauce is simple! Just melt sugar in a saucepan until it turns golden brown, then carefully add butter and cream. Finish with a pinch of sea salt for that perfect balance. It’s a game-changer for this cheesecake!
Final Thoughts
Creating a Salted Caramel Apple Pie Cheesecake is more than just baking; it’s about crafting memories. Each slice tells a story, blending the warmth of apple pie with the creamy delight of cheesecake and the indulgence of salted caramel. Whether you’re celebrating a special occasion or simply treating yourself, this dessert brings joy to the table. The smiles and satisfied sighs from family and friends are the sweetest rewards. So, roll up your sleeves, embrace the process, and let this cheesecake become a cherished part of your culinary adventures. You won’t regret it!
Advertisement
Salted Caramel Apple Pie Cheesecake: Indulge Today!
A delicious blend of salted caramel, apple pie, and cheesecake, perfect for indulgent dessert lovers.
- Prep Time: 15 minutes
- Cook Time: 20 minutes
- Total Time: 35 minutes
- Yield: 4 servings 1x
- Category: Appetizer
- Method: Baking
- Cuisine: American
- Diet: Gluten Free
Ingredients
- 1 pound ground beef
- 1 teaspoon garlic powder
- 1 teaspoon onion powder
- 1 teaspoon salt
- 1/2 teaspoon black pepper
- 1 cup shredded cheddar cheese
- 1/4 cup ketchup
- 1 tablespoon Worcestershire sauce
- 1 package (8 ounces) refrigerated crescent roll dough
- 1/4 cup unsalted butter, melted
- 2 cloves garlic, minced
- 1 tablespoon fresh parsley, chopped (optional)
Instructions
- Preheat the oven to 375°F.
- In a large skillet over medium heat, cook the ground beef until browned, about 5-7 minutes. Drain excess fat.
- Stir in garlic powder, onion powder, salt, black pepper, ketchup, and Worcestershire sauce. Cook for an additional 2-3 minutes until well combined. Remove from heat and let cool slightly.
- Unroll the crescent roll dough on a lightly floured surface and separate it into triangles.
- Place a spoonful of the beef mixture at the wide end of each triangle, then sprinkle with shredded cheddar cheese.
- Roll up each triangle starting from the wide end, tucking in the sides as you go.
- Place the rollups on a baking sheet lined with parchment paper.
- In a small bowl, mix the melted butter with minced garlic. Brush the garlic butter over each rollup.
- Bake for 12-15 minutes or until golden brown.
- If desired, sprinkle with fresh parsley before serving.
Notes
- For a spicy kick, add a teaspoon of hot sauce to the beef mixture.
- To make it a complete meal, serve with a side salad or some steamed vegetables.
Nutrition
- Serving Size: 1 rollup
- Calories: 350
- Sugar: 3g
- Sodium: 600mg
- Fat: 25g
- Saturated Fat: 10g
- Unsaturated Fat: 15g
- Trans Fat: 0g
- Carbohydrates: 10g
- Fiber: 1g
- Protein: 20g
- Cholesterol: 70mg