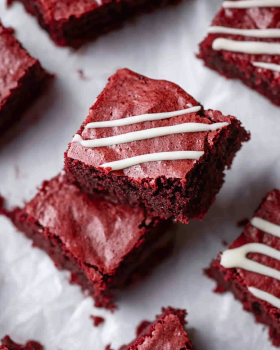
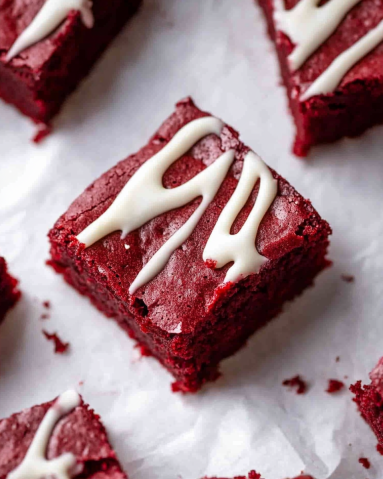
Red Velvet Brownies Recipe
Red velvet brownies are a delightful twist on the classic brownie. They combine the rich, chocolatey flavor of traditional brownies with the unique taste and vibrant color of red velvet cake. This recipe is perfect for those who want to impress their friends and family with a dessert that looks as good as it tastes. The beautiful red hue, paired with creamy white chocolate chips, makes these brownies a feast for the eyes and the palate.
What Makes Red Velvet Brownies Unique?
What sets red velvet brownies apart is their striking color and flavor profile. The addition of red food coloring gives them a bold appearance, while the cocoa powder adds a subtle chocolate taste. Unlike regular brownies, red velvet brownies often have a hint of tanginess, thanks to the buttermilk or vinegar typically used in red velvet recipes. This unique combination creates a dessert that is both rich and refreshing, making it a favorite for special occasions and celebrations.
The History of Red Velvet Desserts
The history of red velvet desserts dates back to the early 20th century. Originally, red velvet cake was a popular treat in the Southern United States. The cake’s signature red color was achieved using cocoa powder and acidic ingredients, which reacted to create a reddish hue. Over the years, this dessert evolved, and its popularity soared, leading to variations like red velvet cupcakes and, of course, red velvet brownies. Today, red velvet desserts are synonymous with celebrations, making them a must-have for birthdays, holidays, and other festive gatherings.
Ingredients for Red Velvet Brownies Recipe
To create the perfect batch of red velvet brownies, you’ll need a few simple ingredients. Each component plays a vital role in achieving that rich flavor and beautiful color. Here’s what you’ll need:
- 1 cup unsalted butter, melted: This adds moisture and richness to the brownies.
- 1 ½ cups granulated sugar: Sweetness is key, and sugar helps create that chewy texture.
- 2 large eggs: Eggs bind the ingredients together and provide structure.
- 1 teaspoon vanilla extract: This enhances the overall flavor of the brownies.
- 1 tablespoon red food coloring: The star ingredient that gives these brownies their signature hue.
- 1 ½ cups all-purpose flour: Flour is essential for the brownie base, providing stability.
- 1 teaspoon cocoa powder: A touch of cocoa adds depth to the chocolate flavor.
- ½ teaspoon baking powder: This helps the brownies rise slightly, making them fluffy.
- ½ teaspoon salt: A pinch of salt balances the sweetness and enhances flavors.
- 1 cup white chocolate chips: These add a creamy sweetness and a delightful texture.
Gathering these ingredients will set you on the right path to baking delicious red velvet brownies. Make sure to measure accurately for the best results. Now that you have everything ready, let’s move on to the step-by-step preparation!
Step-by-Step Preparation of Red Velvet Brownies Recipe
Step 1: Preheat the Oven
First things first, preheat your oven to 350°F (175°C). This step is crucial because it ensures that your brownies bake evenly. A hot oven helps the brownies rise and develop that perfect texture. While the oven heats up, you can prepare the rest of your ingredients.
Step 2: Prepare the Baking Pan
Next, grab a 9×13 inch baking pan and grease it well. You can use butter or cooking spray for this. Greasing the pan prevents the brownies from sticking, making it easier to remove them once they’re baked. If you want an extra layer of protection, consider lining the pan with parchment paper, leaving some overhang for easy lifting later.
Step 3: Mix the Dry Ingredients
In a separate bowl, whisk together the dry ingredients. Combine 1 ½ cups of all-purpose flour, 1 teaspoon of cocoa powder, ½ teaspoon of baking powder, and ½ teaspoon of salt. Mixing these ingredients well ensures that the baking powder and salt are evenly distributed. This step is important for achieving a consistent texture in your brownies.
Step 4: Combine the Wet Ingredients
Now, it’s time to mix the wet ingredients. In a large bowl, combine 1 cup of melted unsalted butter and 1 ½ cups of granulated sugar. Stir until the mixture is smooth and creamy. Then, add in 2 large eggs, 1 teaspoon of vanilla extract, and 1 tablespoon of red food coloring. Mix everything together until it’s well combined and has a lovely red hue.
Step 5: Blend Wet and Dry Ingredients
Gradually add the dry ingredients to the wet mixture. Stir gently until just combined. Be careful not to overmix, as this can lead to dense brownies. You want a smooth batter with a few lumps remaining. Once combined, fold in 1 cup of white chocolate chips for that extra sweetness and delightful texture.
Step 6: Bake the Brownies
Pour the brownie batter into the prepared baking pan. Spread it evenly with a spatula. Place the pan in the preheated oven and bake for 25-30 minutes. To check for doneness, insert a toothpick into the center. If it comes out clean or with a few moist crumbs, your brownies are ready!
Step 7: Cool and Cut the Brownies
Once baked, remove the brownies from the oven and let them cool in the pan. This cooling period is essential for the brownies to set properly. After about 15-20 minutes, you can lift them out using the parchment paper (if you used it) and place them on a wire rack to cool completely. Once cooled, cut them into squares and enjoy your delicious red velvet brownies!
Variation of Red Velvet Brownies Recipe
Gluten-Free Red Velvet Brownies
If you or someone you know has a gluten intolerance, you can still enjoy the deliciousness of red velvet brownies! To make gluten-free red velvet brownies, simply substitute the all-purpose flour with a gluten-free flour blend. Look for a blend that contains xanthan gum, as this will help mimic the texture of regular flour. The rest of the ingredients remain the same, ensuring that you still get that rich flavor and beautiful color. Just follow the same steps, and you’ll have a batch of gluten-free brownies that everyone can enjoy!
Vegan Red Velvet Brownies
For those following a vegan diet, you can easily adapt this red velvet brownies recipe. Start by replacing the eggs with flax eggs. To make a flax egg, mix 1 tablespoon of ground flaxseed with 2.5 tablespoons of water. Let it sit for about 5 minutes until it thickens. Additionally, use a plant-based butter or coconut oil instead of unsalted butter. Ensure that your white chocolate chips are dairy-free as well. With these simple swaps, you can create delicious vegan red velvet brownies that are just as tasty as the original!
Cooking Note for Red Velvet Brownies Recipe
When it comes to baking red velvet brownies, a few cooking notes can help you achieve the best results. First, always use fresh ingredients. Expired baking powder or old cocoa powder can affect the texture and flavor of your brownies. Fresh ingredients ensure that your brownies rise properly and taste delicious.
Next, be mindful of your mixing technique. Overmixing can lead to tough brownies, while undermixing can result in uneven texture. Aim for a smooth batter with a few lumps. This balance is key to achieving that perfect fudgy consistency.
Another important tip is to check your oven temperature. Ovens can vary, so it’s a good idea to use an oven thermometer. This ensures that your brownies bake at the right temperature, preventing them from being undercooked or overbaked.
Lastly, let your brownies cool completely before cutting them. This cooling time allows the brownies to set, making them easier to slice into neat squares. If you’re in a hurry, you can place the pan in the refrigerator for a short time to speed up the cooling process.
By following these cooking notes, you’ll be well on your way to creating the most delightful red velvet brownies. Happy baking!
Serving Suggestions for Red Velvet Brownies Recipe
Pairing with Ice Cream
One of the best ways to enjoy your red velvet brownies is by pairing them with ice cream. The creamy texture of ice cream complements the rich, fudgy brownies perfectly. Vanilla ice cream is a classic choice, as its subtle flavor allows the brownie’s chocolate and red velvet notes to shine. However, you can also try pairing them with other flavors like cream cheese, chocolate, or even raspberry sorbet for a fruity twist.
To serve, simply place a warm brownie on a plate and add a generous scoop of your chosen ice cream on top. For an extra touch, drizzle some chocolate or caramel sauce over the ice cream. This delightful combination creates a dessert that is not only visually appealing but also a treat for your taste buds!
Serving with Cream Cheese Frosting
If you want to elevate your red velvet brownies even further, consider adding a layer of cream cheese frosting. The tangy sweetness of the frosting pairs beautifully with the rich flavor of the brownies. To make the frosting, mix 4 oz of softened cream cheese with 1 cup of powdered sugar and 1 tablespoon of milk until smooth. Once your brownies have cooled, spread the frosting evenly over the top.
For a decorative touch, you can sprinkle some crushed nuts or colorful sprinkles on top of the frosting. This not only adds texture but also makes your brownies look festive and inviting. Whether for a special occasion or just a treat for yourself, serving red velvet brownies with cream cheese frosting is sure to impress!
Tips for Perfecting Your Red Velvet Brownies Recipe
Choosing the Right Cocoa Powder
When it comes to baking red velvet brownies, the type of cocoa powder you choose can make a big difference. There are two main types: natural cocoa powder and Dutch-processed cocoa powder. Natural cocoa powder has a strong chocolate flavor and is slightly acidic, which works well with the baking soda in recipes. On the other hand, Dutch-processed cocoa powder is treated to neutralize its acidity, resulting in a milder flavor and darker color.
For red velvet brownies, using natural cocoa powder is often recommended. It enhances the rich chocolate taste while allowing the red food coloring to shine through. However, if you prefer a deeper chocolate flavor, you can mix both types. Just remember to adjust the leavening agents accordingly if you switch between them. This small change can elevate your brownies, making them even more delicious!
Storing Leftover Brownies
After baking a batch of red velvet brownies, you might find yourself with some leftovers. Proper storage is key to keeping them fresh and tasty. To store your brownies, first, let them cool completely in the pan. Once cooled, you can cut them into squares and place them in an airtight container. This helps prevent them from drying out.
If you want to keep your brownies for a longer period, consider freezing them. Wrap each brownie square in plastic wrap and then place them in a freezer-safe bag. They can last up to three months in the freezer. When you’re ready to enjoy them, simply thaw them at room temperature or warm them in the microwave for a few seconds. This way, you can savor the deliciousness of red velvet brownies anytime!
Breakdown of Time for Red Velvet Brownies Recipe
Prep Time
Preparing your red velvet brownies is a quick and enjoyable process. The prep time typically takes about 15-20 minutes. During this time, you’ll gather your ingredients, preheat the oven, and mix the wet and dry components. This step is essential for ensuring that everything is ready for baking. So, take your time to measure accurately and enjoy the mixing process!
Cooking Time
The cooking time for your red velvet brownies is approximately 25-30 minutes. This is when the magic happens! As the brownies bake, they will rise and develop that beautiful red color. Keep an eye on them, and remember to check for doneness with a toothpick. If it comes out clean or with a few moist crumbs, your brownies are ready to come out of the oven!
Total Time
In total, you can expect to spend about 45-50 minutes from start to finish. This includes both the prep and cooking times. Once your brownies are baked, don’t forget to allow them to cool for a bit before cutting. This cooling period is crucial for achieving the perfect texture. So, in less than an hour, you can have a delicious batch of red velvet brownies ready to impress your family and friends!
Nutritional Information for Red Velvet Brownies Recipe
Calories
When indulging in red velvet brownies, it’s good to know the calorie content. Each brownie contains approximately 210 calories. This makes them a delightful treat, but it’s wise to enjoy them in moderation. The rich ingredients contribute to the calorie count, so savoring each bite is the best way to appreciate their flavor.
Protein
In terms of protein, each serving of red velvet brownies offers about 2 grams. While this isn’t a high protein snack, it does provide a small boost. The eggs and white chocolate chips contribute to this protein content. If you’re looking to increase the protein in your dessert, consider pairing your brownies with a scoop of protein-rich ice cream or a dollop of Greek yogurt.
Sodium
Each brownie contains roughly 100 mg of sodium. This amount is relatively low, making these brownies a suitable option for most diets. However, if you’re watching your sodium intake, be mindful of any additional toppings or pairings that may add extra salt. Enjoying these brownies as part of a balanced diet is key to maintaining a healthy lifestyle.
Advertisement
FAQs about Red Velvet Brownies Recipe
Can I use food coloring alternatives in the Red Velvet Brownies Recipe?
Absolutely! If you prefer not to use traditional red food coloring, there are several alternatives you can try. Natural options include beet juice or pomegranate juice, which can give your brownies a lovely red hue. However, keep in mind that these alternatives may slightly alter the flavor and intensity of the color. If you want a more vibrant red, you might need to use a bit more of the natural coloring. Experimenting with these alternatives can lead to unique and delicious results!
How do I know when my Red Velvet Brownies are done baking?
Knowing when your red velvet brownies are done baking is key to achieving the perfect texture. A good rule of thumb is to check them around the 25-minute mark. Insert a toothpick into the center of the brownies. If it comes out clean or with a few moist crumbs, they are ready to be taken out of the oven. If the toothpick has wet batter on it, give them a few more minutes. Remember, it’s better to underbake slightly than to overbake, as this keeps the brownies fudgy and moist!
Can I freeze Red Velvet Brownies?
Yes, you can freeze red velvet brownies! Freezing is a great way to preserve their deliciousness for later. To freeze, first, let the brownies cool completely. Then, wrap each square tightly in plastic wrap and place them in a freezer-safe bag. They can be stored in the freezer for up to three months. When you’re ready to enjoy them, simply thaw them at room temperature or warm them in the microwave for a few seconds. This way, you can have a tasty treat ready whenever you crave it!
Conclusion on Red Velvet Brownies Recipe
In conclusion, red velvet brownies are a delightful dessert that combines the best of both worlds: the rich, fudgy texture of brownies and the unique flavor of red velvet cake. This recipe is not only easy to follow but also allows for various adaptations, making it suitable for everyone, including those with dietary restrictions. Whether you choose to enjoy them plain, with a scoop of ice cream, or topped with cream cheese frosting, these brownies are sure to impress.
As you embark on your baking journey, remember that the key to perfect red velvet brownies lies in using fresh ingredients and following the steps carefully. Don’t hesitate to experiment with different variations, such as gluten-free or vegan options, to cater to your guests’ preferences. The vibrant color and delicious taste of these brownies will undoubtedly make them a hit at any gathering.
So, gather your ingredients, preheat your oven, and get ready to create a batch of red velvet brownies that will leave everyone asking for seconds. Happy baking!