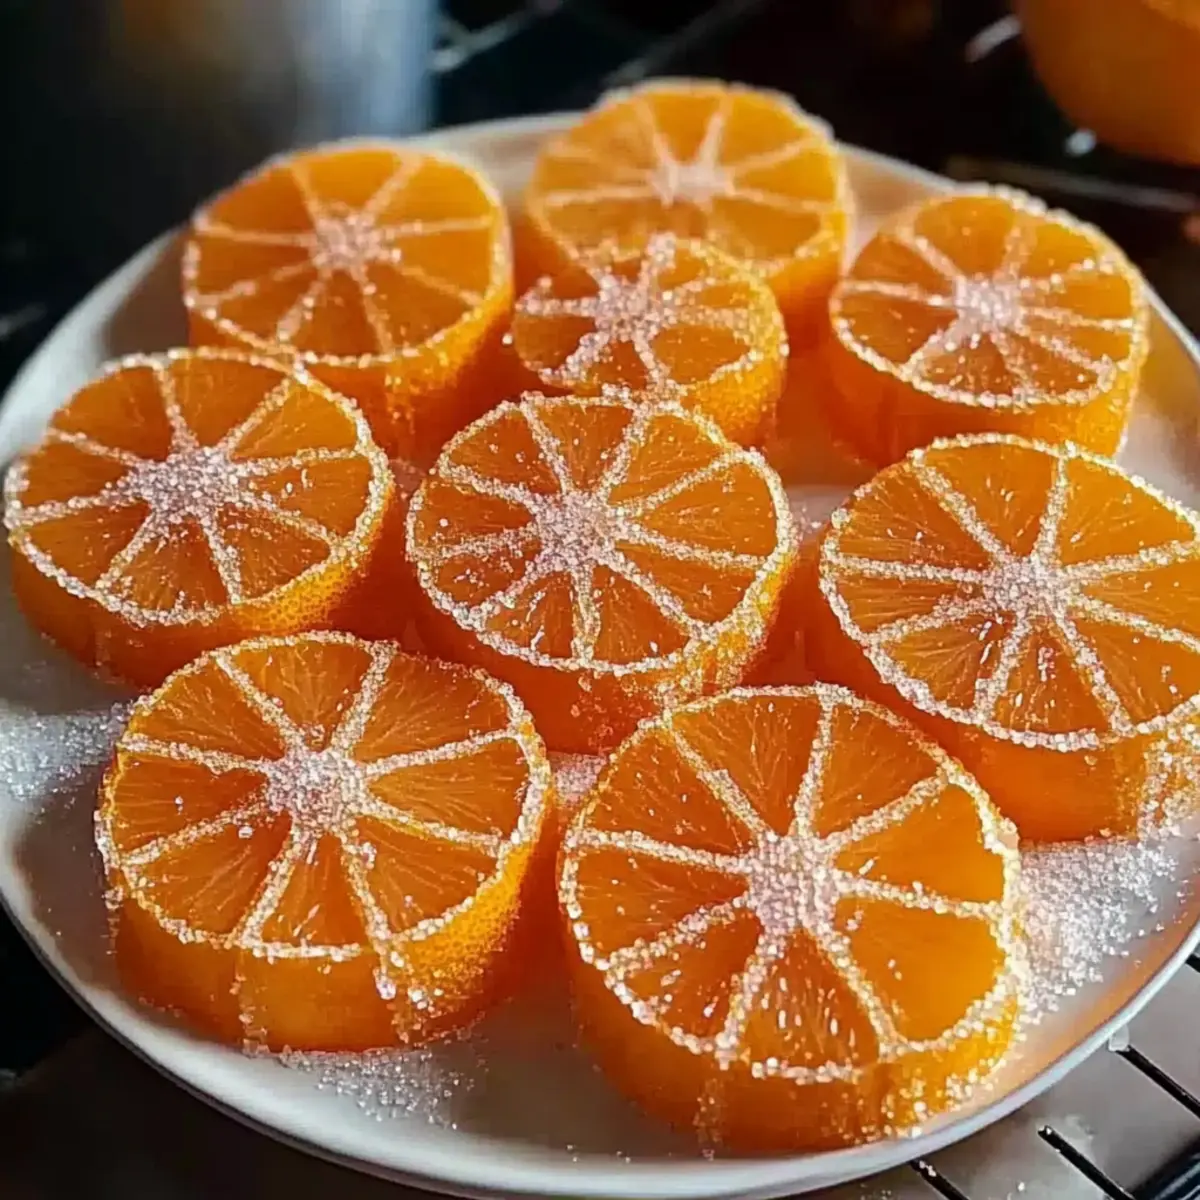
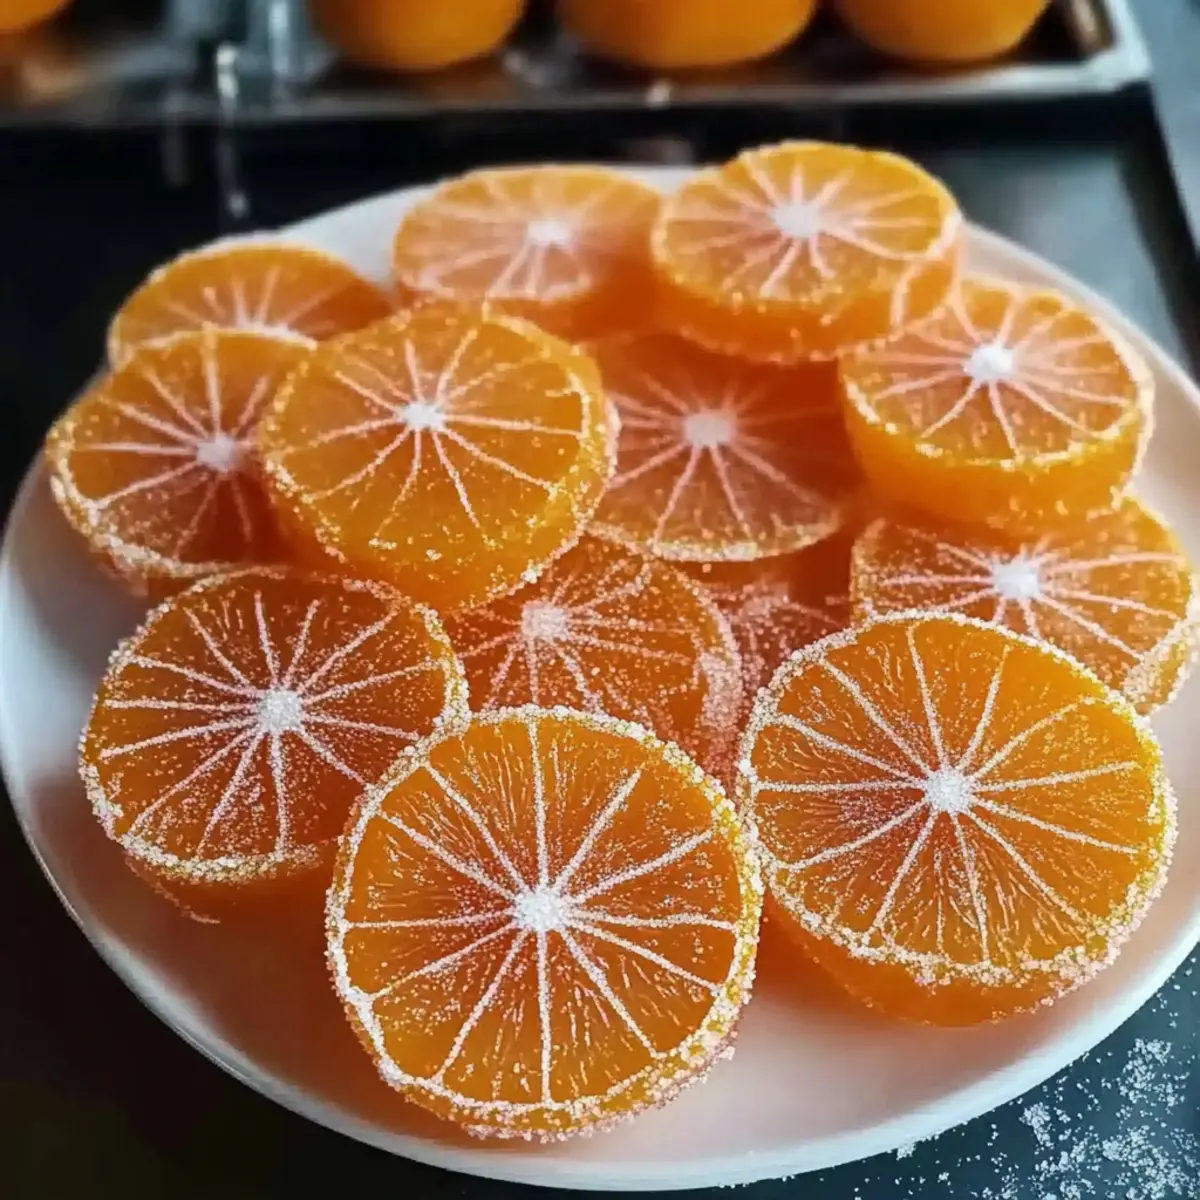
As I stood in my kitchen, the scent of citrus filled the air, bringing a wave of nostalgia that transported me back to sunny afternoons spent feasting on homemade treats. Today, I’m excited to share my recipe for classic homemade orange candy—an incredibly simple two-ingredient delight that captures the essence of summer in every chewy bite. Not only is this recipe a vegan and gluten-free gem, perfect for crafting ahead of time, but it also serves as a versatile addition for various occasions—whether you’re looking to embellish a dessert, create a stunning cheese platter, or enjoy a quick snack. Imagine delighting your friends with these jewel-like morsels that are easy to prepare and downright addictive. Ready to elevate your candy game with bright, zesty flavors? Let’s dive into this sweet adventure together!
Why is Homemade Orange Candy So Special?
Simplicity at its finest: With just two ingredients—oranges and sugar—this candy is a breeze to whip up. Versatile delight: Use these tangy treats as a cake garnish, cocktail stir, or stand-alone snack. Crowd-pleaser appeal: Everyone loves a chewy, citrusy treat that looks as good as it tastes! Make-ahead friendly: Prep in advance to have this candy on hand for gatherings. Unique twist on traditional candies: Elevate your snack game with a vegan, gluten-free option that’s bursting with flavor!
Orange Candy Ingredients
• Dive into the delightful world of homemade orange candy with just two simple ingredients!
For the Candy
- Oranges – Use small oranges or tangelos to capture the bright, natural sweetness essential for the candy.
- Granulated Sugar – This is a must-have; it not only sweetens but also preserves the candy’s delightful texture.
- Water – Vital for dissolving the sugar and creating a smooth syrup to infuse into the oranges.
Optional Toppings
- Crushed Nuts – Roll the dried slices in crushed nuts for a crunchy element that complements the chewy candy.
- Melted Chocolate – A delightful twist; dipping the candy in chocolate adds decadence and a rich flavor.
Get ready to create the most scrumptious Orange Candy that dazzles both the eyes and palate!
Step‑by‑Step Instructions for Classic Homemade Orange Candy
Step 1: Prepare Oranges
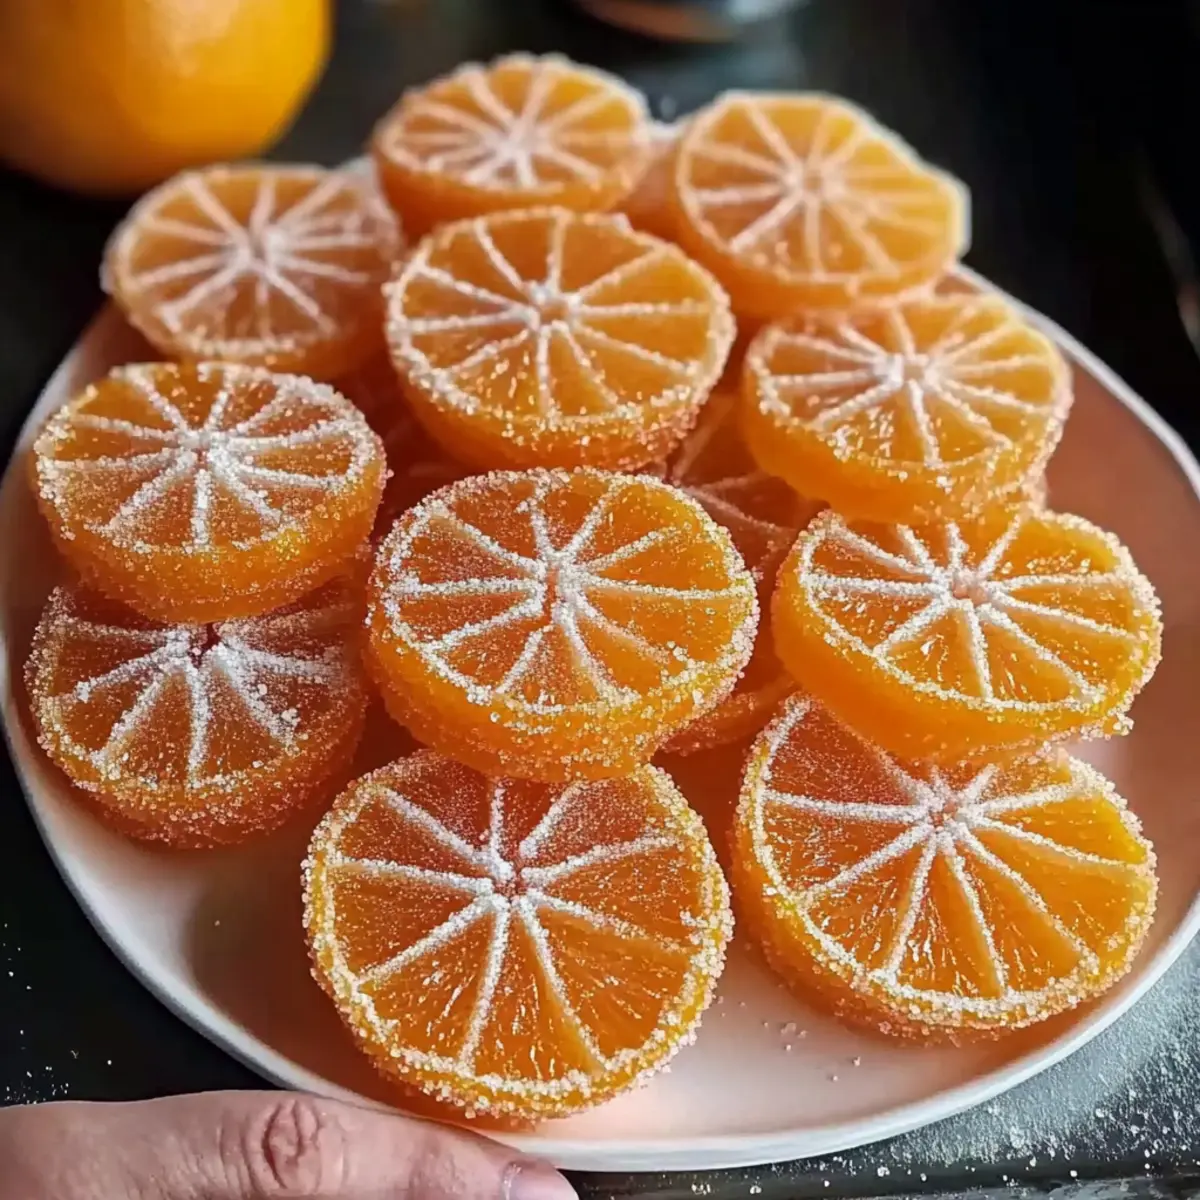
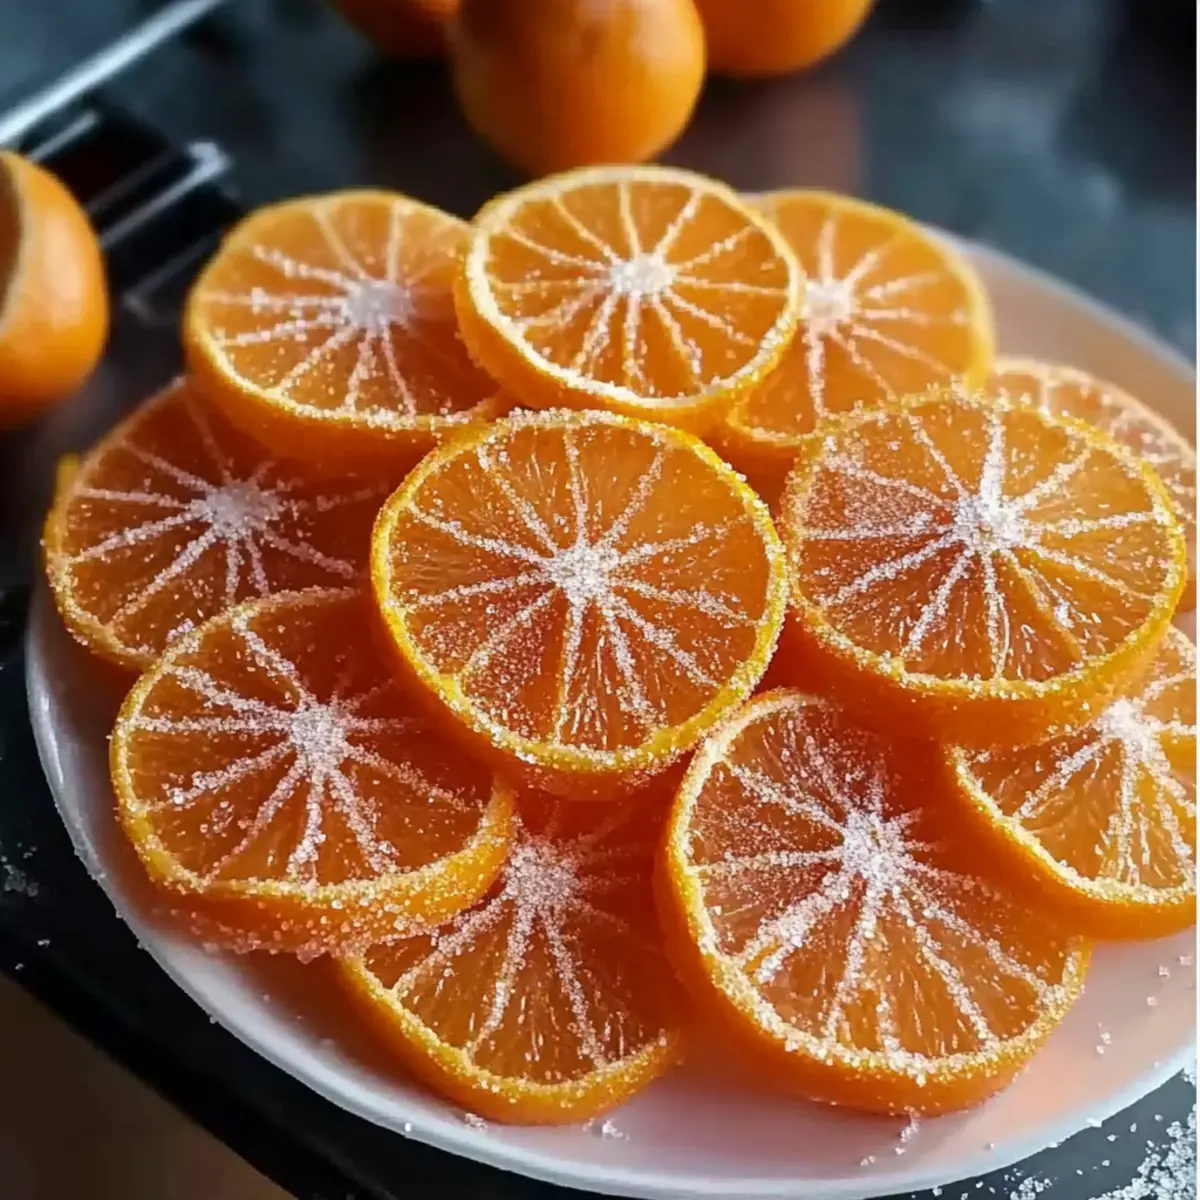
Start by slicing three small oranges or tangelos into thin ¼-inch rounds. A sharp knife or mandoline will help ensure uniformity, making your candy visually appealing. Lay the slices in a single layer on a clean cutting board, allowing their bright, vibrant color to stand out against the surface.
Step 2: Make Syrup
In a large skillet or saucepan, combine 3 cups of granulated sugar with 3 cups of water. Heat the mixture over medium-high heat, stirring consistently until the sugar fully dissolves. Once boiling and bubbly, keep a close eye on it—this syrup will be the base for your delightful orange candy.
Step 3: Simmer Oranges
Reduce the heat to achieve a gentle simmer and carefully add the freshly sliced orange rounds in a single layer. Let them simmer for 45–60 minutes, turning occasionally. You’ll know they’re ready when the peels turn translucent, turning them into exquisite, jewel-like pieces of candy right before your eyes.
Step 4: Dry Slices
Using tongs, carefully remove the simmered orange slices and lay them on a wire rack in a single layer. Allow the candy to dry at room temperature uncovered for 24–48 hours. At this stage, the slices should become tacky but set, ensuring the perfect texture for your homemade orange candy.
Step 5: Optional Finishing Touches
For an extra layer of flavor and sweetness, consider rolling the dried slices in granulated sugar or dipping them in melted chocolate. This not only enhances the taste of your homemade orange candy but also adds a beautiful finish that makes them irresistible for any occasion.
How to Store and Freeze Orange Candy
Room Temperature: Store orange candy in an airtight container at room temperature for up to 1 month, preventing moisture exposure for optimal texture.
Refrigeration (Optional): Refrigeration is not necessary, but if preferred, keep in an airtight container. Ensure the candy is wax paper lined to avoid sticking.
Freezer: For longer storage, freeze the orange candy in a single layer on a parchment-lined tray before transferring to an airtight container. Use within 3 months for best flavor.
Thawing: When ready to enjoy, thaw in the fridge for a few hours or at room temperature for quick enjoyment of your delicious orange candy!
What to Serve with Classic Homemade Orange Candy
Elevate your culinary experience by pairing these delightful orange candies with complementary flavors and textures that enhance every bite.
- Cheese Platter: Pair with creamy goat cheese or blue cheese to contrast the sweet zest of the candy, creating a stunning appetizer.
- Dark Chocolate: Rich, melted dark chocolate drizzled over the candies adds a decadent layer, amplifying their citrusy brightness.
- Fresh Berries: Serve alongside strawberries or blueberries for a refreshing, juicy burst, balancing the chewy sweetness of the orange candy.
- Citrus Mimosa: This bubbly sip featuring fresh orange juice adds an invigorating citrus twist, making brunch a festive occasion.
- Vanilla Ice Cream: A scoop of creamy, cold vanilla ice cream serves as a sumptuous base, allowing the orange candy to shine as a sweet topping.
- Roasted Nuts: Crunchy, salted or spiced nuts offer a delightful contrast, enhancing the chewy texture of the candies with their satisfying crunch.
- Lemonade: The tartness of a refreshing, homemade lemonade cuts through the sweetness, creating a balanced, thirst-quenching drink choice.
- Chocolate Cake: Use these candies as a spectacular garnish on chocolate cake, bringing a citrus flair that elevates the dessert’s presentation.
- Tea Party: Incorporate the orange candy into a whimsical tea party spread, where their vibrant color and flavor will enchant all guests.
Orange Candy Variations & Substitutions
Get ready to unleash your creativity in the kitchen! This orange candy recipe is a fantastic canvas for your culinary imagination.
- Citrus Swap: Experiment with other citrus fruits like lemons, limes, or blood oranges for unique flavors.
- Cutting Styles: For visual appeal, cut larger orange slices in half to create charming half-moon shapes that add a playful twist.
- Nutty Crunch: Roll the dried slices in crushed nuts for an added crunch that beautifully complements the chewy candy.
- Choco Delight: Dip the orange slices in melted chocolate for a rich, decadent finish that’s sure to impress your guests.
- Spice It Up: Sprinkle a pinch of sea salt or chili powder before drying for a surprising contrast that heightens the citrus zing.
- Herb Infusion: Add fresh herbs like mint or rosemary into the syrup while simmering to infuse a delightful, aromatic twist.
- Infused Syrup Use: Use leftover syrup to sweeten your tea or drizzle over yogurt for a fragrant citrus enhancement.
- Dessert Garnish: Use the orange slices as a colorful, eye-catching garnish on cakes or cupcakes for a touch of sophistication.
With these variations, you can cater to your cravings and the tastes of your guests. Whether you’re adding a splash of excitement or sticking with the classic, your homemade orange candy will always steal the show!
Make Ahead Options
These classic homemade orange candies are perfect for meal prep enthusiasts! You can slice the oranges and prepare the syrup up to 24 hours in advance, storing the components separately in the refrigerator. Once prepped, simply simmer the orange slices in the syrup and let them dry at room temperature for 24–48 hours until they become tacky yet set. To maintain quality, store the finished candies in an airtight container at room temperature, allowing you to enjoy these delightful treats whenever you need a sweet snack. When you’re ready to serve, you can finish them with a roll in granulated sugar or a dip in melted chocolate for an extra touch of elegance. Just like that, you’ve got a delicious and time-saving treat on hand!
Expert Tips for Classic Homemade Orange Candy
• Slicing Accuracy: Make sure your orange slices are uniform and about ¼-inch thick. This helps them cook evenly and maintain the right chewy texture.
• Syrup Monitoring: Keep a close eye on the boiling syrup; high heat can lead to burnt sugar. Stir consistently to avoid sticking and ensure a smooth mixture.
• Drying Patience: Allow the candy to dry thoroughly for 24–48 hours. Rushing this step may result in a gooey texture rather than the ideal chewy, jewel-like consistency of orange candy.
• Storage Solutions: Store your finished orange candy in an airtight container at room temperature. Avoid refrigeration to keep the best texture during storage.
• Creative Variations: Experiment with different citrus fruits or toppings for a fun twist. Lemon or lime slices can provide a unique taste, while nuts and chocolate add delightful contrasts.
• Sugar Necessity: Do not reduce the sugar in the recipe. It’s crucial for achieving the perfect preservation and texture of your homemade orange candy.
Classic Homemade Orange Candy Recipe FAQs
How do I choose the right oranges for this recipe?
Absolutely! For the best flavor and sweetness, opt for small oranges or tangelos that are firm and free of dark spots all over their skin. Look for those with a bright orange hue; they should feel heavy for their size, indicating juiciness.
Advertisement
How should I store my orange candy once it’s made?
To maintain the candy’s delightful texture, store your orange candy in an airtight container at room temperature for up to 1 month. If you’re concerned about moisture, place parchment paper between the layers to prevent sticking.
Can I freeze orange candy for later use?
Absolutely! To freeze your orange candy, first lay it out in a single layer on a parchment-lined tray for about an hour, so it sets nicely. Then, transfer the candy to an airtight container, labeling it with the date—ideally, use it within 3 months for the best flavor!
What if my orange slices didn’t turn out translucent?
No worries! If the slices are still opaque after simmering, it often means they just need more time to cook. Keep them on a gentle simmer for an additional 15-30 minutes until they appear translucent. This ensures they achieve that perfect chewy texture!
Is this orange candy suitable for special diets?
Very! This delicious treat is naturally vegan and gluten-free, making it a fantastic option for those with dietary restrictions. However, be sure to double-check any toppings you plan to use, like chocolate or nuts, to ensure they align with your dietary needs.
How long do I need to let the orange slices dry?
It’s important to be patient! Allow your orange slices to dry at room temperature for 24–48 hours once you’ve removed them from the syrup. They should feel tacky but not sticky, which indicates they are ready for that perfect chewy texture!
Homemade Orange Candy: Sweet, Simple, and Totally Irresistible
Ingredients
Equipment
Method
- Slice three small oranges or tangelos into thin ¼-inch rounds.
- In a large skillet or saucepan, combine 3 cups of granulated sugar with 3 cups of water and heat over medium-high until dissolved.
- Reduce heat to a gentle simmer and add the orange rounds. Simmer for 45–60 minutes until peels are translucent.
- Carefully remove slices with tongs and lay them on a wire rack to dry for 24–48 hours.
- Optionally, roll in granulated sugar or dip in melted chocolate before serving.