
Introduction to Hawaiian Chicken with Coconut Rice
There’s something magical about the flavors of the tropics, isn’t there? Hawaiian Chicken with Coconut Rice brings that magic right to your kitchen. This dish is not just a meal; it’s a mini-vacation on a plate. Whether you’re looking to impress your loved ones or simply want a quick solution for a busy weeknight, this recipe has you covered. The tender, marinated chicken pairs beautifully with creamy coconut rice, creating a delightful harmony of taste and texture. Trust me, once you try this, it’ll become a go-to favorite in your culinary repertoire.
Why You’ll Love This Hawaiian Chicken with Coconut Rice
This Hawaiian Chicken with Coconut Rice is a game-changer for your dinner routine. It’s incredibly easy to whip up, taking just 40 minutes from start to finish. The sweet and savory marinade infuses the chicken with flavor, while the creamy coconut rice adds a luxurious touch. Plus, it’s gluten-free, making it a fantastic option for everyone at the table. You’ll love how it transports you to a tropical paradise with every bite!
Ingredients for Hawaiian Chicken with Coconut Rice
Gathering the right ingredients is the first step to creating this tropical delight. Here’s what you’ll need:
- Boneless, skinless chicken thighs: Juicy and flavorful, they soak up the marinade beautifully. You can also use chicken breasts for a leaner option.
- Soy sauce: This adds a savory depth to the dish, balancing the sweetness of the brown sugar.
- Brown sugar: It brings a touch of sweetness that caramelizes beautifully when grilled.
- Rice vinegar: A splash of acidity that brightens the flavors and enhances the marinade.
- Sesame oil: This nutty oil adds richness and a hint of Asian flair to the dish.
- Garlic: Minced garlic infuses the chicken with aromatic goodness.
- Fresh ginger: Grated ginger gives a warm, zesty kick that complements the other flavors.
- Black pepper: A simple seasoning that adds a bit of heat and depth.
- Jasmine rice: This fragrant rice is perfect for soaking up the creamy coconut sauce.
- Coconut milk: The star of the show! It makes the rice creamy and adds a tropical flavor.
- Water: Used to cook the rice to the perfect texture.
- Salt: Enhances all the flavors in the dish.
- Chopped green onions: For garnish, they add a fresh crunch and a pop of color.
- Shredded coconut: Toasted for garnish, it adds a delightful texture and extra coconut flavor.
For those looking to spice things up, consider adding red pepper flakes to the marinade for a kick. You can find all the exact measurements at the bottom of the article, ready for printing!
How to Make Hawaiian Chicken with Coconut Rice
Creating this Hawaiian Chicken with Coconut Rice is a breeze. Follow these simple steps, and you’ll have a tropical feast ready in no time. Let’s dive in!
Step 1: Marinate the Chicken
Start by mixing the soy sauce, brown sugar, rice vinegar, sesame oil, minced garlic, grated ginger, and black pepper in a large bowl. This marinade is where the magic begins. It’s sweet, savory, and oh-so-flavorful!
Add the chicken thighs to the bowl, ensuring they’re well-coated. Cover the bowl and let it marinate for at least 30 minutes. If you have time, marinate it for up to 2 hours in the fridge. The longer, the better!
Step 2: Prepare the Rice
While the chicken is soaking up those delicious flavors, it’s time to prepare the rice. Rinse the jasmine rice under cold water until the water runs clear. This step removes excess starch and helps achieve that perfect fluffy texture.
In a medium saucepan, combine the rinsed rice, coconut milk, water, and salt. Bring it to a boil over medium-high heat. Once boiling, reduce the heat to low, cover, and let it simmer for 15-20 minutes. The rice will absorb the creamy coconut goodness!
Step 3: Grill the Chicken
Preheat your grill or grill pan over medium-high heat. Remove the chicken from the marinade, letting any excess drip off. Grill the chicken for about 6-7 minutes per side. You want it to be fully cooked, reaching an internal temperature of 165°F. The grill marks will add a nice touch!
Step 4: Serve and Garnish
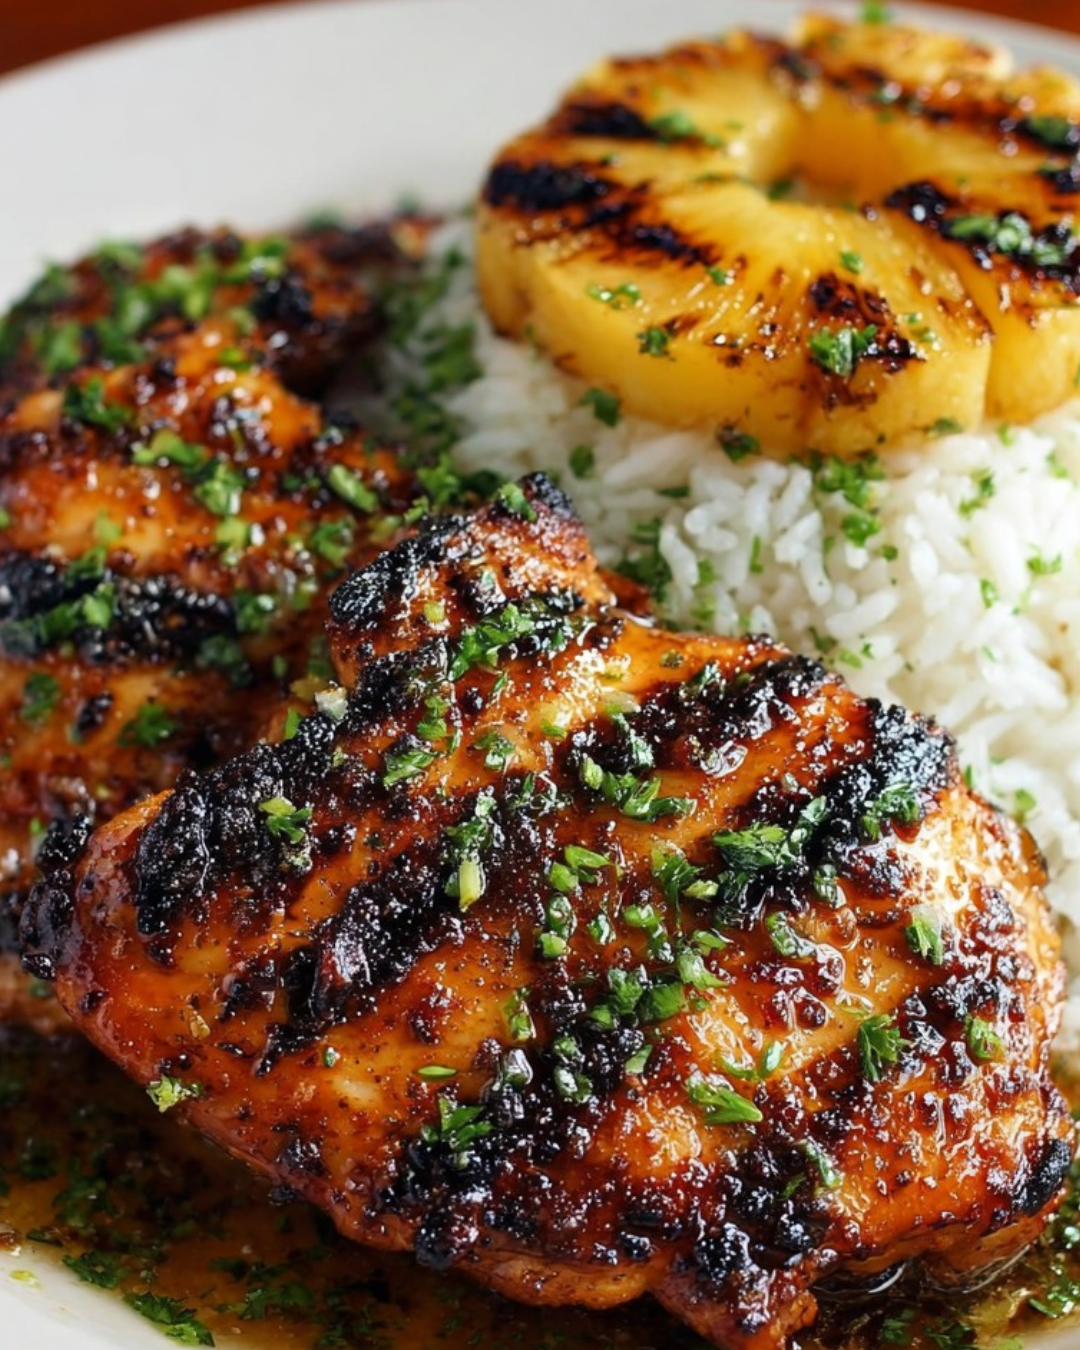
Once the chicken is grilled to perfection, fluff the coconut rice with a fork. Serve the rice on plates, topped with the grilled chicken. For that finishing touch, garnish with chopped green onions and toasted shredded coconut. It’s a feast for the eyes and the taste buds!

Tips for Success
- Marinate the chicken overnight for deeper flavor.
- Use a meat thermometer to ensure chicken is cooked to 165°F.
- Rinse the rice thoroughly to avoid gummy texture.
- Toast the shredded coconut in a dry pan for extra crunch.
- Experiment with different herbs for garnish, like cilantro or parsley.
Equipment Needed
- Grill or Grill Pan: A standard grill works best, but a grill pan on the stovetop is a great alternative.
- Medium Saucepan: Essential for cooking the rice; a pot with a lid will do.
- Mixing Bowl: For marinating the chicken; any large bowl will suffice.
- Meat Thermometer: To check chicken doneness; a simple knife can also work to cut and check.
Variations
- Spicy Hawaiian Chicken: Add a teaspoon of red pepper flakes to the marinade for a fiery kick.
- Vegetarian Option: Substitute chicken with firm tofu or tempeh, marinating and grilling them the same way.
- Fruit Infusion: Toss in some pineapple chunks during grilling for a sweet, caramelized addition.
- Herb-Infused Rice: Mix in fresh herbs like cilantro or basil into the coconut rice for an aromatic twist.
- Low-Carb Version: Swap jasmine rice with cauliflower rice for a lighter, low-carb alternative.
Serving Suggestions
- Fresh Salad: Pair with a light cucumber and tomato salad for a refreshing crunch.
- Tropical Drinks: Serve with a cold Mai Tai or a coconut water for a true island vibe.
- Presentation: Use a colorful plate and garnish with lime wedges for a pop of color.
FAQs about Hawaiian Chicken with Coconut Rice
Can I use chicken breasts instead of thighs?
Absolutely! Chicken breasts are a leaner option and will work just fine. Just keep an eye on the cooking time, as they may cook a bit faster than thighs.
How can I make this dish spicier?
If you’re looking for a kick, add a teaspoon of red pepper flakes to the marinade. You can also serve it with a spicy dipping sauce on the side!
Can I prepare the coconut rice in advance?
Yes, you can! Cook the coconut rice ahead of time and store it in the fridge. Just reheat it gently before serving to keep it fluffy and creamy.
What can I serve with Hawaiian Chicken and Coconut Rice?
This dish pairs wonderfully with a fresh salad or grilled vegetables. For drinks, consider a tropical cocktail or a refreshing iced tea.
Is this recipe gluten-free?
Yes, this Hawaiian Chicken with Coconut Rice is gluten-free! Just ensure that the soy sauce you use is labeled gluten-free, or substitute it with tamari for a safe option.
Final Thoughts
Cooking Hawaiian Chicken with Coconut Rice is more than just preparing a meal; it’s about creating an experience. The vibrant flavors transport you to a sun-soaked beach, where the gentle waves kiss the shore. Each bite is a celebration of sweet and savory, a reminder of the joy that comes from sharing food with loved ones. Whether it’s a casual weeknight dinner or a special gathering, this dish brings smiles and satisfaction. So, roll up your sleeves, embrace the tropical vibes, and let this recipe become a cherished part of your culinary adventures. You won’t regret it!
Advertisement
Hawaiian Chicken with Coconut Rice: A Tropical Delight!
A delicious Hawaiian Chicken dish served with creamy coconut rice, perfect for a tropical meal.
- Prep Time: 10 minutes
- Cook Time: 30 minutes
- Total Time: 40 minutes
- Yield: 4 servings 1x
- Category: Main Course
- Method: Grilling
- Cuisine: Hawaiian
- Diet: Gluten Free
Ingredients
- 2 pounds boneless, skinless chicken thighs
- 1/4 cup soy sauce
- 1/4 cup brown sugar
- 2 tablespoons rice vinegar
- 2 tablespoons sesame oil
- 2 cloves garlic, minced
- 1 teaspoon fresh ginger, grated
- 1/2 teaspoon black pepper
- 1 cup jasmine rice
- 1 can (13.5 ounces) coconut milk
- 1 cup water
- 1/2 teaspoon salt
- 1/4 cup chopped green onions (for garnish)
- 1/4 cup shredded coconut (toasted, for garnish)
Instructions
- In a large bowl, combine soy sauce, brown sugar, rice vinegar, sesame oil, garlic, ginger, and black pepper. Add the chicken thighs and marinate for at least 30 minutes, or up to 2 hours in the refrigerator for more flavor.
- While the chicken is marinating, rinse the jasmine rice under cold water until the water runs clear.
- In a medium saucepan, combine the rinsed rice, coconut milk, water, and salt. Bring to a boil over medium-high heat. Once boiling, reduce the heat to low, cover, and simmer for 15-20 minutes, or until the rice is tender and the liquid is absorbed. Remove from heat and let it sit, covered, for 5 minutes.
- Preheat your grill or a grill pan over medium-high heat. Remove the chicken from the marinade and grill for about 6-7 minutes per side, or until fully cooked and the internal temperature reaches 165°F.
- Fluff the coconut rice with a fork and serve it on plates. Top with the grilled chicken. Garnish with chopped green onions and toasted shredded coconut.
Notes
- For added flavor, consider marinating the chicken overnight.
- You can substitute the chicken thighs with chicken breasts for a leaner option.
- For a spicy kick, add a teaspoon of red pepper flakes to the marinade.
Nutrition
- Serving Size: 1 serving
- Calories: 480
- Sugar: 10g
- Sodium: 800mg
- Fat: 25g
- Saturated Fat: 10g
- Unsaturated Fat: 15g
- Trans Fat: 0g
- Carbohydrates: 40g
- Fiber: 2g
- Protein: 30g
- Cholesterol: 100mg