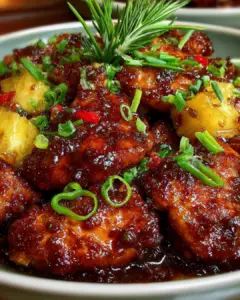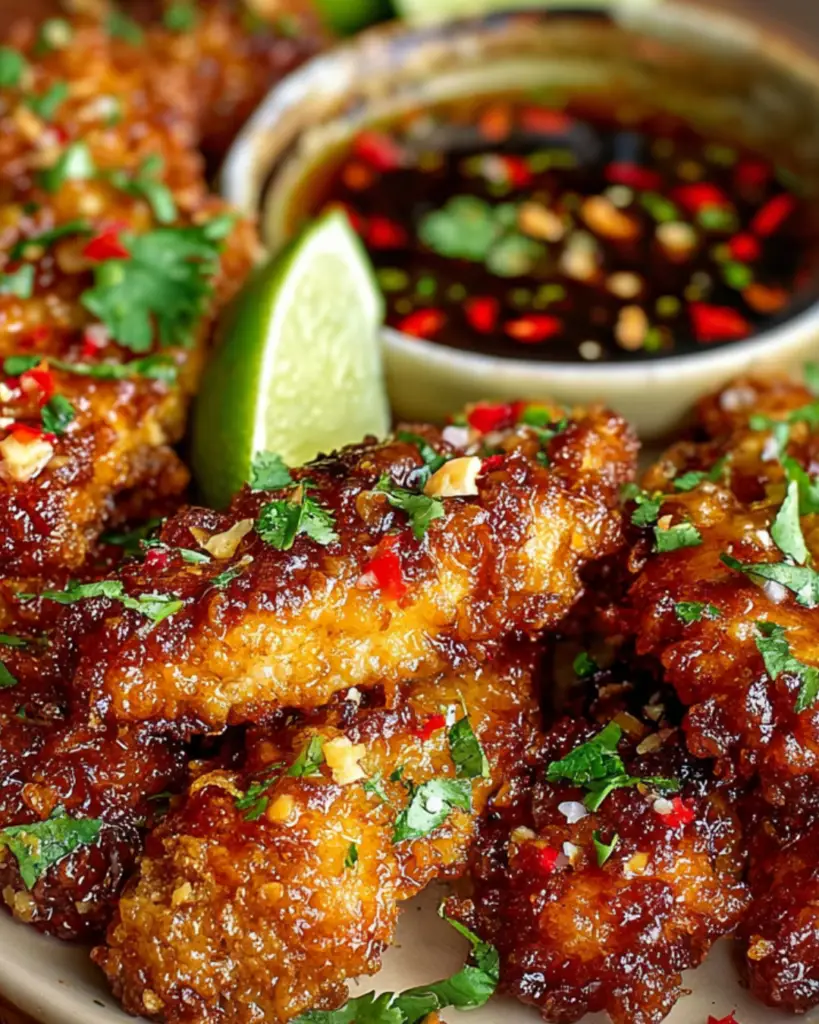
Introduction to Gluten-Free Thai Sticky Chicken Fingers
Cooking has always been my way of connecting with family and friends. When I discovered this recipe for Gluten-Free Thai Sticky Chicken Fingers, it felt like a culinary hug. It’s the perfect dish for those busy weeknights when you want something quick yet impressive. The sweet and savory flavors dance together, making it a hit with everyone at the table. Plus, it’s gluten-free, so you can share it with friends who have dietary restrictions. Trust me, this recipe will become a staple in your kitchen, bringing joy and flavor to your meals!
Why You’ll Love This Gluten-Free Thai Sticky Chicken Fingers
This recipe is a game-changer for busy nights. It’s quick to prepare, taking just 10 minutes of hands-on time. The marinade infuses the chicken with a burst of flavor, making every bite a delight. Plus, it’s versatile enough to please picky eaters and adventurous palates alike. Whether you’re hosting friends or enjoying a family dinner, these sticky chicken fingers will impress without the stress!
Ingredients for Gluten-Free Thai Sticky Chicken Fingers
Gathering the right ingredients is the first step to culinary success. For these Gluten-Free Thai Sticky Chicken Fingers, you’ll need a mix of pantry staples and fresh flavors. Here’s what you’ll need:
- Chicken tenders: Tender and juicy, they cook quickly and soak up the marinade beautifully.
- Gluten-free soy sauce: This adds a savory depth. Look for brands that are certified gluten-free for the best flavor.
- Honey: Sweetness is key! It balances the saltiness of the soy sauce and creates that sticky glaze.
- Rice vinegar: A splash of acidity brightens the dish. It’s milder than regular vinegar, making it perfect for this recipe.
- Sesame oil: This adds a nutty aroma and richness. A little goes a long way in enhancing the overall flavor.
- Garlic: Freshly minced garlic brings a punch of flavor. It’s a must for that authentic Thai taste.
- Fresh ginger: Grated ginger adds warmth and a hint of spice, elevating the dish to new heights.
- Red pepper flakes (optional): If you like a bit of heat, toss in some red pepper flakes for a spicy kick.
- Fresh cilantro (for garnish): This herb adds a fresh, vibrant touch. It’s the perfect finishing touch!
- Sesame seeds (for garnish): These add a delightful crunch and a touch of elegance to your dish.
For exact measurements, check the bottom of the article where you can find everything listed for easy printing. Happy cooking!
How to Make Gluten-Free Thai Sticky Chicken Fingers
Now that you have all your ingredients ready, let’s dive into the fun part—making these Gluten-Free Thai Sticky Chicken Fingers! Follow these simple steps, and you’ll have a delicious meal that’s sure to impress.
Step 1: Prepare the Marinade
Start by grabbing a large bowl. Whisk together the gluten-free soy sauce, honey, rice vinegar, sesame oil, minced garlic, grated ginger, and red pepper flakes if you’re feeling adventurous. This marinade is where the magic happens! It’s sweet, savory, and just a little spicy. Make sure everything is well combined; you want every bite to be packed with flavor.
Step 2: Marinate the Chicken
Next, add the chicken tenders to the marinade. Use your hands or a spatula to ensure each piece is fully coated. Cover the bowl with plastic wrap and pop it in the fridge. Let it marinate for at least an hour, but if you have time, let it sit for up to four hours. The longer it marinates, the more flavorful your chicken will be!
Step 3: Preheat the Grill or Broiler
While the chicken is soaking up all that goodness, it’s time to preheat your grill or oven broiler. Aim for medium-high heat. If you’re using a grill, make sure it’s clean and lightly oiled to prevent sticking. For the broiler, place your oven rack about six inches from the heat source. This step is crucial for achieving that perfect char and glaze.
Step 4: Grill or Broil the Chicken
Once your grill or broiler is hot, it’s time to cook! Remove the chicken from the marinade, letting any excess drip off. Reserve that marinade for basting later. Grill the chicken tenders for about 4-5 minutes on each side. If you’re broiling, place them on a baking sheet and broil for the same amount of time. Baste with the reserved marinade halfway through cooking for that sticky, glossy finish.
Step 5: Rest and Garnish
After cooking, remove the chicken from the heat and let it rest for a few minutes. This helps keep the juices locked in. While it’s resting, chop up some fresh cilantro and get your sesame seeds ready. Once rested, garnish the chicken with cilantro and sesame seeds. This adds a pop of color and flavor that makes your dish look as good as it tastes!

Tips for Success
- Always marinate the chicken for at least an hour to maximize flavor.
- Use a meat thermometer to ensure the chicken reaches 165°F for perfect doneness.
- Don’t skip the resting time; it keeps the chicken juicy.
- Feel free to customize the marinade with your favorite spices.
- For extra crunch, serve with toasted sesame seeds on top.
Equipment Needed
- Large bowl: For mixing the marinade. A mixing bowl works too!
- Whisk: To combine ingredients smoothly. A fork can do the trick in a pinch.
- Grill or broiler: For cooking the chicken. An air fryer is a great alternative!
- Meat thermometer: To check doneness. If you don’t have one, just cut into the chicken to ensure it’s cooked through.
Variations
- Spicy Thai Sticky Chicken: Add more red pepper flakes or a splash of sriracha to the marinade for an extra kick.
- Herb-Infused: Mix in fresh herbs like basil or mint for a fragrant twist that complements the Thai flavors.
- Vegetarian Option: Substitute chicken with tofu or tempeh, marinating them the same way for a delicious plant-based meal.
- Sweet and Tangy: Incorporate a splash of orange juice or zest into the marinade for a citrusy brightness.
- Grilled Veggies: Toss some bell peppers, zucchini, or mushrooms on the grill alongside the chicken for a colorful, healthy side.
Serving Suggestions
- Pair with fluffy jasmine rice to soak up the delicious sauce.
- A fresh cucumber salad adds a crunchy contrast and balances the flavors.
- Serve with a cold Thai iced tea for a refreshing drink.
- Garnish with lime wedges for an extra zing.
FAQs about Gluten-Free Thai Sticky Chicken Fingers
Curious about making these Gluten-Free Thai Sticky Chicken Fingers? Here are some common questions I’ve encountered, along with helpful answers to guide you through the process.
Can I use chicken breasts instead of tenders?
Absolutely! Chicken breasts work just as well. Just cut them into strips to ensure even cooking. The marinade will still work its magic!
How can I make this recipe spicier?
If you’re a fan of heat, add more red pepper flakes or a dash of sriracha to the marinade. You can also serve with a spicy dipping sauce for an extra kick!
Can I prepare the marinade in advance?
Yes! You can make the marinade a day ahead and store it in the fridge. Just add the chicken when you’re ready to cook. It’ll save you time on busy nights!
What should I serve with these chicken fingers?
These sticky chicken fingers pair wonderfully with jasmine rice or a fresh cucumber salad. You can also serve them with a side of steamed veggies for a complete meal.
How do I store leftovers?
Store any leftovers in an airtight container in the fridge for up to three days. Reheat in the oven or microwave, and enjoy them again!
Final Thoughts
Creating these Gluten-Free Thai Sticky Chicken Fingers is more than just cooking; it’s about bringing people together. The aroma of the marinade fills your kitchen, inviting everyone to gather around the table. Each bite is a delightful explosion of flavors, making it hard to resist going back for seconds. Whether you’re sharing a meal with family or impressing friends at a gathering, this dish is sure to be a crowd-pleaser. Plus, knowing it’s gluten-free means everyone can enjoy it without worry. So, roll up your sleeves and dive into this culinary adventure—you won’t regret it!
Advertisement
Gluten-Free Thai Sticky Chicken Fingers: A Tasty Delight!
A delicious and easy recipe for Gluten-Free Thai Sticky Chicken Fingers, perfect for a flavorful meal.
- Prep Time: 10 minutes
- Cook Time: 10 minutes
- Total Time: 1 hour 20 minutes
- Yield: 4 servings 1x
- Category: Main Course
- Method: Grilling or Broiling
- Cuisine: Thai
- Diet: Gluten Free
Ingredients
- 2 pounds chicken tenders
- 1 cup gluten-free soy sauce
- 1/2 cup honey
- 1/4 cup rice vinegar
- 1 tablespoon sesame oil
- 4 cloves garlic, minced
- 1 tablespoon fresh ginger, grated
- 1 teaspoon red pepper flakes (optional)
- 1/4 cup chopped fresh cilantro (for garnish)
- 1 tablespoon sesame seeds (for garnish)
Instructions
- In a large bowl, whisk together the gluten-free soy sauce, honey, rice vinegar, sesame oil, garlic, ginger, and red pepper flakes (if using) until well combined.
- Add the chicken tenders to the marinade, ensuring they are fully coated. Cover the bowl and refrigerate for at least 1 hour, or up to 4 hours for more flavor.
- Preheat your grill or oven broiler to medium-high heat.
- Remove the chicken from the marinade, allowing excess marinade to drip off. Reserve the marinade for basting.
- Grill the chicken tenders for about 4-5 minutes on each side, basting with the reserved marinade, until the chicken is cooked through and has a nice glaze. If using the broiler, place the chicken on a baking sheet and broil for 4-5 minutes on each side, basting as needed.
- Once cooked, remove the chicken from the heat and let it rest for a few minutes.
- Garnish with chopped cilantro and sesame seeds before serving.
Notes
- For a spicier kick, add more red pepper flakes or a dash of sriracha to the marinade.
- Serve with a side of jasmine rice or a fresh cucumber salad for a complete meal.
Nutrition
- Serving Size: 1 serving
- Calories: 320
- Sugar: 10g
- Sodium: 800mg
- Fat: 15g
- Saturated Fat: 2g
- Unsaturated Fat: 10g
- Trans Fat: 0g
- Carbohydrates: 10g
- Fiber: 0g
- Protein: 28g
- Cholesterol: 70mg