A Childhood Tradition Reimagined
There’s something magical about Easter—the blooming flowers, the crisp spring air, and the excitement of a chocolate-filled holiday. As a child, Easter wasn’t just about hunting for eggs; it was about gathering in the kitchen with family, our hands sticky with melted chocolate, shaping little nests that would later be filled with pastel-colored candies.
These Chocolate Crisp Easter Nests bring back those warm childhood memories, but they’re not just for kids. They’re the perfect no-bake treat for anyone looking to add a festive touch to their Easter celebrations. Whether you’re making them with children, preparing a last-minute holiday dessert, or simply indulging in a sweet nostalgia trip, these nests capture the essence of Easter in every bite.
Why These Chocolate Nests Are the Ultimate Easter Treat
If you’ve never made chocolate Easter nests before, you’re in for a delightful surprise. Here’s why they deserve a spot in your holiday tradition:
- No-Bake Simplicity – You don’t need an oven or any fancy equipment, making this the perfect hassle-free treat.
- Kid-Friendly Fun – Children love crumbling the cereal, mixing it with chocolate, and shaping their own little nests.
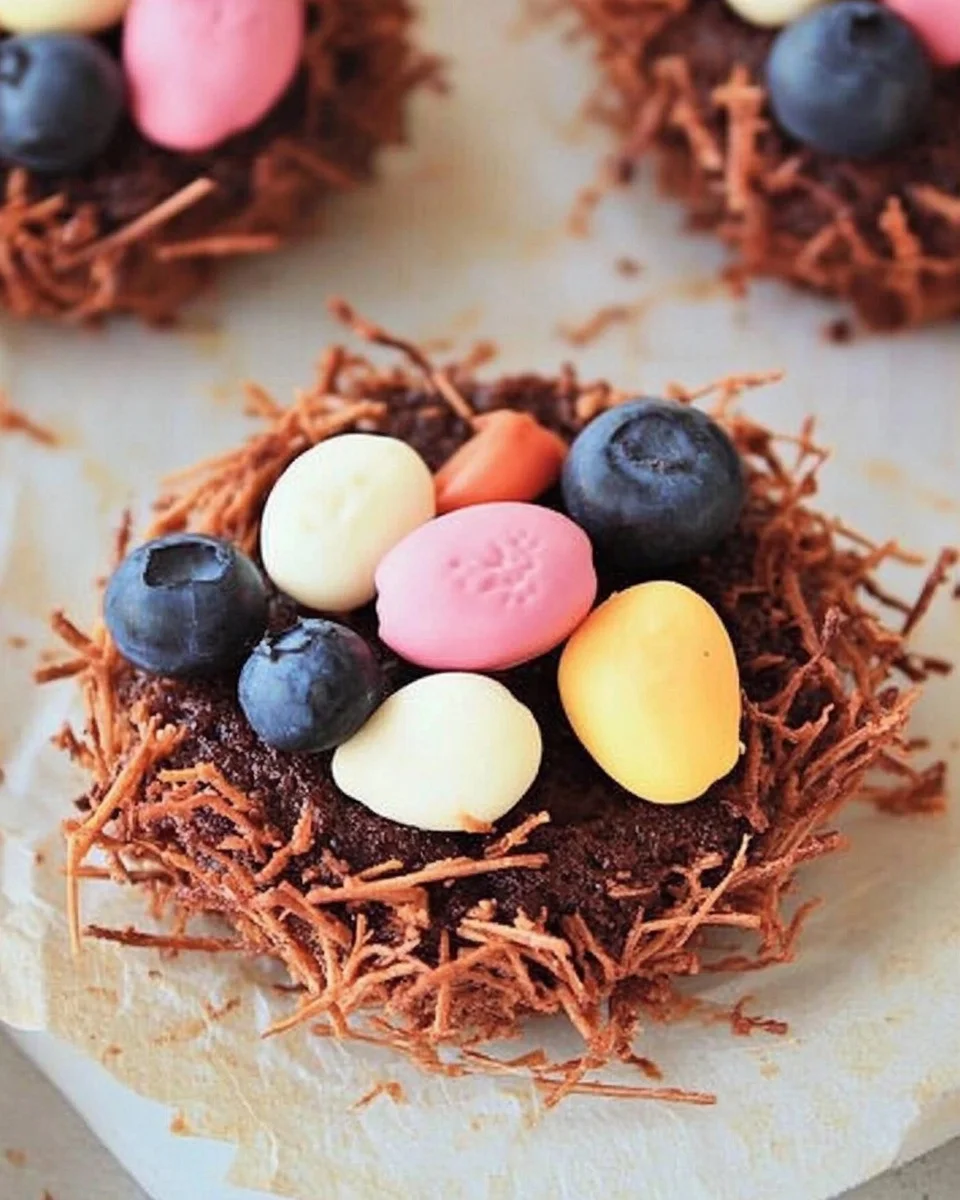
- Festively Adorable – The finished nests look like real bird nests, adding a whimsical touch to your Easter table.
- Endlessly Customizable – While classic mini chocolate eggs are the go-to topping, you can get creative with different candies, sprinkles, or even tiny marshmallow chicks.
- Perfect Balance of Texture and Flavor – The crisp cereal base provides a delightful crunch, while the smooth melted chocolate ties everything together in sweet harmony.
Chocolate Crisp Easter Nests
Ingredients
- 200g (7 oz) milk chocolate
- 85g (3 cups) shredded wheat cereal
- Mini chocolate eggs or other small Easter-themed candies
Directions
- Melt the Chocolate:
- Break the milk chocolate into small pieces and place them in a heatproof bowl.
- Set the bowl over a pot of simmering water, ensuring the bottom doesn’t touch the water.
- Stir occasionally until the chocolate is fully melted and smooth.
- Alternatively, melt the chocolate in a microwave-safe bowl in 30-second intervals, stirring between each, until smooth.
- Prepare the Cereal Base:
- Crumble the shredded wheat cereal into a large bowl until it resembles fine strands.
- Pour the melted chocolate over the crumbled cereal.
- Gently mix until the cereal is thoroughly coated with chocolate.
- Form the Nests:
- Line a baking tray with parchment paper.
- Spoon portions of the chocolate-cereal mixture onto the tray, shaping each into a small nest with a slight indentation in the center.
- While the mixture is still soft, place a few mini chocolate eggs or candies into the center of each nest.
- Set and Serve:
- Allow the nests to cool and harden at room temperature for about an hour.
- Once set, transfer the nests to a serving plate or store them in an airtight container.
Nutritional Information (per nest, makes approximately 12 nests)
- Calories: 150
- Total Fat: 7g
- Saturated Fat: 4g
- Cholesterol: 5mg
- Sodium: 30mg
- Total Carbohydrates: 20g
- Dietary Fiber: 2g
- Sugars: 12g
- Protein: 2g
Note: Nutritional values are approximate and may vary based on ingredient brands and portion sizes.

The Science Behind the Perfect Nest
Though this recipe is simple, there’s a bit of science involved in making sure your chocolate nests hold their shape and have the perfect texture.
- Choosing the Right Chocolate – High-quality milk chocolate works best because of its smooth melt and mild sweetness. Dark chocolate can add a sophisticated depth, while white chocolate offers a creamy, sweeter twist.
- Using the Right Cereal – Shredded wheat is ideal because its fine strands mimic the look of real nests, but alternatives like cornflakes or rice cereal can also work, adding different textures.
- Setting at Room Temperature vs. Refrigeration – While chilling in the fridge speeds up the setting process, allowing the nests to set at room temperature gives them a better texture and prevents condensation, which can cause the chocolate to bloom (develop a white, powdery appearance).
Fun Variations to Try
Though traditional chocolate nests are delicious as is, you can put your own spin on them with these fun variations:
1. Peanut Butter Chocolate Nests
Mix a tablespoon of peanut butter into the melted chocolate before coating the cereal. The nutty flavor adds a rich, slightly salty contrast to the sweetness of the chocolate.
2. White Chocolate Coconut Nests
Replace milk chocolate with white chocolate and mix in shredded coconut for a tropical twist. The coconut enhances the texture while adding a hint of natural sweetness.
3. Dark Chocolate Sea Salt Nests
For a more sophisticated version, use dark chocolate and sprinkle a pinch of sea salt over the finished nests. The salty-sweet combination is irresistible.
4. Nutty Crunch Nests
Mix in chopped almonds, hazelnuts, or pecans for an extra layer of crunch and nutty goodness.
5. Easter Sprinkle Nests
After shaping the nests, sprinkle them with pastel-colored sprinkles for a more festive look.
When to Make These Chocolate Nests
Wondering when these little treats will be a hit? Here are the best occasions to serve them:
- Easter Sunday Gatherings – They make a perfect centerpiece for your Easter dessert table.
- Spring Celebrations – These nests are ideal for spring-themed tea parties, picnics, or family brunches.
- Classroom Treats – A fun and allergy-friendly option for kids’ school celebrations.
- Gifting Ideas – Package them in cute boxes or clear bags with pastel ribbons for an adorable homemade Easter gift.
- Last-Minute Desserts – Since they require no baking and only a few ingredients, they’re great when you need a quick yet festive treat.
Storing and Serving Tips
To keep your Chocolate Crisp Easter Nests fresh and delicious, follow these storage guidelines:
- Room Temperature Storage – Store in an airtight container at room temperature for up to a week.
- Refrigeration – If your kitchen is particularly warm, you can refrigerate them, but allow them to come to room temperature before serving for the best texture.
- Freezing Option – Freeze in a single layer on a baking sheet, then transfer to a freezer-safe bag. They can be stored for up to 3 months.
Frequently Asked Questions
1. Can I use different types of chocolate?
Yes! While milk chocolate is the most common choice, you can experiment with dark, white, or even flavored chocolate to suit your taste.
2. What if I don’t have shredded wheat?
Cornflakes, rice cereal, or even broken-up pretzels can be used as a substitute. Each will give a different texture but will still work well with the melted chocolate.
3. How do I make these allergy-friendly?
For a nut-free version, ensure the chocolate and toppings are free from nut traces. For a gluten-free option, use certified gluten-free cereal.
4. Can I make these ahead of time?
Absolutely! These nests stay fresh for up to a week, making them a great make-ahead Easter treat.
5. Why isn’t my chocolate setting properly?
If your chocolate is taking too long to set, it may be due to excess heat from the kitchen or humidity. Try placing the nests in a cool, dry area or refrigerating them briefly.
Advertisement
6. How can I make these more festive?
Adding sprinkles, edible glitter, or even a drizzle of white chocolate can make these nests extra special for Easter.
Conclusion: A Simple, Sweet Tradition
Chocolate Crisp Easter Nests aren’t just a delicious treat—they’re a nostalgic reminder of the joy that simple traditions bring. Whether you’re making them with little hands eager to help or preparing them as a charming addition to your Easter spread, these nests are sure to bring smiles all around.
There’s something special about the way chocolate, crunch, and a bit of creativity come together in these delightful little treats. They remind us that sometimes, the best desserts aren’t the most complicated—they’re the ones that bring us back to cherished moments, childhood excitement, and the warmth of family traditions.
So gather your ingredients, embrace the mess, and create a batch of these chocolate nests. Whether you’re sharing them with loved ones or enjoying them with a cup of tea, they’re sure to make your Easter celebration a little sweeter.