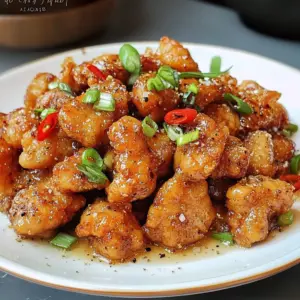
Introduction to Crispy Salt and Pepper Chicken
There’s something undeniably comforting about a plate of Crispy Salt and Pepper Chicken.
Growing up, my family often gathered around the dinner table, and this dish was a staple that never failed to bring smiles.
It’s the kind of meal that feels like a warm hug after a long day.
Whether you’re looking for a quick solution for a busy weeknight or a dish to impress your friends at a weekend gathering, this recipe has you covered.
With its crunchy exterior and juicy interior, it’s sure to become a favorite in your home, just like it is in mine.
Why You’ll Love This Crispy Salt and Pepper Chicken
This Crispy Salt and Pepper Chicken is a game-changer for any home cook.
It’s quick to whip up, taking just 30 minutes from start to finish.
The flavor is bold yet simple, making it a hit with everyone at the table.
Plus, the satisfying crunch will have you reaching for seconds.
Whether you’re a seasoned chef or a kitchen novice, this dish is sure to impress without the fuss.
Ingredients for Crispy Salt and Pepper Chicken
To create this mouthwatering Crispy Salt and Pepper Chicken, you’ll need a handful of simple ingredients that pack a punch.
Here’s what you’ll gather:
- Chicken thighs: Boneless and skinless, they stay juicy and tender while frying.
- All-purpose flour: This is the base for your crispy coating, giving that satisfying crunch.
- Salt: Essential for enhancing the flavors of the chicken and the coating.
- Black pepper: Adds a subtle heat and depth to the dish.
- Garlic powder: A must for that aromatic kick that elevates the flavor.
- Onion powder: Complements the garlic and adds a savory note.
- Paprika: This gives a hint of smokiness and a beautiful color to the coating.
- Cayenne pepper: Optional, but if you like a little heat, this is your go-to.
- Eggs: They help the flour stick to the chicken, creating that perfect crust.
- Milk: Adds richness to the egg mixture, making the coating even more delicious.
- Vegetable oil: For frying, it needs to be hot enough to create that crispy texture.
- Fresh parsley: A sprinkle on top adds a pop of color and freshness when serving.
Feel free to get creative! You can experiment with different spices in the flour mixture, like smoked paprika or Italian seasoning, to customize the flavor profile.
For those looking for a little extra tenderness, consider marinating the chicken in buttermilk for a few hours or overnight.
Exact quantities for each ingredient are available at the bottom of the article for easy printing.
How to Make Crispy Salt and Pepper Chicken
Creating the perfect Crispy Salt and Pepper Chicken is easier than you might think.
Follow these simple steps, and you’ll have a delicious meal ready in no time.
Step 1: Prepare the Chicken
Start by cutting the chicken thighs into bite-sized pieces.
Pat them dry with paper towels to remove excess moisture.
This step is crucial for achieving that crispy texture.
If the chicken is wet, it won’t fry properly.
Step 2: Mix the Coating
In a large bowl, combine the all-purpose flour, salt, black pepper, garlic powder, onion powder, paprika, and cayenne pepper.
Mix well until all the dry ingredients are evenly distributed.
This flavorful coating is what gives the chicken its signature crunch.
Step 3: Whisk the Egg Mixture
In another bowl, whisk together the eggs and milk until fully combined.
This mixture acts as the glue for the flour coating.
Make sure it’s well blended for an even coating on the chicken.
Step 4: Coat the Chicken
Dip each piece of chicken into the egg mixture, allowing any excess to drip off.
Then, coat it in the flour mixture, pressing gently to ensure an even layer.
This double-dipping technique is key to achieving that crispy crust.
Step 5: Heat the Oil
In a large skillet, heat about 1 inch of vegetable oil over medium-high heat.
You want the oil to reach around 350°F for optimal frying.
A good test is to drop a small piece of flour into the oil; if it sizzles, you’re ready to fry.
Step 6: Fry the Chicken
Carefully add the coated chicken pieces to the hot oil in batches.
Avoid overcrowding the pan, as this can lower the oil temperature.
Fry for about 5-7 minutes per side, or until golden brown and cooked through.
Use a slotted spoon to turn the chicken for even cooking.
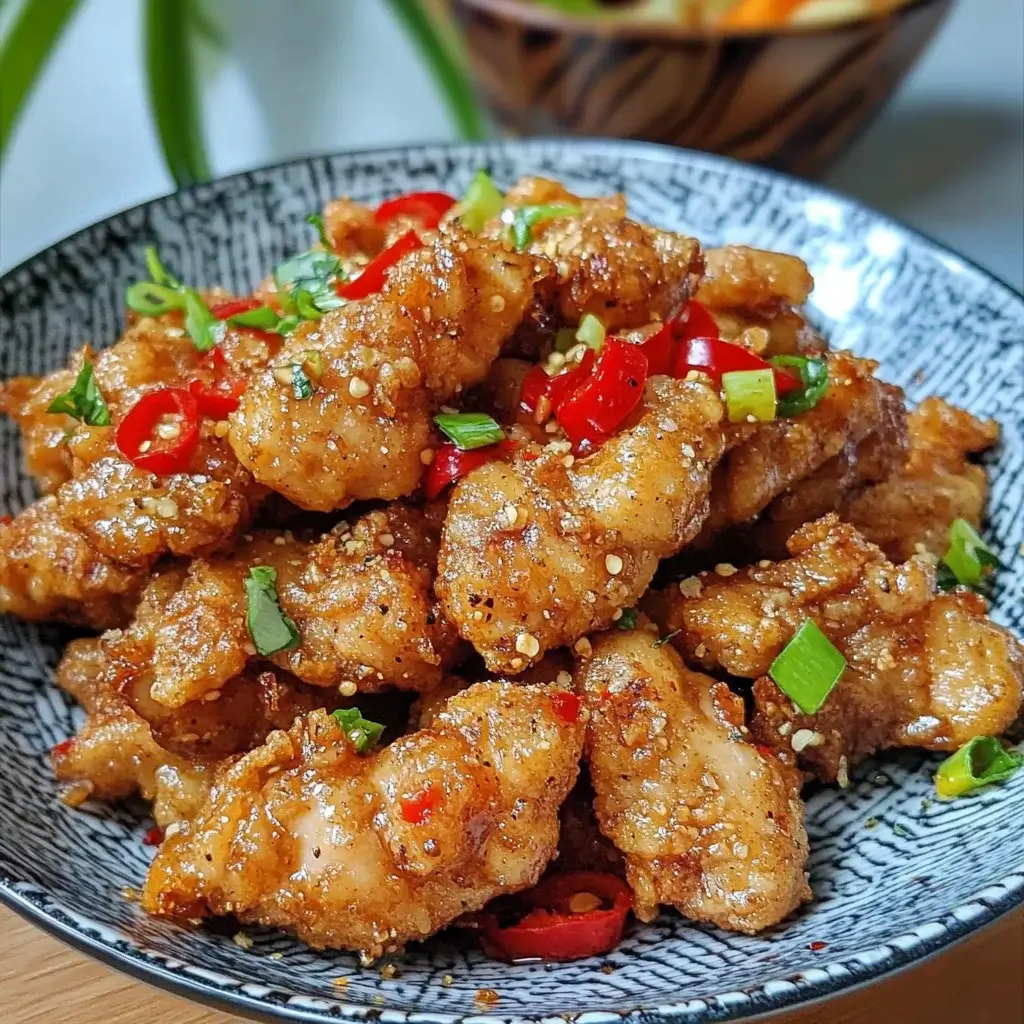
Step 7: Drain and Garnish
Once cooked, transfer the fried chicken to a paper towel-lined plate to drain excess oil.
This step helps keep the chicken crispy.
Garnish with chopped parsley before serving for a fresh touch.
Now, you’re ready to enjoy your Crispy Salt and Pepper Chicken!

Tips for Success
- Always pat the chicken dry before coating to ensure maximum crispiness.
- Use a thermometer to check oil temperature; it should be around 350°F for perfect frying.
- Fry in small batches to maintain oil temperature and achieve even cooking.
- Let the fried chicken rest on paper towels to absorb excess oil.
- Feel free to adjust spices in the coating to suit your taste preferences.
Equipment Needed
- Large skillet: A cast-iron skillet works wonders, but any heavy-bottomed pan will do.
- Slotted spoon: Essential for safely removing the chicken from hot oil.
- Mixing bowls: Use two for the egg and flour mixtures.
- Meat thermometer: Optional, but great for checking oil temperature.
- Paper towels: For draining excess oil after frying.
Variations
- Spicy Kick: Add more cayenne pepper or a splash of hot sauce to the egg mixture for an extra kick.
- Herb-Infused: Mix dried herbs like thyme or oregano into the flour for a fragrant twist.
- Gluten-Free Option: Substitute all-purpose flour with a gluten-free flour blend for a similar crunch.
- Asian Flair: Incorporate sesame seeds into the coating for a nutty flavor and added texture.
- Vegetarian Version: Replace chicken with firm tofu or cauliflower florets for a delicious plant-based alternative.
Serving Suggestions
- Classic Sides: Serve with crispy fries or a fresh coleslaw for a delightful crunch.
- Dipping Sauces: Pair with sweet chili sauce or a tangy ranch dressing for extra flavor.
- Refreshing Drink: Enjoy with a cold beer or a zesty lemonade to balance the spices.
- Presentation: Garnish with lemon wedges and extra parsley for a vibrant touch.
FAQs about Crispy Salt and Pepper Chicken
Can I use chicken breasts instead of thighs?
Absolutely! Chicken breasts can be used, but they may dry out more easily. Thighs are juicier and more forgiving, making them ideal for frying.
How can I make the chicken extra crispy?
For an extra crispy texture, try double-dipping the chicken in the egg and flour mixtures. Also, ensure the oil is hot enough before frying.
Can I prepare the chicken in advance?
Yes! You can coat the chicken ahead of time and refrigerate it. Just fry it when you’re ready to serve for that fresh, crispy experience.
What dipping sauces pair well with this dish?
Sweet chili sauce, ranch dressing, or even a spicy sriracha mayo make fantastic accompaniments to enhance the flavors of your Crispy Salt and Pepper Chicken.
Is this recipe suitable for meal prep?
Definitely! You can make a batch and store it in the fridge. Just reheat in the oven to maintain that crispy texture when you’re ready to enjoy.
Final Thoughts
Crispy Salt and Pepper Chicken is more than just a meal; it’s a celebration of flavor and texture that brings people together.
Advertisement
Each bite delivers a satisfying crunch, followed by juicy chicken that dances on your taste buds.
Whether you’re cooking for family or friends, this dish is sure to spark joy and create lasting memories.
It’s a recipe that invites creativity, allowing you to experiment with spices and flavors.
So, roll up your sleeves, embrace the process, and enjoy the delicious rewards of your culinary adventure.
Trust me, your taste buds will thank you!
PrintCrispy Salt and Pepper Chicken: Discover the Secret Crunch!
A delicious and crunchy recipe for Crispy Salt and Pepper Chicken, perfect for a satisfying meal.
- Prep Time: 15 minutes
- Cook Time: 15 minutes
- Total Time: 30 minutes
- Yield: 4 servings 1x
- Category: Main Course
- Method: Frying
- Cuisine: American
- Diet: Gluten Free
Ingredients
- 2 pounds chicken thighs, boneless and skinless
- 1 cup all-purpose flour
- 1 teaspoon salt
- 1 teaspoon black pepper
- 1 teaspoon garlic powder
- 1 teaspoon onion powder
- 1/2 teaspoon paprika
- 1/2 teaspoon cayenne pepper (optional for heat)
- 2 large eggs
- 1/4 cup milk
- Vegetable oil, for frying
- Fresh parsley, chopped (for garnish)
Instructions
- Begin by cutting the chicken thighs into bite-sized pieces and pat them dry with paper towels.
- In a large bowl, combine the flour, salt, black pepper, garlic powder, onion powder, paprika, and cayenne pepper. Mix well.
- In another bowl, whisk together the eggs and milk until fully combined.
- Dip each piece of chicken into the egg mixture, allowing any excess to drip off, then coat it in the flour mixture, pressing gently to ensure an even coating.
- Heat about 1 inch of vegetable oil in a large skillet over medium-high heat until it reaches 350°F.
- Carefully add the coated chicken pieces to the hot oil in batches, making sure not to overcrowd the pan. Fry for about 5-7 minutes per side or until golden brown and cooked through.
- Use a slotted spoon to transfer the fried chicken to a paper towel-lined plate to drain excess oil.
- Garnish with chopped parsley before serving.
Notes
- For added flavor, marinate the chicken pieces in buttermilk for a few hours or overnight before coating and frying.
- Experiment with different spices in the flour mixture, such as smoked paprika or Italian seasoning, to customize the flavor profile.
Nutrition
- Serving Size: 1 serving
- Calories: 450
- Sugar: 0g
- Sodium: 800mg
- Fat: 25g
- Saturated Fat: 5g
- Unsaturated Fat: 20g
- Trans Fat: 0g
- Carbohydrates: 30g
- Fiber: 1g
- Protein: 30g
- Cholesterol: 200mg