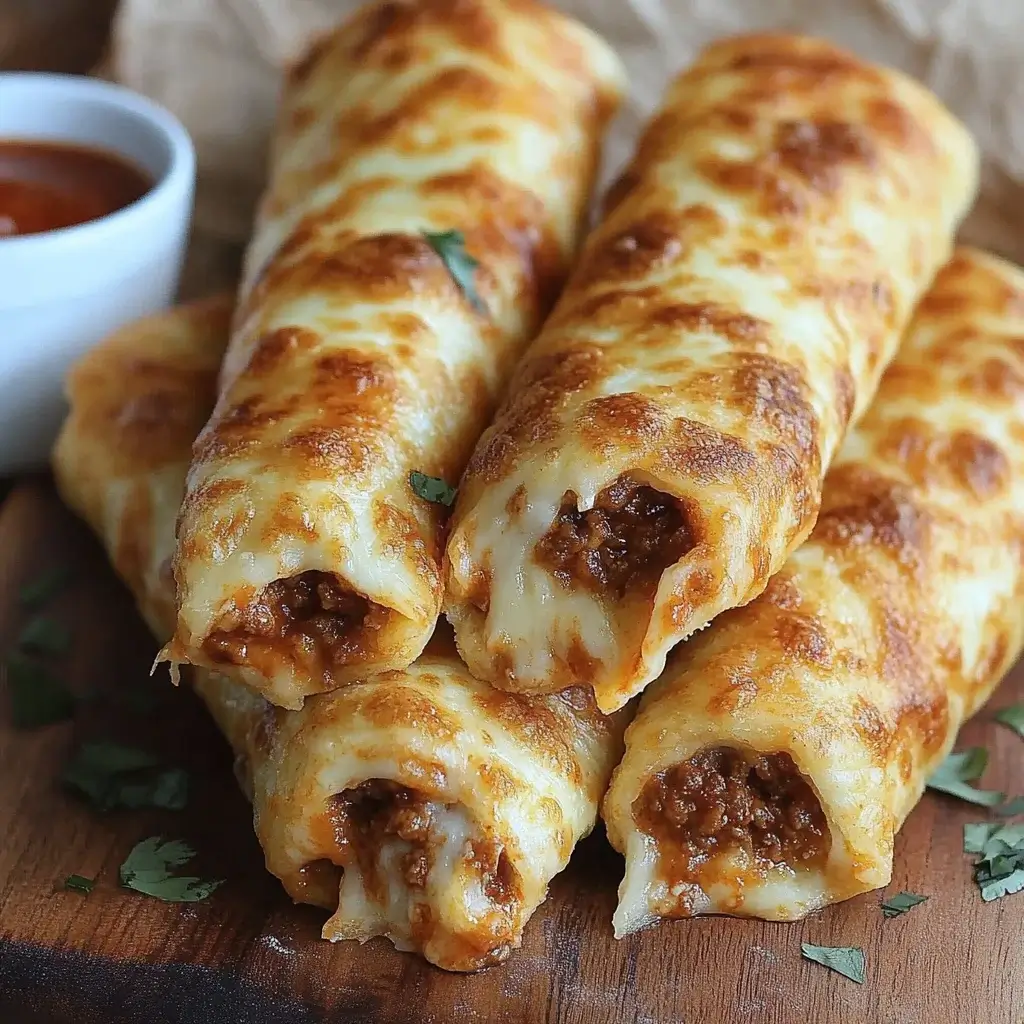
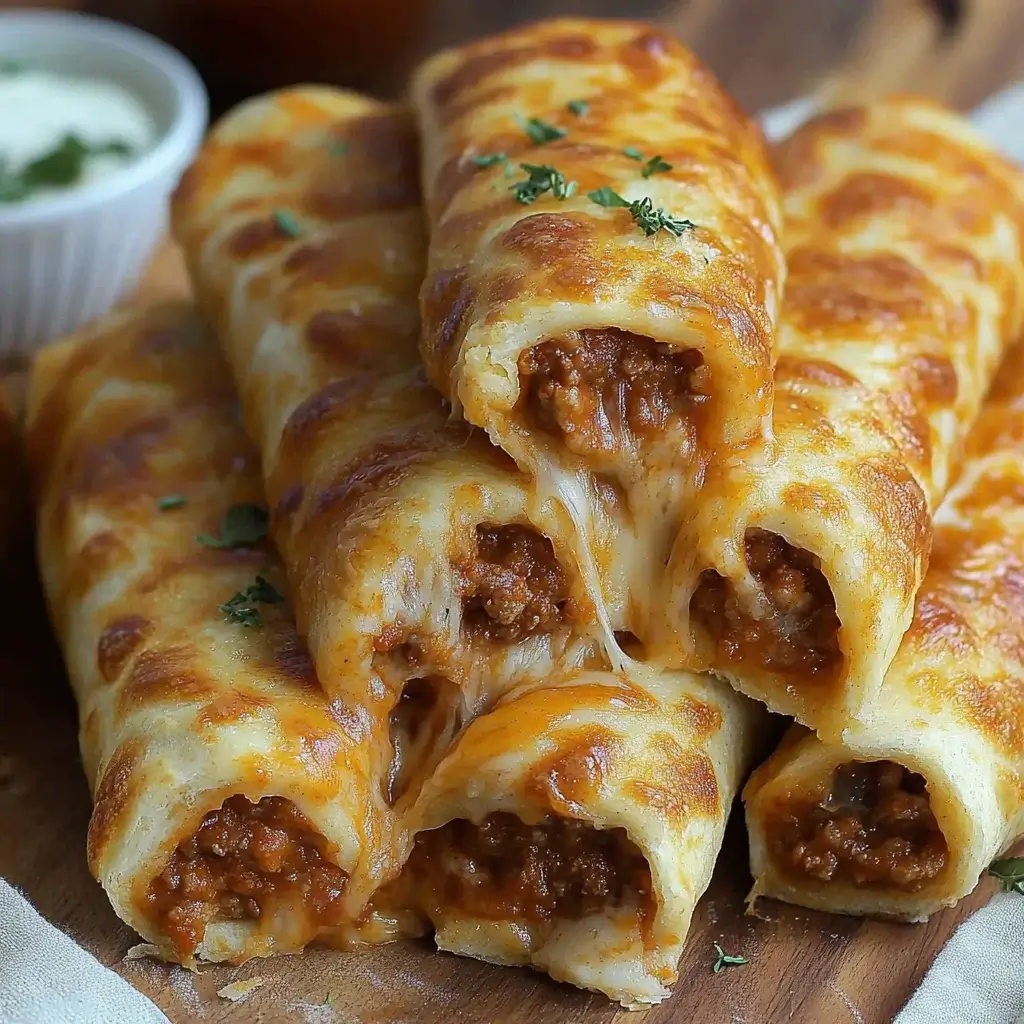
Introduction to Cheesy Taco Breadsticks
There’s something magical about the combination of cheese and tacos, isn’t there?
Cheesy Taco Breadsticks bring that delightful fusion right to your kitchen.
Whether you’re hosting friends for game night or just need a quick snack after a long day, these breadsticks are your go-to solution.
They’re easy to whip up, and the aroma that fills your home while they bake is simply irresistible.
Plus, who can resist that gooey, cheesy goodness?
Trust me, once you try these, they’ll become a staple in your recipe rotation.
Why You’ll Love This Cheesy Taco Breadsticks
These Cheesy Taco Breadsticks are a game-changer for busy weeknights.
They come together in just 30 minutes, making them perfect for those last-minute cravings.
The blend of savory beef, zesty salsa, and melty cheese creates a flavor explosion that will have everyone coming back for more.
Plus, they’re versatile enough to serve as an appetizer or a fun family dinner.
You’ll love how easy they are to make and how quickly they disappear!
Ingredients for Cheesy Taco Breadsticks
Creating these Cheesy Taco Breadsticks is a breeze, thanks to a handful of simple ingredients.
Here’s what you’ll need:
- Refrigerated crescent roll dough: This is the base of your breadsticks, providing a flaky, buttery texture.
- Cooked ground beef: Seasoned with taco seasoning, it adds that classic taco flavor. You can swap it for ground turkey or chicken for a leaner option.
- Shredded cheddar cheese: The star of the show! It melts beautifully and brings that cheesy goodness we all crave.
- Salsa: This adds a zesty kick and moisture, enhancing the overall flavor profile.
- Sliced black olives (optional): For those who enjoy a briny touch, olives add a nice contrast to the richness of the cheese.
- Chopped green onions (optional): These provide a fresh crunch and a pop of color, making your breadsticks even more appealing.
- Garlic powder: A sprinkle of this elevates the flavor, giving it that savory depth.
- Onion powder: Similar to garlic powder, it enhances the overall taste without overpowering the dish.
- Cooking spray: A quick spray on your baking sheet ensures your breadsticks won’t stick, making cleanup a breeze.
For exact measurements, check the bottom of the article where you can find everything listed for easy printing.
With these ingredients, you’re just a few steps away from a delicious snack that’s sure to impress!
How to Make Cheesy Taco Breadsticks
Making Cheesy Taco Breadsticks is a fun and straightforward process.
Follow these steps, and you’ll have a delicious snack ready in no time!
Step 1: Preheat the Oven
Start by preheating your oven to 375°F (190°C).
This step is crucial because it ensures your breadsticks bake evenly and achieve that golden-brown perfection.
While the oven heats up, lightly grease a baking sheet with cooking spray to prevent sticking.
Step 2: Prepare the Dough
Next, grab your refrigerated crescent roll dough.
Unroll it carefully and separate it into triangles.
Lay the triangles out on the baking sheet, slightly overlapping them to form a rectangle.
This creates a solid base for your cheesy goodness.
Step 3: Season the Dough
Now, it’s time to seal the seams of the dough.
Press them together gently to create a uniform surface.
Sprinkle garlic powder and onion powder evenly over the dough.
These spices add a savory kick that enhances the overall flavor of your Cheesy Taco Breadsticks.
Step 4: Add the Filling
Spread the cooked ground beef evenly over the dough.
Make sure it’s seasoned well with taco seasoning for that authentic taste.
Next, layer on the salsa, followed by a generous amount of shredded cheddar cheese.
If you’re using black olives and green onions, sprinkle them on top for added flavor and texture.
Step 5: Roll and Slice
Starting from one end, carefully roll the dough up into a log shape.
Pinch the seams to seal it tightly, ensuring none of that delicious filling escapes.
Once rolled, slice the log into 1-inch thick pieces.
Arrange them cut-side up on the baking sheet, ready for baking.
Step 6: Bake to Perfection
Pop the baking sheet into the preheated oven.
Bake for 15-20 minutes, or until the breadsticks are golden brown and the cheese is melted.
Keep an eye on them; the aroma will be hard to resist!
Once done, allow them to cool slightly before serving.
Enjoy your warm, cheesy taco breadsticks!
Tips for Success
- Use fresh ingredients for the best flavor; fresh salsa and quality cheese make a difference.
- Don’t rush the rolling process; a tight roll ensures the filling stays inside.
- Experiment with spices; add cumin or chili powder for an extra kick.
- Let the breadsticks cool for a few minutes before serving to avoid burns.
- Pair with your favorite dipping sauce for an added flavor boost.
Equipment Needed
- Baking sheet: A standard sheet works, but a stone or cast-iron pan can enhance browning.
- Mixing bowl: For combining your filling ingredients; any bowl will do.
- Rolling pin: Optional, but it helps if you want a more uniform dough.
- Knife: For slicing the rolled dough into pieces.
Variations
- Spicy Kick: Add diced jalapeños or a splash of hot sauce to the filling for a fiery twist.
- Vegetarian Option: Substitute the ground beef with black beans or lentils for a hearty, meat-free version.
- Cheese Lovers: Mix different cheeses like pepper jack or mozzarella for a unique flavor profile.
- Herb Infusion: Incorporate fresh herbs like cilantro or parsley into the filling for a fresh taste.
- Gluten-Free: Use gluten-free crescent roll dough to accommodate dietary restrictions.
Serving Suggestions
- Pair with guacamole: The creamy texture complements the cheesy breadsticks perfectly.
- Serve with a side salad: A fresh salad adds a nice crunch and balances the richness.
- Offer a variety of dips: Salsa, sour cream, or ranch dressing can elevate the experience.
- Presentation: Arrange on a colorful platter and garnish with fresh cilantro for a pop of color.
FAQs about Cheesy Taco Breadsticks
Can I make Cheesy Taco Breadsticks ahead of time?
Absolutely! You can prepare the filling and roll the dough in advance. Just store them separately in the fridge. When you’re ready to bake, simply assemble and pop them in the oven.
What can I use instead of ground beef?
If you’re looking for alternatives, ground turkey or chicken works well. For a vegetarian option, try black beans or lentils. They’ll still pack a flavorful punch!
How do I store leftovers?
Store any leftover Cheesy Taco Breadsticks in an airtight container in the fridge. They’ll stay fresh for up to three days. Reheat them in the oven for the best texture.
Can I freeze these breadsticks?
Yes! You can freeze them before baking. Just wrap them tightly in plastic wrap and foil. When you’re ready to enjoy, bake them straight from the freezer, adding a few extra minutes to the cooking time.
What dips pair well with Cheesy Taco Breadsticks?
These breadsticks are fantastic with guacamole, salsa, or sour cream. Each dip adds a unique flavor that complements the cheesy goodness perfectly!
Final Thoughts
Creating Cheesy Taco Breadsticks is more than just cooking; it’s about bringing people together.
The joy of pulling a tray of golden, cheesy goodness from the oven is unmatched.
Advertisement
Each bite is a delightful blend of flavors that sparks nostalgia and excitement.
Whether you’re sharing them with friends during a game or enjoying a cozy night in, these breadsticks are sure to impress.
They’re quick, easy, and oh-so-satisfying.
So, roll up your sleeves and dive into this delicious adventure.
Trust me, once you make these, they’ll become a cherished favorite in your home!
PrintCheesy Taco Breadsticks: A Must-Try Recipe Today!
Cheesy Taco Breadsticks are a delicious and easy-to-make snack or appetizer that combines the flavors of tacos with cheesy goodness.
- Prep Time: 10 minutes
- Cook Time: 20 minutes
- Total Time: 30 minutes
- Yield: Serves 4
- Category: Appetizer
- Method: Baking
- Cuisine: Mexican
- Diet: Low Calorie
Ingredients
- 1 can (8 oz) refrigerated crescent roll dough
- 1 cup cooked ground beef (seasoned with taco seasoning)
- 1 cup shredded cheddar cheese
- 1/2 cup salsa
- 1/4 cup sliced black olives (optional)
- 1/4 cup chopped green onions (optional)
- 1 teaspoon garlic powder
- 1 teaspoon onion powder
- Cooking spray
Instructions
- Preheat the oven to 375°F (190°C). Lightly grease a baking sheet with cooking spray.
- Unroll the crescent roll dough and separate it into triangles. Lay the triangles out on the baking sheet, slightly overlapping them to form a rectangle.
- Press the seams of the dough together to seal. Sprinkle garlic powder and onion powder evenly over the dough.
- Spread the cooked ground beef evenly over the dough, followed by the salsa, cheddar cheese, black olives, and green onions if using.
- Starting from one end, carefully roll the dough up into a log shape, pinching the seams to seal.
- Slice the log into 1-inch thick pieces and arrange them cut-side up on the baking sheet.
- Bake for 15-20 minutes or until golden brown and the cheese is melted.
- Allow to cool slightly before serving. Enjoy warm!
Notes
- For a spicier version, add diced jalapeños to the filling.
- Substitute ground turkey or chicken for a leaner protein option.
Nutrition
- Serving Size: 1 piece
- Calories: 320
- Sugar: 2g
- Sodium: 600mg
- Fat: 22g
- Saturated Fat: 10g
- Unsaturated Fat: 8g
- Trans Fat: 0g
- Carbohydrates: 18g
- Fiber: 1g
- Protein: 18g
- Cholesterol: 50mg