Introduction to Cheesy Beef Taco Braid
There’s something magical about a dish that brings everyone together, and the Cheesy Beef Taco Braid does just that. I remember the first time I made it for friends; the aroma filled the kitchen, and their eyes lit up with anticipation. This recipe is perfect for those busy weeknights when you want to whip up something impressive without spending hours in the kitchen. With its flaky crust and savory filling, it’s a guaranteed crowd-pleaser. Whether you’re hosting a game night or just looking to treat your family, this taco braid is sure to wow your guests!
Why You’ll Love This Cheesy Beef Taco Braid
This Cheesy Beef Taco Braid is a game-changer for any home cook. It’s incredibly easy to make, taking just 40 minutes from start to finish. The combination of cheesy goodness and seasoned beef wrapped in flaky dough is simply irresistible. Plus, it’s versatile! You can customize it with your favorite toppings or even switch up the protein. It’s a delicious way to impress without the stress!
Ingredients for Cheesy Beef Taco Braid
Gathering the right ingredients is the first step to creating your Cheesy Beef Taco Braid. Here’s what you’ll need:
- Ground beef: The star of the show! It provides a hearty base and absorbs all those delicious taco flavors.
- Taco seasoning mix: This blend of spices adds that classic taco taste. Feel free to use homemade seasoning for a personal touch.
- Shredded cheddar cheese: A must for that gooey, melty goodness. It brings a sharp flavor that pairs perfectly with the beef.
- Shredded Monterey Jack cheese: This cheese adds creaminess and a mild flavor, balancing the sharper cheddar.
- Refrigerated crescent roll dough: The flaky, buttery crust that wraps everything together. It’s quick and easy, making it a favorite for busy cooks.
- Diced tomatoes: These add freshness and a bit of moisture to the filling. Make sure to drain them well to avoid sogginess.
- Sliced black olives (optional): For those who love a briny kick, olives add a nice contrast to the richness of the cheese and beef.
- Chopped green onions (optional): These provide a pop of color and a mild onion flavor that brightens the dish.
- Egg (beaten, for egg wash): This gives the braid a beautiful golden finish when baked, making it look as good as it tastes.
For exact measurements, check the bottom of the article where you can find everything listed for easy printing. Happy cooking!
How to Make Cheesy Beef Taco Braid
Creating your Cheesy Beef Taco Braid is a fun and straightforward process. Follow these steps, and you’ll have a delicious dish ready to impress in no time!
Step 1: Preheat the Oven
Start by preheating your oven to 375°F. This step is crucial because it ensures even cooking. A hot oven helps the dough rise beautifully, giving you that perfect flaky texture.
Step 2: Cook the Ground Beef
In a skillet over medium heat, brown the ground beef until it’s fully cooked. Use a wooden spoon to break it apart as it cooks. Once browned, drain any excess fat. This keeps your braid from becoming greasy and allows the flavors to shine.
Step 3: Add Taco Seasoning
Next, stir in the taco seasoning mix according to the package instructions. Usually, this involves adding a bit of water and letting it simmer for a few minutes. For an extra flavor boost, consider adding a pinch of garlic powder or some chopped jalapeños to the mix!
Step 4: Prepare the Crescent Roll Dough
On a large baking sheet, unroll the refrigerated crescent roll dough. Pinch the seams together to form a rectangle. This will be the base of your braid, so make sure it’s nice and even.
Step 5: Make Diagonal Cuts
Using a knife or pizza cutter, make diagonal cuts along the sides of the dough, about 1 inch apart. Leave the center intact. These cuts are essential for creating that beautiful braid effect, allowing the filling to peek through.
Step 6: Fill the Dough
Spread the cooked beef mixture down the center of the dough. Then, layer on the shredded cheddar and Monterey Jack cheese, diced tomatoes, and any optional toppings like olives or green onions. This layering ensures every bite is packed with flavor!
Step 7: Create the Braid
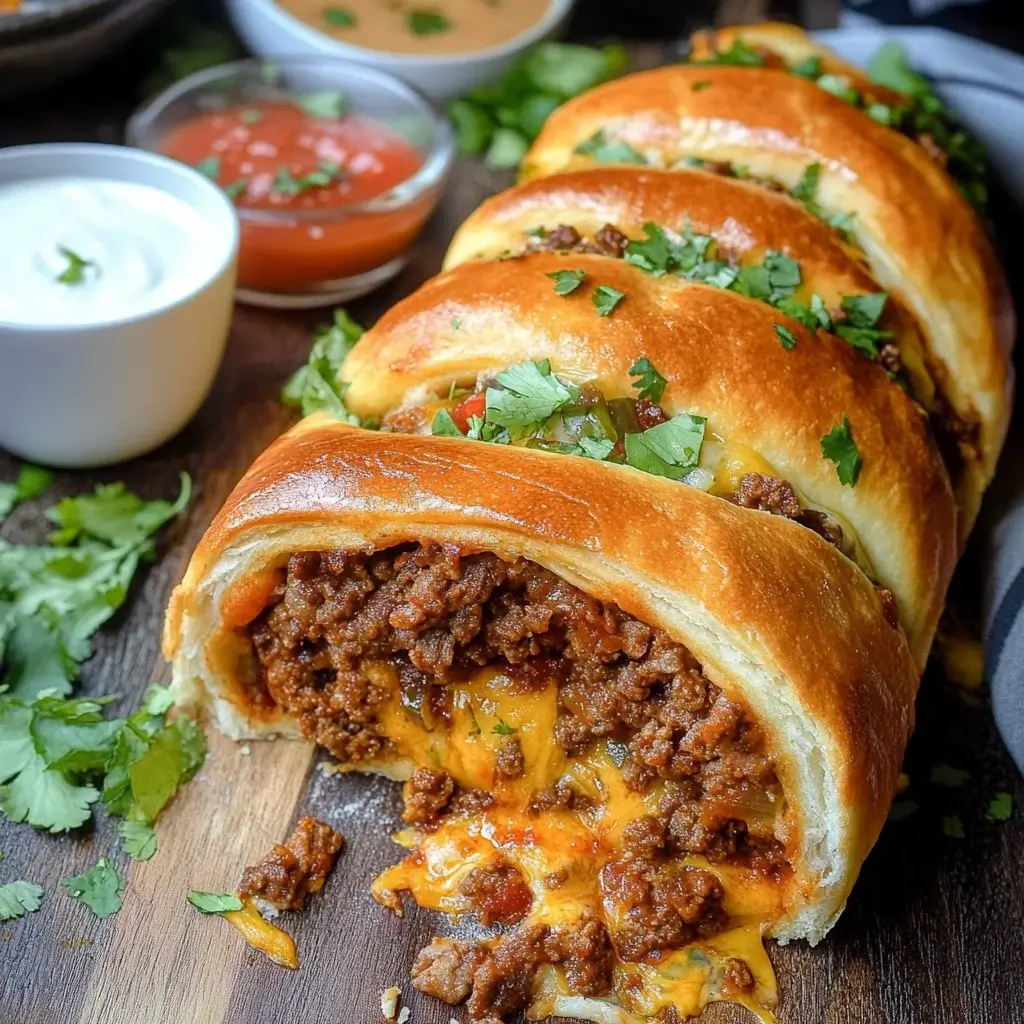
Now comes the fun part! Fold the strips of dough over the filling, alternating sides to create a braid pattern. Pinch the ends to seal everything in. This not only looks great but keeps all that cheesy goodness from escaping.
Step 8: Brush with Egg Wash
Brush the top of the braid with the beaten egg. This egg wash gives your braid a beautiful golden finish when baked, making it as appealing to the eyes as it is to the taste buds.
Step 9: Bake the Braid
Place your braid in the preheated oven and bake for 20-25 minutes. Keep an eye on it! You’ll know it’s done when the dough is golden brown and flaky. A quick poke with a toothpick can help check if the filling is hot throughout.
Step 10: Cool and Slice
Once baked, allow the braid to cool for a few minutes before slicing. This cooling time helps the filling set a bit, making for cleaner slices. Plus, it gives you a moment to savor the delicious aroma wafting through your kitchen!
Tips for Success
- Make sure to drain the ground beef well to avoid a soggy braid.
- Experiment with different cheeses for unique flavors; pepper jack adds a nice kick!
- Don’t rush the cooling process; it helps with slicing and presentation.
- For a crispy bottom, place the braid on a preheated baking sheet.
- Feel free to prep the filling ahead of time for a quicker assembly!
Equipment Needed
- Skillet: A non-stick skillet works best for browning the beef.
- Baking sheet: A standard baking sheet will do, but a stone or cast iron can enhance crispiness.
- Knife or pizza cutter: For making those diagonal cuts in the dough.
- Mixing spoon: To stir the beef and seasoning together.
Variations
- Spicy Taco Braid: Add chopped jalapeños or use a spicy taco seasoning for a kick that’ll wake up your taste buds.
- Vegetarian Option: Substitute the ground beef with black beans or lentils for a hearty, meat-free version.
- Cheese Lovers: Mix in additional cheeses like pepper jack or feta for a flavor explosion.
- Gluten-Free: Use gluten-free crescent roll dough or a gluten-free pizza crust for a safe alternative.
- Breakfast Braid: Swap the beef for scrambled eggs, breakfast sausage, and cheese for a delicious morning twist.
Serving Suggestions
- Fresh Salsa: Serve with a side of homemade salsa for a zesty kick.
- Guacamole: Creamy guacamole pairs perfectly with the braid’s flavors.
- Chips: Tortilla chips add a satisfying crunch alongside your braid.
- Cold Beverages: Pair with a cold beer or a refreshing margarita.
- Garnish: Top with extra green onions or cilantro for a pop of color.
FAQs about Cheesy Beef Taco Braid
Can I make the Cheesy Beef Taco Braid ahead of time?
Absolutely! You can prepare the filling and assemble the braid a few hours in advance. Just cover it and refrigerate until you’re ready to bake. This makes it a perfect option for entertaining!
What can I substitute for ground beef?
If you’re looking for alternatives, ground turkey or chicken works well. For a vegetarian twist, try black beans or lentils. Each option brings its own unique flavor to the Cheesy Beef Taco Braid!
How do I store leftovers?
Store any leftovers in an airtight container in the fridge for up to three days. Reheat in the oven for a few minutes to restore that crispy texture.
Can I freeze the Cheesy Beef Taco Braid?
Yes! You can freeze the assembled braid before baking. Just wrap it tightly in plastic wrap and foil. When you’re ready to enjoy, bake it straight from the freezer, adding a few extra minutes to the cooking time.
What sides pair well with the Cheesy Beef Taco Braid?
Consider serving it with a fresh salad, tortilla chips, or a side of guacamole. These sides complement the flavors beautifully and make for a well-rounded meal!
Final Thoughts
Making a Cheesy Beef Taco Braid is more than just cooking; it’s about creating memories. The joy of pulling a golden, flaky braid from the oven, the aroma wafting through the air, and the smiles on your friends’ faces as they take that first bite—it’s priceless. This dish is a celebration of flavors and togetherness, perfect for any occasion. Whether it’s a casual weeknight dinner or a festive gathering, this taco braid brings everyone to the table. So roll up your sleeves, embrace the fun, and enjoy the deliciousness that awaits!
Advertisement
Cheesy Beef Taco Braid: An Easy Recipe to Wow Guests!
A delicious and easy-to-make Cheesy Beef Taco Braid that is sure to impress your guests.
- Prep Time: 15 minutes
- Cook Time: 25 minutes
- Total Time: 40 minutes
- Yield: 6 servings 1x
- Category: Main Dish
- Method: Baking
- Cuisine: Mexican
- Diet: Low Calorie
Ingredients
- 1 pound ground beef
- 1 packet taco seasoning mix
- 1 cup shredded cheddar cheese
- 1 cup shredded Monterey Jack cheese
- 1 can (8 ounces) refrigerated crescent roll dough
- 1/2 cup diced tomatoes (drained)
- 1/4 cup sliced black olives (optional)
- 1/4 cup chopped green onions (optional)
- 1 egg (beaten, for egg wash)
Instructions
- Preheat the oven to 375°F.
- In a skillet over medium heat, brown the ground beef until fully cooked. Drain any excess fat.
- Stir in the taco seasoning mix and follow package instructions, usually adding water and simmering for a few minutes. Remove from heat and let cool slightly.
- On a large baking sheet, unroll the crescent roll dough and pinch the seams together to form a rectangle.
- Use a knife or pizza cutter to make diagonal cuts along the sides of the dough, about 1 inch apart, leaving the center intact.
- Spread the cooked beef mixture down the center of the dough.
- Top with shredded cheddar cheese, Monterey Jack cheese, diced tomatoes, black olives, and green onions if using.
- Fold the strips of dough over the filling, alternating sides to create a braid pattern. Pinch the ends to seal.
- Brush the top of the braid with the beaten egg for a golden finish.
- Bake in the preheated oven for 20-25 minutes or until the dough is golden brown.
- Allow to cool for a few minutes before slicing.
Notes
- For added flavor, consider mixing in some chopped jalapeños or using a spicy taco seasoning.
- You can also substitute the ground beef with ground turkey or chicken for a lighter option.
Nutrition
- Serving Size: 1 slice
- Calories: 320
- Sugar: 2g
- Sodium: 600mg
- Fat: 22g
- Saturated Fat: 10g
- Unsaturated Fat: 8g
- Trans Fat: 0g
- Carbohydrates: 12g
- Fiber: 1g
- Protein: 20g
- Cholesterol: 70mg


