Baked Caesar Chicken
What Makes Baked Caesar Chicken Special?
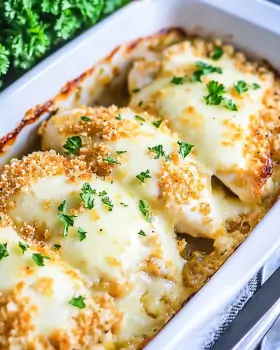
Baked Caesar Chicken is a delightful dish that combines the classic flavors of Caesar salad with juicy chicken breasts. What makes this recipe truly special is its simplicity and the rich, creamy taste of the Caesar dressing. The crispy panko breadcrumbs and Parmesan cheese create a delicious crust that adds texture to each bite. This dish is not only easy to prepare but also offers a satisfying meal that can please the whole family. Plus, it’s a great way to enjoy the beloved Caesar salad flavors in a new and exciting way!
The Popularity of Baked Caesar Chicken in Home Cooking
Baked Caesar Chicken has gained immense popularity in home cooking for several reasons. First, it’s a one-dish meal, which means less cleanup after dinner. Busy families appreciate recipes that save time without sacrificing flavor. Additionally, the ingredients are often pantry staples, making it easy to whip up on a weeknight. The dish is versatile, allowing cooks to customize it with various vegetables or proteins. This adaptability, combined with its delicious taste, makes Baked Caesar Chicken a favorite among home cooks everywhere.
Ingredients for Baked Caesar Chicken
To create a mouthwatering Baked Caesar Chicken, you’ll need a few simple ingredients. Each component plays a vital role in delivering that classic Caesar flavor while ensuring the chicken remains juicy and tender. Here’s what you’ll need:
- 2 large chicken breasts (about 1.5 pounds) – Choose fresh, high-quality chicken for the best results.
- 1 cup Caesar salad dressing – This is the star of the dish, providing rich flavor and moisture.
- 1 cup shredded Parmesan cheese – Adds a savory, cheesy element that complements the dressing.
- 1 cup panko breadcrumbs – These breadcrumbs create a delightful crunch on top of the chicken.
- 1 teaspoon garlic powder – Enhances the overall flavor with a hint of garlic.
- 1 teaspoon onion powder – Adds depth and sweetness to the dish.
- 1 teaspoon dried parsley – Provides a touch of color and a mild herbal flavor.
- Salt and pepper to taste – Essential for seasoning the chicken perfectly.
- Fresh parsley, chopped (for garnish) – A fresh touch that brightens up the dish before serving.
These ingredients come together to create a delicious meal that’s sure to impress. Feel free to adjust the quantities based on your taste preferences or dietary needs. For a lighter version, consider using Greek yogurt instead of Caesar dressing. This swap not only reduces calories but also adds a creamy texture. You can also sneak in some spinach or kale under the chicken for an extra boost of nutrition. With these ingredients, you’re well on your way to making a delightful Baked Caesar Chicken!
Step-by-Step Preparation of Baked Caesar Chicken
Step 1: Preparing the Chicken
To start, you need to prepare the chicken breasts. First, rinse them under cold water and pat them dry with paper towels. This step is important as it helps the seasoning stick better. Next, place the chicken breasts on a cutting board. If they are very thick, consider slicing them in half horizontally. This will help them cook evenly and faster. Once prepared, season both sides of the chicken with salt and pepper. This simple seasoning enhances the flavor of the chicken, making it even more delicious.
Step 2: Making the Caesar Dressing
Now, let’s move on to the Caesar dressing. In a mixing bowl, combine the Caesar salad dressing, garlic powder, onion powder, salt, and pepper. Use a whisk or a fork to mix everything together until it’s well blended. This mixture will coat the chicken, infusing it with flavor. If you want to make a lighter version, you can substitute Greek yogurt for the Caesar dressing. This swap not only cuts calories but also adds a creamy texture that pairs well with the chicken.
Step 3: Assembling the Baked Caesar Chicken
With the chicken and dressing ready, it’s time to assemble the dish. Place the seasoned chicken breasts in the greased baking dish. Pour the Caesar dressing mixture over the chicken, ensuring each piece is well coated. This step is crucial as it allows the flavors to penetrate the chicken. In a separate bowl, mix the panko breadcrumbs, shredded Parmesan cheese, dried parsley, and a pinch of salt and pepper. Stir until everything is evenly combined. Then, sprinkle this breadcrumb mixture over the chicken, pressing down gently to help it stick. This will create a crispy topping that contrasts beautifully with the tender chicken.
Step 4: Baking the Chicken to Perfection
Finally, it’s time to bake the chicken! Place the baking dish in the preheated oven at 400°F. Bake for 25-30 minutes, or until the chicken is cooked through and the breadcrumbs are golden brown. To ensure the chicken is done, check that its internal temperature reaches 165°F. Once baked, remove the dish from the oven and let it rest for about 5 minutes. This resting time allows the juices to redistribute, keeping the chicken moist. Before serving, garnish with fresh chopped parsley for a pop of color and flavor. Now, your Baked Caesar Chicken is ready to be enjoyed!
Variations of Baked Caesar Chicken

Adding Vegetables to Baked Caesar Chicken
One of the best things about Baked Caesar Chicken is its versatility. You can easily add vegetables to enhance both flavor and nutrition. For instance, consider layering fresh spinach or kale under the chicken before adding the dressing. These greens will wilt slightly during baking, adding a lovely texture and a boost of vitamins. You can also include sliced bell peppers, zucchini, or cherry tomatoes. Simply toss them in olive oil, salt, and pepper, and spread them around the chicken in the baking dish. This not only makes the dish more colorful but also creates a complete meal in one pan!
Alternative Proteins for Baked Caesar Chicken
If you’re looking to switch things up, try using alternative proteins in your Baked Caesar Chicken. For example, turkey breasts or chicken thighs can be great substitutes. Turkey offers a leaner option, while chicken thighs provide a richer flavor due to their higher fat content. You can also experiment with fish, such as salmon or tilapia. Just adjust the cooking time, as fish cooks faster than chicken. These alternatives can bring new flavors to the table while still keeping the essence of the beloved Caesar dish. No matter which protein you choose, the creamy dressing and crunchy topping will still shine through!
Cooking Note for Baked Caesar Chicken
When preparing Baked Caesar Chicken, there are a few important cooking notes to keep in mind. First, always ensure your oven is fully preheated to 400°F before placing the chicken inside. This step is crucial for achieving that perfect golden-brown crust on the breadcrumbs. If the oven isn’t hot enough, the chicken may cook unevenly, leading to a less desirable texture.
Next, consider the thickness of your chicken breasts. If they are particularly thick, they may require a few extra minutes in the oven. To avoid undercooked chicken, use a meat thermometer to check the internal temperature. Remember, it should reach 165°F for safe consumption. If you don’t have a thermometer, you can cut into the thickest part of the chicken to ensure it’s no longer pink inside.
Another tip is to let the chicken rest for about 5 minutes after baking. This resting period allows the juices to redistribute throughout the meat, making it more tender and juicy. If you cut into the chicken too soon, you might lose those delicious juices, resulting in a drier dish.
Lastly, feel free to experiment with the cooking time based on your oven’s performance. Every oven is different, and some may cook faster than others. Keep an eye on the chicken as it bakes, and adjust the time as needed. With these cooking notes in mind, you’ll be well on your way to creating a delicious Baked Caesar Chicken that’s sure to impress!
Serving Suggestions for Baked Caesar Chicken
Side Dishes that Pair Well with Baked Caesar Chicken
When it comes to serving Baked Caesar Chicken, choosing the right side dishes can elevate your meal. Here are some delicious options that complement the flavors of the chicken:
- Garlic Mashed Potatoes: Creamy mashed potatoes with a hint of garlic make a comforting side. Their smooth texture pairs perfectly with the crispy chicken.
- Roasted Vegetables: A mix of seasonal vegetables like carrots, broccoli, and bell peppers adds color and nutrition. Roasting brings out their natural sweetness.
- Caesar Salad: Keep the Caesar theme going with a fresh Caesar salad. Crisp romaine lettuce, croutons, and a sprinkle of Parmesan will enhance the meal.
- Quinoa or Rice: A side of fluffy quinoa or rice can soak up the delicious juices from the chicken. Consider adding herbs for extra flavor.
- Steamed Asparagus: Lightly steamed asparagus adds a touch of elegance. Its bright green color and mild flavor balance the richness of the chicken.
These side dishes not only complement the Baked Caesar Chicken but also create a well-rounded meal. Feel free to mix and match based on your preferences and what you have on hand!
Creative Ways to Serve Baked Caesar Chicken
Serving Baked Caesar Chicken can be fun and creative! Here are some ideas to make your presentation stand out:
- Chicken Sandwiches: Slice the baked chicken and serve it on a toasted bun with lettuce and extra Caesar dressing. This makes for a delicious sandwich option!
- Wraps: Use tortillas to create wraps. Add sliced chicken, fresh greens, and a drizzle of dressing for a quick and tasty meal.
- Stuffed Peppers: Hollow out bell peppers and fill them with shredded Baked Caesar Chicken, quinoa, and cheese. Bake until the peppers are tender for a unique dish.
- Salad Bowls: Chop the chicken and toss it into a salad bowl with mixed greens, cherry tomatoes, and cucumbers. Top with Caesar dressing for a refreshing meal.
- Skewers: Cut the chicken into cubes and thread them onto skewers with vegetables. Grill or bake for a fun finger food option.
These creative serving ideas not only make your meal more exciting but also allow you to enjoy Baked Caesar Chicken in different ways. Whether you’re hosting a dinner party or enjoying a family meal, these suggestions will impress your guests and family alike!
Tips for Perfecting Baked Caesar Chicken
Common Mistakes to Avoid
When making Baked Caesar Chicken, avoiding common mistakes can make a big difference in the final dish. Here are some pitfalls to watch out for:
- Not Preheating the Oven: Always preheat your oven to 400°F before baking. This ensures even cooking and a crispy topping.
- Skipping the Seasoning: Don’t forget to season the chicken with salt and pepper. This simple step enhances the overall flavor.
- Using Thick Chicken Breasts: If your chicken breasts are too thick, they may not cook evenly. Consider slicing them in half for quicker cooking.
- Overbaking the Chicken: Keep an eye on the chicken as it bakes. Overcooking can lead to dry meat. Use a meat thermometer to check for doneness.
- Not Letting It Rest: Allow the chicken to rest for about 5 minutes after baking. This helps the juices redistribute, keeping the chicken moist.
By avoiding these common mistakes, you’ll be on your way to creating a delicious Baked Caesar Chicken that everyone will love!
Enhancing Flavor in Baked Caesar Chicken
To take your Baked Caesar Chicken to the next level, consider these flavor-enhancing tips:
- Marinate the Chicken: For extra flavor, marinate the chicken in Caesar dressing for a few hours or overnight. This allows the flavors to penetrate deeply.
- Add Fresh Herbs: Incorporate fresh herbs like basil or thyme into the breadcrumb mixture. This adds a burst of freshness to the dish.
- Use Different Cheeses: Experiment with different cheeses, such as mozzarella or feta, for a unique twist on the classic flavor.
- Incorporate Spices: Add a pinch of red pepper flakes or smoked paprika to the breadcrumb mixture for a hint of heat and smokiness.
- Finish with a Squeeze of Lemon: Just before serving, squeeze fresh lemon juice over the chicken. This brightens the flavors and adds a refreshing touch.
These tips will help you enhance the flavor of your Baked Caesar Chicken, making it even more delicious and memorable. Enjoy experimenting with different ingredients to find your perfect combination!
Breakdown of Time for Baked Caesar Chicken
Prep Time for Baked Caesar Chicken
Preparing Baked Caesar Chicken is quick and easy! You can expect to spend about 15-20 minutes on prep. This includes gathering your ingredients, washing and seasoning the chicken, and mixing the dressing. If you decide to add vegetables or make any variations, you might need a few extra minutes. However, this time is minimal compared to the delicious meal you’ll create!
Cooking Time for Baked Caesar Chicken
The cooking time for Baked Caesar Chicken is approximately 25-30 minutes. During this time, the chicken will bake in the oven at 400°F. It’s essential to keep an eye on the chicken as it cooks. You want the breadcrumbs to turn golden brown and the chicken to reach an internal temperature of 165°F. Using a meat thermometer can help ensure perfect doneness!
Total Time for Baked Caesar Chicken
In total, you’ll need about 40-50 minutes to make Baked Caesar Chicken from start to finish. This includes both prep and cooking time. With such a reasonable time commitment, you can enjoy a delicious, homemade meal without spending hours in the kitchen. It’s perfect for busy weeknights or when you want to impress guests with minimal effort!
Nutritional Information for Baked Caesar Chicken
Calories in Baked Caesar Chicken
When it comes to enjoying a delicious meal, knowing the calorie content is essential. Each serving of Baked Caesar Chicken contains approximately 400 calories. This makes it a satisfying option for dinner without going overboard on calories. The combination of chicken, Caesar dressing, and cheese provides a hearty meal that can keep you feeling full and satisfied.
Protein Content in Baked Caesar Chicken
Protein is a vital nutrient for our bodies, and Baked Caesar Chicken delivers a generous amount. Each serving contains about 35 grams of protein. This high protein content is primarily from the chicken, making it an excellent choice for those looking to build muscle or maintain a healthy diet. Including protein in your meals can help you feel fuller for longer, making it easier to resist unhealthy snacks.
Sodium Levels in Baked Caesar Chicken
While Baked Caesar Chicken is delicious, it’s important to be mindful of sodium levels. Each serving contains around 800 milligrams of sodium. This amount can vary based on the Caesar dressing and cheese used. If you’re watching your sodium intake, consider using low-sodium dressing or cheese alternatives. Balancing your meals with fresh vegetables can also help offset sodium levels while adding essential nutrients.
FAQs about Baked Caesar Chicken
Can I use frozen chicken for Baked Caesar Chicken?
Yes, you can use frozen chicken for Baked Caesar Chicken! However, it’s important to thaw the chicken completely before cooking. Cooking frozen chicken directly can lead to uneven cooking and may result in a longer cooking time. To thaw, simply place the chicken in the refrigerator overnight or use the defrost setting on your microwave. Once thawed, follow the recipe as usual for a delicious meal!
Advertisement
What can I substitute for Caesar dressing in Baked Caesar Chicken?
If you’re looking for a substitute for Caesar dressing, there are several options! You can use Greek yogurt mixed with lemon juice, garlic, and a bit of Parmesan cheese for a lighter version. Another option is to use ranch dressing or a homemade vinaigrette. These alternatives will still provide flavor while allowing you to customize the dish to your taste. Feel free to experiment and find the dressing that you enjoy the most!
How do I know when Baked Caesar Chicken is done?
To ensure your Baked Caesar Chicken is done, the best method is to check the internal temperature. Use a meat thermometer to check the thickest part of the chicken. It should read 165°F for safe consumption. Additionally, the breadcrumbs should be golden brown and crispy. If you don’t have a thermometer, you can cut into the chicken to check that it’s no longer pink inside. These steps will help you achieve perfectly cooked chicken every time!
Can I make Baked Caesar Chicken ahead of time?
Absolutely! You can prepare Baked Caesar Chicken ahead of time. Simply follow the recipe up to the baking step, then cover the dish and refrigerate it for up to 24 hours. When you’re ready to bake, just pop it in the oven. You may need to add a few extra minutes to the cooking time if it’s coming straight from the fridge. This makes it a great option for meal prep or when hosting guests!
Conclusion on Baked Caesar Chicken
Recap of the Benefits of Baked Caesar Chicken
Baked Caesar Chicken is not just a meal; it’s a delightful experience! This dish combines the rich flavors of Caesar salad with tender chicken, making it a family favorite. The simplicity of the recipe means you can whip it up on busy weeknights without stress. Plus, the crispy panko topping adds a satisfying crunch that everyone will love. With its high protein content and customizable ingredients, Baked Caesar Chicken is a nutritious option that can fit into various dietary needs. Whether you’re looking for a quick dinner or a dish to impress guests, this recipe has you covered!
Encouragement to Try Baked Caesar Chicken at Home
If you haven’t tried making Baked Caesar Chicken yet, now is the perfect time! Gather your ingredients and follow the simple steps to create a delicious meal that will leave everyone asking for seconds. Don’t hesitate to experiment with different vegetables or proteins to make it your own. Remember, cooking is all about creativity and enjoyment. So, roll up your sleeves, get in the kitchen, and enjoy the process. You’ll be amazed at how easy and rewarding it is to make this delightful dish at home. Happy cooking!