Introduction to Patriotic Oreo Balls
When I think of summer celebrations, my mind instantly drifts to those vibrant red, white, and blue treats that bring everyone together. That’s where these delightful Patriotic Oreo Balls come in. They’re not just easy to whip up; they’re a guaranteed crowd-pleaser.
Whether you’re hosting a backyard barbecue or heading to a potluck, these festive bites are the perfect solution for busy days. With just a few simple ingredients, you can create a dessert that looks as good as it tastes. Trust me, your friends and family will be asking for seconds!
Why You’ll Love This Patriotic Oreo Balls
These Patriotic Oreo Balls are a game-changer for any celebration.
They come together in no time, making them perfect for those last-minute gatherings.
The rich, creamy filling paired with a sweet chocolate coating is simply irresistible.
Plus, they’re versatile enough to suit any occasion, from Fourth of July parties to birthday bashes.
With minimal effort, you’ll impress your guests and satisfy your sweet tooth. What’s not to love?
Ingredients for Patriotic Oreo Balls
Creating these Patriotic Oreo Balls is a breeze, thanks to a handful of simple ingredients. Here’s what you’ll need:
- Oreo cookies: The star of the show! These chocolatey cookies provide the perfect base for our creamy filling.
- Cream cheese: This adds richness and a delightful tang to the mixture, making every bite melt in your mouth.
- Vanilla extract: A splash of this enhances the overall flavor, bringing warmth and sweetness to the mix.
- White chocolate chips: These are essential for coating the balls, giving them a smooth and sweet finish.
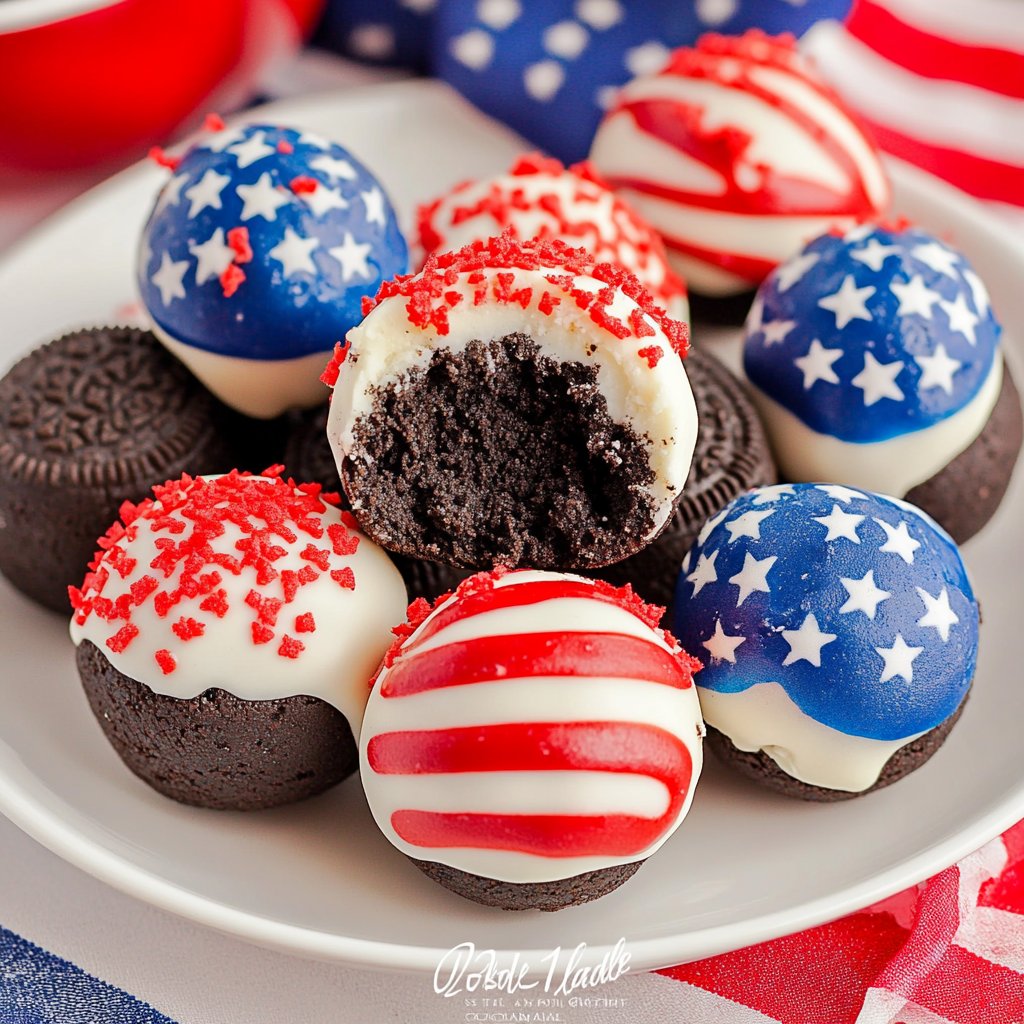
- Red candy melts: These add a pop of color and a fun drizzle that screams patriotism.
- Blue candy melts: Just like the red, these provide a vibrant touch to your festive treats.
- Sprinkles: Red, white, and blue sprinkles are the finishing touch, adding a festive crunch and visual appeal.
For those looking to make adjustments, consider using gluten-free Oreo cookies for a gluten-free version.
Feeling adventurous? A teaspoon of peppermint extract can add a refreshing twist to the filling.
Exact measurements for each ingredient can be found at the bottom of the article, ready for printing!
How to Make Patriotic Oreo Balls
Making these Patriotic Oreo Balls is as easy as pie, or should I say, as easy as a no-bake dessert! Follow these simple steps, and you’ll have a festive treat that’s sure to impress.
Step 1: Prepare the Mixture
Start by combining the crushed Oreo cookies, softened cream cheese, and vanilla extract in a mixing bowl.
Use a sturdy spatula or your hands to mix until a dough forms.
The mixture should be well combined and slightly sticky, perfect for rolling into balls.
Step 2: Shape the Balls
Now, it’s time to get your hands a little messy!
Roll the mixture into 1-inch balls, making sure they’re nice and round.
Place each ball on a baking sheet lined with parchment paper.
This step is crucial for easy cleanup later!
Step 3: Chill the Balls
Pop the baking sheet into the refrigerator for about 30 minutes.
This chilling time helps the Oreo balls firm up, making them easier to coat later.
Trust me, you want them to hold their shape!
Step 4: Melt the White Chocolate
While the balls are chilling, melt the white chocolate chips.
Use a microwave-safe bowl and heat them in 30-second intervals.
Stir between each interval until the chocolate is smooth and creamy.
This will be the delicious coating for your Oreo balls!
Step 5: Coat the Oreo Balls
Once the Oreo balls are chilled, it’s time for the fun part!
Dip each chilled ball into the melted white chocolate, ensuring it’s fully coated.
Let any excess chocolate drip off before returning them to the baking sheet.
This step adds a sweet layer that complements the rich filling.
Step 6: Add Colorful Drizzles
Next, melt the red and blue candy melts in separate microwave-safe bowls.
Just like the white chocolate, heat them in 30-second intervals until smooth.
Using a fork or piping bag, drizzle the melted red and blue candy over the white chocolate-coated Oreo balls.
This is where the festive magic happens!
Step 7: Decorate with Sprinkles
Before the candy coating sets, sprinkle the red, white, and blue sprinkles on top.
This adds a delightful crunch and a burst of color.
Be generous; after all, it’s a celebration!
Step 8: Final Chill
Finally, refrigerate the finished Oreo balls for at least 15 minutes.
This allows the chocolate to harden, ensuring your treats are ready to serve.
Once they’re set, you can enjoy your delicious Patriotic Oreo Balls!
Tips for Success
- Make sure your cream cheese is softened for easy mixing.
- Use a cookie scoop for uniform ball sizes; it saves time and ensures even coating.
- Chill the balls thoroughly to prevent them from falling apart during coating.
- Experiment with different sprinkles or toppings for a unique twist.
- Store any leftovers in an airtight container in the fridge for up to a week.
Equipment Needed
- Mixing bowl: A large bowl works best, but any bowl will do.
- Spatula: Use a sturdy spatula or your hands for mixing.
- Baking sheet: A standard baking sheet lined with parchment paper is essential.
- Microwave-safe bowls: For melting chocolate and candy melts.
- Fork or piping bag: For drizzling the colorful candy melts.
Variations
- Nutty Delight: Add crushed nuts like almonds or walnuts to the Oreo mixture for a crunchy texture.
- Minty Fresh: Incorporate a teaspoon of mint extract into the filling for a refreshing twist.
- Chocolate Lovers: Use chocolate-flavored cream cheese instead of regular cream cheese for an extra chocolatey flavor.
- Fruit Fusion: Mix in finely chopped strawberries or raspberries for a fruity burst in every bite.
- Vegan Option: Substitute cream cheese with a vegan cream cheese alternative and use dairy-free chocolate for a plant-based treat.
Serving Suggestions
- Pair these Patriotic Oreo Balls with a refreshing lemonade or iced tea for a perfect summer treat.
- Serve them on a festive platter, garnished with fresh berries for a pop of color.
- For a fun twist, place them in individual cupcake liners for easy serving at parties.
FAQs about Patriotic Oreo Balls
Can I make these Patriotic Oreo Balls ahead of time?
Absolutely! You can prepare the Oreo balls a day in advance. Just store them in an airtight container in the refrigerator until you’re ready to serve. This makes them a perfect make-ahead treat for any celebration.
How do I store leftover Oreo Balls?
Leftover Patriotic Oreo Balls can be stored in an airtight container in the fridge for up to a week. Just make sure they’re well-covered to keep them fresh and delicious!
Can I use different types of cookies?
Yes! While Oreos are classic, feel free to experiment with other cookies like chocolate sandwich cookies or even graham crackers for a unique flavor twist. Just keep in mind that the texture may vary slightly.
What if I don’t have candy melts?
If you don’t have candy melts, you can use colored chocolate chips instead. Just melt them the same way you would with candy melts. They’ll still give you that festive look!
Are these Oreo Balls gluten-free?
To make gluten-free Patriotic Oreo Balls, simply use gluten-free Oreo cookies. The rest of the ingredients are naturally gluten-free, so you can enjoy these treats without worry!
Final Thoughts
Creating these Patriotic Oreo Balls is more than just a cooking project; it’s a way to bring joy and celebration into your home.
Advertisement
Each bite is a delightful explosion of flavors, evoking memories of summer gatherings and festive occasions.
Whether you’re sharing them with family or friends, these treats spark smiles and create lasting memories.
So, roll up your sleeves and dive into this easy recipe.
With minimal effort, you’ll have a dessert that not only looks stunning but tastes incredible.
Let the festivities begin, and enjoy every delicious moment!
PrintPatriotic Oreo Balls: Easy Recipe for Festive Treats!
Delicious and festive Patriotic Oreo Balls perfect for celebrations.
- Prep Time: 15 minutes
- Cook Time: 15 minutes
- Total Time: 1 hour
- Yield: 12 servings 1x
- Category: Dessert
- Method: No-Bake
- Cuisine: American
- Diet: Vegetarian
Ingredients
- 16 Oreo cookies, crushed into fine crumbs
- 8 ounces cream cheese, softened
- 1 teaspoon vanilla extract
- 1 cup white chocolate chips
- 1 cup red candy melts
- 1 cup blue candy melts
- Sprinkles (red, white, and blue) for decoration
Instructions
- In a mixing bowl, combine the crushed Oreo cookies, softened cream cheese, and vanilla extract. Mix until well combined and a dough forms.
- Using your hands, roll the mixture into 1-inch balls and place them on a baking sheet lined with parchment paper.
- Chill the Oreo balls in the refrigerator for about 30 minutes to firm up.
- While the balls are chilling, melt the white chocolate chips in a microwave-safe bowl in 30-second intervals, stirring between each interval until smooth.
- Dip each chilled Oreo ball into the melted white chocolate, allowing any excess to drip off. Return the coated balls to the parchment-lined baking sheet.
- Melt the red and blue candy melts separately in microwave-safe bowls, also in 30-second intervals until smooth.
- Drizzle the melted red and blue candy over the white chocolate-coated Oreo balls using a fork or piping bag.
- Immediately sprinkle the red, white, and blue sprinkles on top before the candy coating sets.
- Refrigerate the finished Oreo balls for at least 15 minutes to allow the chocolate to harden.
Notes
- For a gluten-free version, use gluten-free Oreo cookies.
- Add a teaspoon of peppermint extract to the mixture for a refreshing twist.
Nutrition
- Serving Size: 1 ball
- Calories: 150
- Sugar: 10g
- Sodium: 50mg
- Fat: 8g
- Saturated Fat: 4g
- Unsaturated Fat: 2g
- Trans Fat: 0g
- Carbohydrates: 18g
- Fiber: 1g
- Protein: 2g
- Cholesterol: 15mg