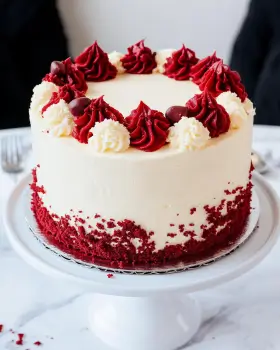
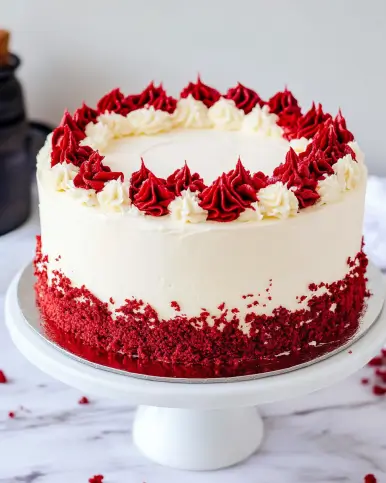
Classic Red Velvet Cake
Classic Red Velvet Cake is more than just a dessert; it’s a celebration of flavor and color. This cake has captured the hearts of many with its rich, velvety texture and striking red hue. Whether it’s for a birthday, wedding, or holiday gathering, this cake stands out on any dessert table. But what is the story behind this iconic treat? Let’s dive into its history and discover what makes it so special.
The History of Classic Red Velvet Cake
The origins of Classic Red Velvet Cake can be traced back to the early 20th century. It first gained popularity in the United States, particularly in the South. Some say it was created in the 1920s at the Waldorf-Astoria Hotel in New York City. The cake was originally known for its subtle chocolate flavor and unique red color, which was achieved through the reaction of cocoa powder with acidic ingredients like buttermilk and vinegar.
During World War II, the cake became even more popular. Rationing made cocoa scarce, and bakers began using beet juice to enhance the cake’s color. This not only gave the cake its signature red hue but also added moisture and sweetness. Over the years, Classic Red Velvet Cake has evolved, but its rich history remains a key part of its charm.
What Makes Classic Red Velvet Cake Unique?
What sets Classic Red Velvet Cake apart from other cakes? It’s all about the flavor and texture. The cake is known for its moist, tender crumb, which is achieved through the combination of oil and buttermilk. This creates a delightful melt-in-your-mouth experience. The subtle cocoa flavor adds depth without overpowering the cake’s sweetness.
Another unique aspect is the vibrant red color, which makes it visually appealing. The contrast between the red cake and the creamy white frosting creates a stunning presentation. Additionally, the cream cheese frosting adds a tangy richness that perfectly complements the cake’s sweetness. Together, these elements create a dessert that is not only delicious but also a feast for the eyes.
In summary, Classic Red Velvet Cake is a beloved dessert with a rich history and unique characteristics. Its combination of flavors, textures, and stunning appearance makes it a favorite for many. Now that we’ve explored its background, let’s move on to the ingredients needed to create this delightful cake.
Ingredients for Classic Red Velvet Cake
To create a delicious Classic Red Velvet Cake, you’ll need a selection of simple yet essential ingredients. Each component plays a vital role in achieving the cake’s signature flavor and texture. Here’s what you’ll need:
- 2 ½ cups all-purpose flour: This forms the base of the cake, providing structure.
- 1 ½ cups granulated sugar: Sugar adds sweetness and helps create a moist texture.
- 1 teaspoon baking soda: This leavening agent helps the cake rise, giving it a light and fluffy texture.
- 1 teaspoon salt: Salt enhances the flavors and balances the sweetness.
- 1 teaspoon cocoa powder: Just a hint of cocoa adds depth to the flavor without making it a chocolate cake.
- 1 ½ cups vegetable oil: Oil keeps the cake moist and tender, contributing to its velvety texture.
- 1 cup buttermilk, room temperature: Buttermilk adds moisture and a slight tang, enhancing the cake’s flavor.
- 2 large eggs, room temperature: Eggs provide structure and richness to the cake.
- 2 tablespoons red food coloring: This is what gives the cake its iconic red hue.
- 1 teaspoon vanilla extract: Vanilla adds a warm, sweet flavor that complements the other ingredients.
- 1 teaspoon white vinegar: The vinegar reacts with the baking soda, helping the cake rise and adding to its moistness.
For the cream cheese frosting, you will need:
- 8 ounces cream cheese, softened: Cream cheese provides a rich and creamy base for the frosting.
- ½ cup unsalted butter, softened: Butter adds richness and helps create a smooth texture.
- 4 cups powdered sugar: This sweetens the frosting and gives it a light, fluffy consistency.
- 1 teaspoon vanilla extract: Just like in the cake, vanilla enhances the flavor of the frosting.
- 1-2 tablespoons milk (as needed for consistency): Milk helps achieve the desired frosting consistency.
With these ingredients on hand, you’re ready to embark on your baking adventure. Each element contributes to the overall experience of enjoying a Classic Red Velvet Cake. Now, let’s move on to the step-by-step preparation to bring this delightful dessert to life!
Step-by-Step Preparation of Classic Red Velvet Cake
Now that you have all your ingredients ready, it’s time to dive into the step-by-step preparation of your Classic Red Velvet Cake. Each step is crucial to ensure your cake turns out perfectly moist and delicious. Let’s get started!
Step 1: Preparing the Cake Batter
First, gather your mixing bowls and measuring cups. In a large mixing bowl, sift together the all-purpose flour, granulated sugar, baking soda, salt, and cocoa powder. Sifting helps to aerate the dry ingredients, making your cake lighter.
In another bowl, whisk together the vegetable oil, buttermilk, eggs, red food coloring, vanilla extract, and white vinegar. Make sure these ingredients are well combined. The red food coloring is what gives the cake its signature hue, so mix it in thoroughly.
Next, gradually add the wet mixture to the dry ingredients. Stir gently until just combined. Be careful not to overmix, as this can lead to a dense cake. The batter should be smooth and slightly thick. Once ready, set it aside while you prepare to bake.
Step 2: Baking the Classic Red Velvet Cake
Preheat your oven to 350°F (175°C) if you haven’t done so already. Grease and flour two 9-inch round cake pans to prevent sticking. This step is essential for easy removal after baking.
Now, divide the batter evenly between the two prepared pans. Use a spatula to smooth the tops for an even bake. Place the pans in the preheated oven and bake for 25-30 minutes. To check for doneness, insert a toothpick into the center of the cakes. If it comes out clean, your cakes are ready!
Once baked, allow the cakes to cool in the pans for about 10 minutes. Then, carefully turn them out onto wire racks to cool completely. This cooling process is important for the frosting to adhere properly later on.
Step 3: Making the Cream Cheese Frosting
While your cakes are cooling, it’s time to prepare the cream cheese frosting. In a mixing bowl, beat the softened cream cheese and unsalted butter together until smooth and creamy. This should take about 2-3 minutes.
Gradually add the powdered sugar and vanilla extract, mixing until well combined. If your frosting is too thick, add milk one tablespoon at a time until you reach your desired consistency. The frosting should be spreadable but not runny.
Once your frosting is ready, set it aside. You’ll want to make sure it’s at room temperature when you frost the cake for the best results.
Step 4: Assembling the Classic Red Velvet Cake
Now comes the fun part—assembling your Classic Red Velvet Cake! Start by placing one cooled cake layer on a serving plate. Spread a generous amount of cream cheese frosting on top. Make sure to cover the entire surface for a delicious bite every time.
Next, carefully place the second layer on top. Use the remaining frosting to cover the top and sides of the cake. Don’t worry about making it perfect; a rustic look can be charming!
For an extra touch, consider decorating the cake with fresh berries or chocolate shavings. This not only enhances the visual appeal but also adds a delightful flavor contrast. Your Classic Red Velvet Cake is now ready to be enjoyed!
Variation of Classic Red Velvet Cake
Classic Red Velvet Cake is a beloved dessert, but it can be adapted to suit different dietary needs. Whether you’re gluten-free or vegan, you can still enjoy this delicious treat. Here are two variations that maintain the essence of the original while catering to specific preferences.
Gluten-Free Classic Red Velvet Cake
If you’re looking for a gluten-free option, you can easily substitute the all-purpose flour with a gluten-free flour blend. Make sure to choose a blend that contains xanthan gum, as this will help mimic the texture of traditional flour. Here’s how to make a gluten-free version:
- 2 ½ cups gluten-free flour blend: This will replace the all-purpose flour.
- 1 ½ cups granulated sugar: Keep this the same for sweetness.
- 1 teaspoon baking soda: This will still help the cake rise.
- 1 teaspoon salt: Essential for flavor.
- 1 teaspoon cocoa powder: Adds depth without making it a chocolate cake.
- 1 ½ cups vegetable oil: Keeps the cake moist.
- 1 cup buttermilk, room temperature: Adds moisture and tang.
- 2 large eggs, room temperature: Provides structure.
- 2 tablespoons red food coloring: For that iconic hue.
- 1 teaspoon vanilla extract: Enhances flavor.
- 1 teaspoon white vinegar: Reacts with baking soda for a fluffy texture.
Follow the same baking instructions as the original recipe. Your gluten-free Classic Red Velvet Cake will be just as delicious and moist!
Vegan Classic Red Velvet Cake
For those following a vegan diet, you can create a delightful Vegan Classic Red Velvet Cake by replacing the eggs and buttermilk with plant-based alternatives. Here’s how to make it:
- 2 ½ cups all-purpose flour: Use the same flour as the original recipe.
- 1 ½ cups granulated sugar: Sweetness remains unchanged.
- 1 teaspoon baking soda: Essential for leavening.
- 1 teaspoon salt: Balances the sweetness.
- 1 teaspoon cocoa powder: Adds flavor depth.
- 1 ½ cups vegetable oil: Keeps the cake moist.
- 1 cup almond milk (or any plant-based milk): This replaces buttermilk.
- 2 tablespoons ground flaxseed mixed with 6 tablespoons water: This acts as a substitute for the eggs.
- 2 tablespoons red food coloring: For that vibrant color.
- 1 teaspoon vanilla extract: Enhances the flavor.
- 1 teaspoon white vinegar: Helps with the cake’s rise.
Mix the ground flaxseed with water and let it sit for about 5 minutes to thicken. Then, follow the same mixing and baking instructions as the original recipe. Your Vegan Classic Red Velvet Cake will be just as delightful and satisfying!
These variations ensure that everyone can enjoy a slice of Classic Red Velvet Cake, regardless of dietary restrictions. Now that you know how to adapt the recipe, let’s move on to some cooking notes to help you achieve the best results!
Cooking Note for Classic Red Velvet Cake
When it comes to baking a Classic Red Velvet Cake, a few cooking notes can make all the difference. These tips will help you achieve the best results, ensuring your cake is moist, flavorful, and visually stunning. Let’s explore some essential cooking notes to keep in mind.
First, always use room temperature ingredients. This includes eggs, buttermilk, and butter. Room temperature ingredients blend more easily, creating a smoother batter. It also helps the cake rise evenly, resulting in a light and fluffy texture.
Next, be mindful of your mixing technique. When combining the wet and dry ingredients, mix until just combined. Overmixing can lead to a dense cake, which is not what you want. A few lumps in the batter are perfectly fine!
Another important note is to check your oven temperature. Ovens can vary, so it’s a good idea to use an oven thermometer. This ensures that your cakes bake at the correct temperature, preventing undercooking or overbaking.
When it comes to cooling, patience is key. Allow the cakes to cool in the pans for about 10 minutes before transferring them to wire racks. This helps them set properly and reduces the risk of breaking. Once on the racks, let them cool completely before frosting.
Lastly, don’t forget to taste as you go! Adjust the sweetness of your cream cheese frosting by adding more powdered sugar or a splash of milk for consistency. This way, you can customize the flavor to your liking.
By following these cooking notes, you’ll be well on your way to creating a Classic Red Velvet Cake that impresses everyone. Now that you’re equipped with these tips, let’s move on to serving suggestions to elevate your cake experience!
Serving Suggestions for Classic Red Velvet Cake
Once your Classic Red Velvet Cake is beautifully assembled and frosted, it’s time to think about how to serve it. The presentation can enhance the overall experience, making your cake even more delightful. Here are some serving suggestions to elevate your dessert:
- Garnish with Fresh Berries: Adding fresh strawberries, raspberries, or blueberries on top of the cake not only adds a pop of color but also a burst of freshness. The tartness of the berries complements the sweetness of the cake perfectly.
- Chocolate Shavings: For a touch of elegance, sprinkle chocolate shavings over the frosting. This adds a rich flavor and a beautiful visual contrast against the red cake.
- Serve with Ice Cream: Pairing a slice of Classic Red Velvet Cake with a scoop of vanilla or cream cheese ice cream can take your dessert to the next level. The cold ice cream balances the cake’s richness.
- Drizzle with Caramel Sauce: A light drizzle of caramel sauce over the top can add a sweet, buttery flavor that enhances the overall taste. Just be careful not to overpower the cake!
- Use Decorative Plates: Presentation matters! Serve your cake on decorative plates or cake stands to make it look even more appealing. A beautiful display can make any occasion feel special.
- Slice with Care: When cutting the cake, use a sharp knife and clean it between slices. This ensures that each piece looks neat and maintains its beautiful layers.
These serving suggestions can help you create a memorable dessert experience. Whether it’s a birthday party, a holiday gathering, or just a special treat for yourself, your Classic Red Velvet Cake will surely impress. Now that you have some ideas for serving, let’s move on to tips for perfecting your cake!
Tips for Perfecting Your Classic Red Velvet Cake
Creating the perfect Classic Red Velvet Cake is an art that combines technique, quality ingredients, and a dash of love. To help you achieve a cake that is not only delicious but also visually stunning, here are some essential tips to keep in mind:
- Choose Quality Ingredients: The quality of your ingredients can significantly impact the final result. Use fresh eggs, high-quality cocoa powder, and pure vanilla extract. These elements enhance the flavor and texture of your cake.
- Measure Accurately: Baking is a science, so precise measurements are crucial. Use a kitchen scale for dry ingredients and liquid measuring cups for wet ingredients. This ensures consistency in your batter.
- Don’t Skip the Sifting: Sifting your dry ingredients helps to aerate them, resulting in a lighter cake. It also removes any lumps, ensuring a smooth batter.
- Room Temperature Ingredients: As mentioned earlier, using room temperature ingredients is key. This allows for better mixing and helps the cake rise evenly, creating a tender crumb.
- Check for Doneness: Ovens can vary in temperature, so always check your cake a few minutes before the suggested baking time. Insert a toothpick into the center; if it comes out clean or with a few moist crumbs, your cake is done.
- Cool Completely: Allow your cakes to cool completely before frosting. This prevents the frosting from melting and ensures a beautiful finish. Patience is essential here!
- Frosting Technique: When frosting, start with a thin layer to seal in crumbs, known as a crumb coat. Chill the cake for about 30 minutes, then apply a final layer of frosting for a smooth finish.
- Experiment with Flavors: While the classic cream cheese frosting is a favorite, don’t hesitate to experiment. Try adding a hint of almond extract or citrus zest to your frosting for a unique twist.
- Store Properly: To keep your cake fresh, store it in an airtight container at room temperature for up to three days. If you need to store it longer, refrigerate it, but allow it to come to room temperature before serving.
By following these tips, you’ll be well on your way to mastering the art of Classic Red Velvet Cake. Each step contributes to the overall success of your baking adventure. Now that you’re equipped with these insights, let’s move on to the breakdown of time for making this delightful cake!
Breakdown of Time for Classic Red Velvet Cake
Understanding the time required for each step in making a Classic Red Velvet Cake can help you plan your baking session effectively. Here’s a breakdown of the time you’ll need for preparation, cooking, and the total time involved in creating this delightful dessert.
Prep Time
The prep time for your Classic Red Velvet Cake is approximately 30 minutes. This includes gathering your ingredients, measuring them accurately, and mixing the batter. Make sure to set aside enough time to ensure everything is done correctly. Remember, taking your time during prep can lead to a better final product!
Cooking Time
Once your batter is ready, the cooking time is about 25-30 minutes. This is the time it takes for the cakes to bake in the oven. Keep an eye on them as they bake, and use a toothpick to check for doneness. If it comes out clean, your cakes are ready to cool!
Total Time
In total, you can expect to spend around 1 hour to 1 hour and 15 minutes on your Classic Red Velvet Cake. This includes both prep and cooking time. However, don’t forget to factor in additional time for cooling the cakes before frosting. Allowing them to cool completely is crucial for achieving the best results.
With this time breakdown, you can plan your baking session accordingly. Whether you’re making this cake for a special occasion or just for fun, knowing how long each step takes will help you enjoy the process even more. Now that you have a clear timeline, let’s move on to the nutritional information for your Classic Red Velvet Cake!
Nutritional Information for Classic Red Velvet Cake
Understanding the nutritional information of your Classic Red Velvet Cake can help you enjoy it mindfully. While this cake is a delightful treat, it’s good to know what you’re indulging in. Here’s a breakdown of the key nutritional components:
Calories
A typical slice of Classic Red Velvet Cake contains approximately 450 calories. This calorie count can vary based on portion size and any additional toppings or fillings you may choose to add. While it’s a rich dessert, enjoying it in moderation can be part of a balanced diet.
Protein
Each slice of Classic Red Velvet Cake provides about 4 grams of protein. While this isn’t a high-protein dessert, the protein content comes from the eggs and cream cheese used in the recipe. Pairing your cake with a protein-rich side, like a scoop of Greek yogurt, can enhance the overall nutritional value.
Sodium
The sodium content in a slice of Classic Red Velvet Cake is around 300 milligrams. This amount is primarily from the baking soda and salt used in the recipe. If you’re watching your sodium intake, consider enjoying a smaller slice or balancing it with lower-sodium meals throughout the day.
In summary, while Classic Red Velvet Cake is a delicious indulgence, being aware of its nutritional information can help you make informed choices. Enjoying this cake as an occasional treat can add joy to your celebrations without compromising your health goals. Now that you have a better understanding of the nutritional aspects, let’s move on to some frequently asked questions about Classic Red Velvet Cake!
Advertisement
FAQs about Classic Red Velvet Cake
What is the origin of Classic Red Velvet Cake?
The origin of Classic Red Velvet Cake is quite fascinating. It is believed to have originated in the early 20th century, particularly in the Southern United States. The cake gained popularity in the 1920s, especially after being featured in a recipe from the Waldorf-Astoria Hotel in New York City. Initially, the cake was known for its subtle chocolate flavor and unique red color, which was achieved through a reaction between cocoa powder and acidic ingredients like buttermilk and vinegar. Over the years, the cake has evolved, but its rich history remains a key part of its charm.
How can I make Classic Red Velvet Cake healthier?
If you want to make Classic Red Velvet Cake healthier, there are several simple adjustments you can make. First, consider reducing the amount of sugar in the recipe. You can also substitute half of the all-purpose flour with whole wheat flour for added fiber. Another option is to replace some of the vegetable oil with unsweetened applesauce, which can help reduce fat content while keeping the cake moist. Additionally, using Greek yogurt instead of cream cheese in the frosting can lower calories and add protein. These small changes can help you enjoy this classic dessert with a healthier twist!
Can I use food coloring alternatives in Classic Red Velvet Cake?
Yes, you can use food coloring alternatives in Classic Red Velvet Cake! If you prefer a natural option, consider using beet juice or pomegranate juice to achieve a similar red hue. These natural alternatives not only provide color but also add a hint of sweetness. Keep in mind that the shade may vary slightly, but the cake will still be delicious. Just be sure to adjust the amount based on the intensity of the color you desire.
How do I store Classic Red Velvet Cake?
To store Classic Red Velvet Cake properly, first, ensure it has cooled completely. You can keep it at room temperature for up to three days in an airtight container. If you need to store it longer, refrigerate it for up to a week. When refrigerating, cover the cake with plastic wrap or place it in a cake dome to prevent it from drying out. If you want to keep it for an extended period, consider freezing it. Wrap the cake layers tightly in plastic wrap and then in aluminum foil. It can be frozen for up to three months. When ready to enjoy, simply thaw it in the refrigerator overnight before serving.
Conclusion on Classic Red Velvet Cake
In conclusion, Classic Red Velvet Cake is a timeless dessert that brings joy to any occasion. Its rich history, unique flavor, and stunning appearance make it a favorite among cake lovers everywhere. Whether you’re celebrating a special event or simply indulging in a sweet treat, this cake never fails to impress.
From the moist, velvety texture to the tangy cream cheese frosting, every bite is a delightful experience. Plus, with the variations available, everyone can enjoy a slice, regardless of dietary preferences. Whether you opt for the traditional recipe or try a gluten-free or vegan version, the essence of Classic Red Velvet Cake remains intact.
As you embark on your baking journey, remember the tips and techniques shared throughout this article. They will help you create a cake that not only tastes amazing but also looks beautiful. So, gather your ingredients, preheat your oven, and get ready to whip up a Classic Red Velvet Cake that will leave everyone asking for seconds!
Ultimately, baking is about sharing love and creating memories. So, enjoy the process, savor the flavors, and celebrate the joy that comes with each slice of this iconic cake. Happy baking!