
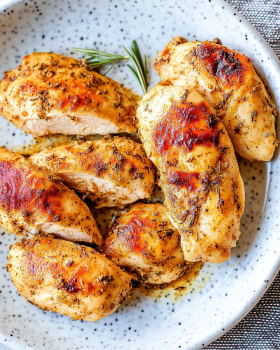
Oven-Baked Rotisserie Chicken Breasts
Are you looking for a delicious and easy way to prepare chicken? Look no further! Oven-baked rotisserie chicken breasts are a fantastic option for busy weeknights or special occasions. This recipe is not only simple but also packed with flavor. With just a few ingredients, you can create a mouthwatering dish that your whole family will love.
Cooking chicken in the oven allows for even cooking and a juicy texture. The combination of spices gives the chicken a delightful taste, reminiscent of your favorite rotisserie chicken from the store. Plus, making it at home means you can control the ingredients, ensuring a healthier meal.
Whether you’re a seasoned cook or a beginner in the kitchen, this recipe is straightforward and forgiving. You can easily adjust the spices to suit your taste. Plus, the leftovers are perfect for salads, wraps, or sandwiches, making this dish versatile and practical.
So, roll up your sleeves and get ready to impress your family and friends with these oven-baked rotisserie chicken breasts. Let’s dive into the ingredients and preparation steps to get you started on this culinary adventure!
Ingredients for Oven-Baked Rotisserie Chicken Breasts
To create the perfect oven-baked rotisserie chicken breasts, you’ll need a handful of simple ingredients. Each one plays a vital role in enhancing the flavor and ensuring a juicy, tender result. Here’s what you’ll need:
- 4 boneless, skinless chicken breasts (about 1.5 pounds total) – This is the star of the dish, providing a lean source of protein.
- 2 tablespoons olive oil – This helps the spices stick and adds a rich flavor.
- 2 teaspoons garlic powder – A must-have for that savory taste.
- 2 teaspoons onion powder – Adds depth and sweetness to the seasoning.
- 2 teaspoons smoked paprika – This gives a lovely smoky flavor, reminiscent of traditional rotisserie chicken.
- 1 teaspoon dried thyme – A classic herb that complements chicken beautifully.
- 1 teaspoon dried oregano – Adds a hint of earthiness to the mix.
- 1 teaspoon salt – Essential for enhancing all the flavors.
- 1/2 teaspoon black pepper – For a touch of heat and spice.
- 1/2 teaspoon cayenne pepper (optional) – If you like a little kick, this is the perfect addition.
- 1 tablespoon lemon juice – This brightens the dish and adds a refreshing zing.
These ingredients come together to create a flavorful and satisfying meal. Feel free to adjust the spices according to your preferences. For instance, if you love garlic, add a bit more garlic powder! The beauty of this recipe lies in its flexibility, allowing you to make it your own.
Preparation of Oven-Baked Rotisserie Chicken Breasts
Now that you have gathered all your ingredients, it’s time to prepare your oven-baked rotisserie chicken breasts. This process is simple and straightforward, ensuring that you achieve juicy and flavorful chicken every time. Let’s break it down into easy steps.
Step 1: Preheat the Oven
First things first, preheat your oven to 400°F. This temperature is perfect for cooking chicken breasts evenly while keeping them moist. Preheating is crucial as it helps the chicken cook properly from the moment it goes in. So, don’t skip this step!
Step 2: Prepare the Chicken Breasts
Next, take your boneless, skinless chicken breasts and pat them dry with paper towels. This step is important because it helps the seasoning stick better and promotes browning. A dry surface allows for a nice crust to form during baking, enhancing the overall flavor and texture.
Step 3: Season the Chicken Breasts
In a small bowl, mix together the olive oil, garlic powder, onion powder, smoked paprika, thyme, oregano, salt, black pepper, and cayenne pepper (if you’re using it). This seasoning blend is what gives your chicken that delicious rotisserie flavor. Rub this mixture evenly over both sides of each chicken breast, ensuring every inch is coated. The more evenly you season, the better the flavor will be!
Step 4: Bake the Chicken Breasts
Now, it’s time to bake! Place the seasoned chicken breasts on a baking sheet lined with parchment paper or in a greased baking dish. Drizzle the lemon juice over the chicken for an extra burst of flavor. Bake in the preheated oven for 25-30 minutes. You’ll know the chicken is done when it reaches an internal temperature of 165°F. Using a meat thermometer is the best way to check this.
Step 5: Rest the Chicken Breasts
Once your chicken is cooked, remove it from the oven and let it rest for 5-10 minutes. This resting period is essential as it allows the juices to redistribute throughout the meat. If you slice it too soon, those delicious juices will run out, leaving you with dry chicken. So, be patient and let it rest!
Following these steps will ensure that your oven-baked rotisserie chicken breasts turn out perfectly every time. Now that you know how to prepare them, let’s explore some variations to make this dish even more exciting!
Variation of Oven-Baked Rotisserie Chicken Breasts

While the original recipe for oven-baked rotisserie chicken breasts is delicious on its own, there are many ways to switch things up! Variations can enhance the flavor and keep your meals exciting. Let’s explore some different seasoning options and the benefits of cooking with marinades.
Different Seasoning Options
One of the best things about cooking is the ability to customize your dishes. For oven-baked rotisserie chicken breasts, you can experiment with various seasonings to suit your taste. Here are a few ideas:
- Herb Blend: Try using fresh herbs like rosemary, basil, or parsley. Chop them finely and mix them with olive oil for a fresh twist.
- Citrus Zest: Add lemon or orange zest to the seasoning mix for a bright, zesty flavor that pairs well with chicken.
- Spicy Kick: If you love heat, consider adding chili powder or a dash of hot sauce to the seasoning. This will give your chicken a fiery flavor.
- Asian-Inspired: Use soy sauce, ginger, and sesame oil for an Asian twist. This combination will create a savory and aromatic dish.
Feel free to mix and match these ideas! The key is to find flavors that you and your family enjoy. Remember, the more you experiment, the more you’ll discover your favorite combinations.
Cooking with Marinades
Marinating your chicken breasts is another fantastic way to infuse flavor. A marinade is a mixture of ingredients that you soak the chicken in before cooking. This process not only adds flavor but also helps tenderize the meat. Here’s how to do it:
- Choose Your Marinade: You can use a store-bought marinade or create your own. A simple mix of olive oil, vinegar, herbs, and spices works great.
- Marinate Time: For the best results, let the chicken marinate for at least 30 minutes. If you have more time, marinating overnight in the refrigerator will yield even better flavor.
- Drain Before Cooking: Before baking, make sure to drain excess marinade. This prevents the chicken from becoming too soggy and helps achieve that perfect golden crust.
Using marinades can elevate your oven-baked rotisserie chicken breasts to a whole new level. It’s a simple step that makes a big difference in taste. Now that you have some variations in mind, let’s move on to cooking notes to ensure your chicken turns out perfectly every time!
Cooking Note for Oven-Baked Rotisserie Chicken Breasts
When it comes to cooking oven-baked rotisserie chicken breasts, a few key notes can help you achieve the best results. These tips will ensure that your chicken is not only flavorful but also juicy and tender. Let’s dive into some important cooking notes to keep in mind.
First, always use a meat thermometer to check the internal temperature of your chicken. This is the most reliable way to ensure it’s fully cooked. The USDA recommends that chicken should reach an internal temperature of 165°F. This guarantees that harmful bacteria are eliminated, making your meal safe to eat.
Next, consider the thickness of your chicken breasts. If they are uneven in size, they may cook at different rates. To solve this, you can pound the chicken breasts to an even thickness. This helps them cook uniformly, preventing some parts from drying out while others are still undercooked.
Another important note is to avoid overcrowding the baking sheet. If the chicken breasts are too close together, they may steam instead of bake. This can lead to a less desirable texture. Make sure to leave some space between each piece to allow for proper air circulation.
Lastly, don’t forget about resting your chicken after baking. As mentioned earlier, letting the chicken rest for 5-10 minutes is crucial. This step allows the juices to redistribute, resulting in a more succulent bite. If you skip this step, you might end up with dry chicken, which no one wants!
By following these cooking notes, you’ll be well on your way to mastering oven-baked rotisserie chicken breasts. With a little attention to detail, you can create a dish that’s not only delicious but also perfectly cooked every time. Now, let’s explore some serving suggestions to complement your flavorful chicken!
Serving Suggestions for Oven-Baked Rotisserie Chicken Breasts
Now that you’ve prepared your delicious oven-baked rotisserie chicken breasts, it’s time to think about how to serve them. This dish is incredibly versatile and pairs well with a variety of side dishes and can be used in salads and wraps. Let’s explore some tasty serving suggestions that will elevate your meal!
Pairing with Side Dishes
When it comes to side dishes, the options are endless! Here are some delightful pairings that complement the flavors of your oven-baked rotisserie chicken breasts:
- Roasted Vegetables: A mix of seasonal vegetables like carrots, bell peppers, and zucchini roasted in olive oil makes a colorful and nutritious side.
- Mashed Potatoes: Creamy mashed potatoes with a hint of garlic or herbs provide a comforting and hearty addition to your meal.
- Quinoa Salad: A light quinoa salad with cherry tomatoes, cucumber, and a lemon vinaigrette adds a refreshing touch.
- Steamed Broccoli: Simple steamed broccoli drizzled with a bit of lemon juice is a healthy and vibrant side that balances the richness of the chicken.
- Rice Pilaf: Fluffy rice pilaf with herbs and spices can soak up the juices from the chicken, making every bite flavorful.
These side dishes not only enhance the meal but also add a variety of textures and flavors. Feel free to mix and match based on your preferences and what you have on hand!
Serving in Salads and Wraps
Another fantastic way to enjoy your oven-baked rotisserie chicken breasts is by incorporating them into salads and wraps. This method is perfect for using leftovers and creating quick, satisfying meals. Here are some ideas:
- Chicken Caesar Salad: Slice the chicken and toss it with romaine lettuce, croutons, Parmesan cheese, and Caesar dressing for a classic dish.
- Greek Salad Wrap: Wrap the chicken in a whole wheat tortilla with mixed greens, feta cheese, olives, and a drizzle of olive oil for a Mediterranean twist.
- BBQ Chicken Salad: Combine shredded chicken with mixed greens, corn, black beans, and BBQ sauce for a zesty and filling salad.
- Chicken Avocado Wrap: Layer sliced chicken with avocado, spinach, and a spread of hummus in a wrap for a healthy and delicious lunch option.
- Asian Chicken Salad: Mix sliced chicken with cabbage, carrots, and a sesame dressing for a crunchy and flavorful salad.
These serving suggestions not only make your meal more exciting but also allow you to enjoy the oven-baked rotisserie chicken breasts in different ways. Whether you choose a hearty side dish or a fresh salad, you’re sure to create a satisfying dining experience!
Tips for Perfect Oven-Baked Rotisserie Chicken Breasts
To achieve the best oven-baked rotisserie chicken breasts, a few tips can make all the difference. These simple yet effective strategies will help you create juicy, flavorful chicken every time. Let’s explore some essential tips that will elevate your cooking game!
First, always start with high-quality chicken. Fresh, organic chicken breasts often have better flavor and texture than frozen or lower-quality options. If possible, choose chicken that is free from antibiotics and hormones. This choice not only benefits your health but also enhances the overall taste of your dish.
Next, consider brining your chicken before cooking. Brining involves soaking the chicken in a saltwater solution for a few hours. This process helps the chicken retain moisture during cooking, resulting in a juicier final product. If you have time, try this method for an extra layer of flavor and tenderness.
Another important tip is to let your chicken come to room temperature before baking. Allowing the chicken to sit out for about 30 minutes helps it cook more evenly. Cold chicken straight from the fridge can lead to uneven cooking, so this step is worth the wait!
When seasoning your chicken, don’t be afraid to be generous. A well-seasoned chicken is key to a flavorful dish. Make sure to rub the seasoning mixture thoroughly into the meat, ensuring every bite is packed with flavor. You can also sprinkle some seasoning under the skin if you’re using skin-on chicken for added taste.
Lastly, keep an eye on the cooking time. Ovens can vary, so it’s essential to check the chicken a few minutes before the recommended cooking time. Using a meat thermometer is the best way to ensure your chicken is perfectly cooked. Remember, overcooking can lead to dry chicken, so aim for that sweet spot of 165°F.
By following these tips, you’ll be well on your way to mastering oven-baked rotisserie chicken breasts. With a little attention to detail and care, you can create a dish that’s not only delicious but also a hit with family and friends. Now that you have the tips, let’s break down the time needed for this recipe!
Breakdown of Time for Oven-Baked Rotisserie Chicken Breasts
Understanding the time required for each step in preparing oven-baked rotisserie chicken breasts is essential for planning your meal. Knowing how long each part takes can help you manage your kitchen time effectively. Let’s break it down into prep time, cooking time, and total time.
Prep Time
The prep time for oven-baked rotisserie chicken breasts is quite minimal. You’ll need about 10-15 minutes to gather your ingredients and prepare the chicken. This includes:
- Gathering all ingredients and tools.
- Patting the chicken breasts dry.
- Mixing the seasoning blend.
- Rubbing the seasoning on the chicken.
- Prepping the baking sheet or dish.
With a little organization, you can have everything ready to go in no time!
Cooking Time
The cooking time for your oven-baked rotisserie chicken breasts is approximately 25-30 minutes. This time may vary slightly based on your oven and the thickness of the chicken breasts. Here’s what to keep in mind:
- Preheat the oven to 400°F before placing the chicken inside.
- Cook until the internal temperature reaches 165°F, ensuring the chicken is safe to eat.
Using a meat thermometer will help you achieve the perfect doneness without overcooking.
Total Time
When you combine the prep time and cooking time, the total time for making oven-baked rotisserie chicken breasts is about 35-45 minutes. This makes it a quick and convenient option for dinner. Here’s a quick summary:
- Prep Time: 10-15 minutes
- Cooking Time: 25-30 minutes
- Total Time: 35-45 minutes
This total time frame allows you to enjoy a delicious, homemade meal without spending hours in the kitchen. With this breakdown, you can easily fit this recipe into your busy schedule, making it a go-to option for any night of the week!
Nutritional Information for Oven-Baked Rotisserie Chicken Breasts
Understanding the nutritional content of your meals is essential for maintaining a balanced diet. Oven-baked rotisserie chicken breasts are not only delicious but also provide a wealth of nutrients. Let’s break down the key nutritional information for this dish, focusing on calories, protein, and sodium.
Calories
Each serving of oven-baked rotisserie chicken breasts contains approximately 230 calories. This makes it a great option for those looking to enjoy a satisfying meal without consuming excessive calories. The lean protein from the chicken helps keep you full, making it a smart choice for lunch or dinner.
Protein
One of the standout features of this dish is its high protein content. Each serving provides about 30 grams of protein. Protein is essential for building and repairing tissues, making it crucial for overall health. Including protein-rich foods like chicken in your diet can help support muscle growth and maintenance, especially if you lead an active lifestyle.
Sodium
The sodium content in oven-baked rotisserie chicken breasts is around 600 milligrams per serving. While sodium is necessary for various bodily functions, it’s important to monitor your intake. This recipe allows you to control the amount of salt used, making it a healthier option compared to many store-bought rotisserie chickens, which can be high in sodium. If you’re watching your sodium intake, consider reducing the salt in the seasoning mix or using low-sodium alternatives.
In summary, oven-baked rotisserie chicken breasts are a nutritious choice that offers a good balance of calories, protein, and sodium. This dish not only satisfies your taste buds but also supports your health goals. Now that you know the nutritional benefits, let’s move on to some frequently asked questions about this recipe!
FAQs about Oven-Baked Rotisserie Chicken Breasts
How do I know when the chicken is fully cooked?
Knowing when your chicken is fully cooked is crucial for both safety and taste. The best way to check is by using a meat thermometer. Insert the thermometer into the thickest part of the chicken breast. It should read 165°F (75°C) to ensure it’s safe to eat. If you don’t have a thermometer, you can cut into the chicken. The juices should run clear, and the meat should no longer be pink. However, using a thermometer is the most reliable method!
Can I use frozen chicken breasts for this recipe?
Yes, you can use frozen chicken breasts, but there are a few things to keep in mind. First, it’s best to thaw the chicken in the refrigerator overnight before cooking. This ensures even cooking and helps the seasoning stick better. If you’re in a hurry, you can use the microwave to defrost the chicken, but be careful not to start cooking it. If you cook from frozen, you’ll need to increase the baking time by about 50%. Always check the internal temperature to ensure it reaches 165°F.
What can I do with leftovers from Oven-Baked Rotisserie Chicken Breasts?
Leftovers from your oven-baked rotisserie chicken breasts can be incredibly versatile! Here are some tasty ideas:
Advertisement
- Chicken Salad: Shred the leftover chicken and mix it with mayonnaise, celery, and grapes for a delicious chicken salad.
- Wraps and Sandwiches: Use the chicken in wraps or sandwiches with your favorite toppings and sauces.
- Stir-Fries: Add the chicken to a stir-fry with vegetables and your choice of sauce for a quick meal.
- Soups: Incorporate the chicken into soups or stews for added protein and flavor.
- Pizza Topping: Use the chicken as a topping for homemade pizza along with your favorite ingredients.
These ideas not only help reduce food waste but also allow you to enjoy your delicious chicken in new and exciting ways!
FAQs about Oven-Baked Rotisserie Chicken Breasts
How do I know when the chicken is fully cooked?
Knowing when your chicken is fully cooked is crucial for both safety and taste. The best way to check is by using a meat thermometer. Insert the thermometer into the thickest part of the chicken breast. It should read 165°F (75°C) to ensure it’s safe to eat. If you don’t have a thermometer, you can cut into the chicken. The juices should run clear, and the meat should no longer be pink. However, using a thermometer is the most reliable method!
Can I use frozen chicken breasts for this recipe?
Yes, you can use frozen chicken breasts, but there are a few things to keep in mind. First, it’s best to thaw the chicken in the refrigerator overnight before cooking. This ensures even cooking and helps the seasoning stick better. If you’re in a hurry, you can use the microwave to defrost the chicken, but be careful not to start cooking it. If you cook from frozen, you’ll need to increase the baking time by about 50%. Always check the internal temperature to ensure it reaches 165°F.
What can I do with leftovers from Oven-Baked Rotisserie Chicken Breasts?
Leftovers from your oven-baked rotisserie chicken breasts can be incredibly versatile! Here are some tasty ideas:
- Chicken Salad: Shred the leftover chicken and mix it with mayonnaise, celery, and grapes for a delicious chicken salad.
- Wraps and Sandwiches: Use the chicken in wraps or sandwiches with your favorite toppings and sauces.
- Stir-Fries: Add the chicken to a stir-fry with vegetables and your choice of sauce for a quick meal.
- Soups: Incorporate the chicken into soups or stews for added protein and flavor.
- Pizza Topping: Use the chicken as a topping for homemade pizza along with your favorite ingredients.
These ideas not only help reduce food waste but also allow you to enjoy your delicious chicken in new and exciting ways!
Conclusion on Oven-Baked Rotisserie Chicken Breasts
In conclusion, oven-baked rotisserie chicken breasts are a fantastic addition to your meal repertoire. This recipe is not only simple to follow but also delivers a burst of flavor that will satisfy your taste buds. With just a few ingredients and straightforward steps, you can create a delicious dish that is perfect for any occasion.
Whether you’re preparing a quick weeknight dinner or hosting a gathering, these chicken breasts are sure to impress. The versatility of this dish allows you to customize the flavors to suit your preferences, making it a go-to option for everyone in the family. Plus, the nutritional benefits, including high protein content and low calories, make it a smart choice for health-conscious eaters.
Remember, the key to perfect oven-baked rotisserie chicken breasts lies in the details. From seasoning to cooking time, each step plays a crucial role in achieving juicy, flavorful chicken. Don’t hesitate to experiment with different spices and marinades to find your favorite combination.
So, gather your ingredients, preheat that oven, and get ready to enjoy a delightful meal. With this recipe in your cooking arsenal, you’ll be able to whip up a satisfying dish that everyone will love. Happy cooking!