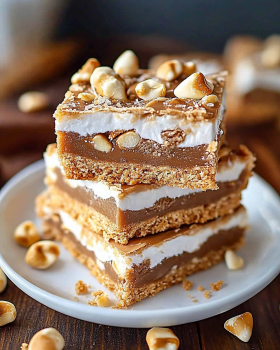
Fluffernutter Bars Recipe
What are Fluffernutter Bars?
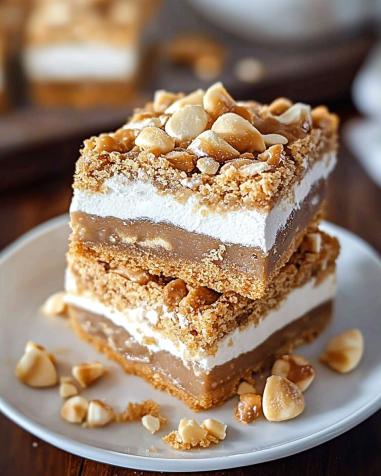
Fluffernutter Bars are a delightful dessert that combines the classic flavors of peanut butter and marshmallow fluff. These bars are soft, chewy, and packed with sweetness, making them a favorite among both kids and adults. The rich, creamy peanut butter pairs perfectly with the gooey marshmallows and chocolate chips, creating a treat that is hard to resist. Each bite offers a burst of flavor, making them ideal for parties, potlucks, or just a cozy night in.
The Origin of Fluffernutter Bars
The Fluffernutter treat has a fun history that dates back to the early 20th century. It originated from the combination of peanut butter and marshmallow fluff, which became popular in New England. The name “Fluffernutter” was coined in the 1960s, and it quickly became a beloved sandwich for children and adults alike. Over the years, creative bakers have transformed this classic combination into various desserts, including the delicious Fluffernutter Bars. These bars capture the essence of the original sandwich while offering a new and exciting way to enjoy those familiar flavors.
Ingredients for Fluffernutter Bars Recipe
To create the perfect Fluffernutter Bars, you’ll need a few simple ingredients. Each component plays a vital role in achieving that delightful balance of flavors and textures. Here’s what you’ll need:
- 1 cup unsalted butter, softened
- 1 cup creamy peanut butter
- 1 cup granulated sugar
- 1 cup brown sugar, packed
- 2 large eggs
- 1 teaspoon vanilla extract
- 2 cups all-purpose flour
- 1 teaspoon baking powder
- 1/2 teaspoon salt
- 1 cup mini marshmallows
- 1 cup semi-sweet chocolate chips
These ingredients come together to create a rich and satisfying dessert. The unsalted butter and creamy peanut butter provide a smooth base, while the sugars add sweetness and moisture. Eggs and vanilla extract enhance the flavor and texture, making the bars soft and chewy. The flour, baking powder, and salt work together to give the bars structure. Finally, the mini marshmallows and chocolate chips add delightful bursts of flavor in every bite.
Feel free to get creative! You can swap out the semi-sweet chocolate chips for white chocolate chips for a different taste. Or, if you want a little extra crunch, consider adding chopped nuts. The possibilities are endless, and each variation can lead to a new favorite treat!
Step-by-Step Preparation of Fluffernutter Bars Recipe
Step 1: Gather Your Ingredients
Before you start baking, it’s essential to gather all your ingredients. This makes the process smoother and more enjoyable. Make sure you have everything listed in the ingredients section. Having your ingredients ready will help you focus on mixing and baking without interruptions. So, grab your butter, peanut butter, sugars, eggs, and all the other goodies!
Step 2: Prepare the Base
Now, let’s get to the fun part! In a large mixing bowl, cream together the softened unsalted butter and creamy peanut butter. Use an electric mixer for about 2-3 minutes until the mixture is light and fluffy. Then, add the granulated sugar and brown sugar. Mix well until everything is combined. This step is crucial as it creates a smooth base for your Fluffernutter Bars.
Step 3: Make the Fluffernutter Filling
Next, it’s time to add the eggs. Crack them in one at a time, mixing well after each addition. This ensures that the eggs blend nicely into the batter. After that, stir in the vanilla extract for an extra burst of flavor. In a separate bowl, whisk together the all-purpose flour, baking powder, and salt. Gradually add this dry mixture to your wet ingredients. Mix until just combined, being careful not to overmix.
Step 4: Assemble the Bars
Now comes the exciting part! Fold in the mini marshmallows and semi-sweet chocolate chips. Make sure they are evenly distributed throughout the batter. This will give your Fluffernutter Bars those delightful pockets of gooey marshmallow and rich chocolate. Once everything is mixed, spread the batter evenly into your prepared baking pan. Use a spatula to smooth the top for an even bake.
Step 5: Bake the Fluffernutter Bars
It’s time to bake! Place your baking pan in the preheated oven at 350°F (175°C). Bake for 25-30 minutes. Keep an eye on them! You want the edges to turn golden brown, and a toothpick inserted in the center should come out clean. This is the moment when your kitchen will start to smell heavenly!
Step 6: Cool and Cut the Bars
Once baked, remove the pan from the oven and let the bars cool in the pan for about 10 minutes. This helps them set. After that, transfer them to a wire rack to cool completely. Once cooled, cut them into squares. Now, you’re ready to serve these delicious Fluffernutter Bars to your family and friends!
Variations of Fluffernutter Bars Recipe
Gluten-Free Fluffernutter Bars
If you’re looking for a gluten-free option, you can easily adapt the Fluffernutter Bars recipe. Simply replace the all-purpose flour with a gluten-free flour blend. Many brands offer a 1:1 gluten-free flour that works well in baking. This way, you can enjoy the same delicious flavors without the gluten. Just make sure to check that your chocolate chips and marshmallows are also gluten-free. With these simple swaps, you can create a treat that everyone can enjoy!
Vegan Fluffernutter Bars
For those following a vegan diet, you can still indulge in Fluffernutter Bars! Start by substituting the unsalted butter with a plant-based butter or coconut oil. Instead of eggs, use flax eggs or applesauce. To make a flax egg, mix 1 tablespoon of ground flaxseed with 2.5 tablespoons of water and let it sit for a few minutes until it thickens. Additionally, ensure that your chocolate chips and marshmallows are dairy-free. These adjustments will give you a delicious vegan version of Fluffernutter Bars that everyone will love!
Cooking Note for Fluffernutter Bars Recipe
When it comes to baking Fluffernutter Bars, a few cooking notes can help you achieve the best results. First, always use room temperature ingredients. This means letting your butter and eggs sit out for about 30 minutes before you start. Room temperature ingredients mix together more smoothly, leading to a better texture in your bars.
Next, be mindful of your oven temperature. Ovens can vary, so it’s a good idea to use an oven thermometer to ensure accuracy. If your oven runs hot, your bars may bake faster than expected. Conversely, if it runs cool, they may take longer. Keep an eye on them during the last few minutes of baking to avoid overcooking.
Another tip is to line your baking pan with parchment paper. This makes it easier to lift the bars out once they’re cooled. It also helps prevent sticking, ensuring that you get clean, beautiful squares when you cut them. If you don’t have parchment paper, greasing the pan well will also work, but parchment is preferred for easy removal.
Lastly, let the bars cool completely before cutting. This allows them to set properly, making it easier to achieve clean cuts. If you’re in a hurry, you can place the pan in the fridge for a short time to speed up the cooling process. However, be careful not to chill them for too long, as they may become too firm.
By following these cooking notes, you’ll be well on your way to creating perfect Fluffernutter Bars that are sure to impress!
Serving Suggestions for Fluffernutter Bars Recipe
Once your Fluffernutter Bars are baked and cooled, it’s time to think about how to serve them. These bars are delicious on their own, but with a few creative serving ideas, you can elevate your dessert experience. Here are some delightful suggestions:
- With a Scoop of Ice Cream: Serve your Fluffernutter Bars warm with a scoop of vanilla or chocolate ice cream. The creamy ice cream pairs perfectly with the chewy bars, creating a delightful contrast in textures.
- Drizzle with Chocolate Sauce: For an extra indulgent treat, drizzle some warm chocolate sauce over the top of the bars. This adds a rich flavor and makes them look even more tempting.
- Top with Whipped Cream: A dollop of whipped cream can add a light and airy touch to your Fluffernutter Bars. You can even sprinkle some crushed peanuts or chocolate shavings on top for added flair.
- Serve with Fresh Fruit: Pair the bars with fresh fruit like strawberries or bananas. The natural sweetness of the fruit complements the rich flavors of the bars, making for a balanced dessert.
- Pack for Lunches: Cut the bars into smaller squares and pack them in lunchboxes. They make a great treat for kids and adults alike, providing a sweet pick-me-up during the day.
- Garnish with Sea Salt: For a touch of sophistication, sprinkle a little sea salt on top before serving. The salty-sweet combination enhances the flavors and adds a gourmet touch.
These serving suggestions can help you enjoy your Fluffernutter Bars in new and exciting ways. Whether you’re hosting a gathering or enjoying a quiet night at home, these ideas will make your dessert experience even more delightful!
Tips for Perfect Fluffernutter Bars Recipe
Creating the perfect Fluffernutter Bars is all about attention to detail. Here are some handy tips to ensure your bars turn out delicious every time:
- Use Fresh Ingredients: Always check the freshness of your ingredients, especially the baking powder and eggs. Fresh ingredients will enhance the flavor and texture of your bars.
- Don’t Overmix: When combining the wet and dry ingredients, mix until just combined. Overmixing can lead to tough bars, so be gentle!
- Check for Doneness: Ovens can vary, so start checking your bars a few minutes before the recommended baking time. Look for golden edges and a toothpick that comes out clean.
- Let Them Cool: Allow the bars to cool completely in the pan before cutting. This helps them set and makes for cleaner cuts.
- Experiment with Mix-Ins: Feel free to get creative! Add chopped nuts, dried fruit, or even a swirl of caramel for a unique twist on the classic recipe.
- Store Properly: Keep your Fluffernutter Bars in an airtight container at room temperature. They’ll stay fresh for several days, making them perfect for snacking!
- Use Parchment Paper: Lining your baking pan with parchment paper not only makes for easy removal but also helps prevent sticking, ensuring your bars come out perfectly.
- Adjust Sweetness: If you prefer a less sweet treat, reduce the amount of granulated sugar or brown sugar slightly. This can help balance the flavors to your liking.
By following these tips, you’ll be well on your way to baking Fluffernutter Bars that are not only delicious but also visually appealing. Enjoy the process and happy baking!
Breakdown of Time for Fluffernutter Bars Recipe
Prep Time
Preparing your Fluffernutter Bars is a breeze! The prep time typically takes about 15-20 minutes. This includes gathering your ingredients, creaming the butter and peanut butter, and mixing everything together. Make sure to have all your ingredients ready to go, as this will help speed up the process. Once you have everything measured and mixed, you’ll be ready to bake!
Cooking Time
The cooking time for Fluffernutter Bars is around 25-30 minutes. During this time, your kitchen will fill with the delightful aroma of baking peanut butter and chocolate. Keep an eye on the bars as they bake, checking for that golden brown edge and a clean toothpick test. This is the moment when patience pays off, and you can almost taste the deliciousness!
Total Time
In total, you can expect to spend about 45-50 minutes from start to finish. This includes both prep and cooking time. Once the bars are baked, don’t forget to allow them to cool for about 10 minutes in the pan before transferring them to a wire rack. After they cool completely, you can cut them into squares and enjoy your homemade Fluffernutter Bars!
Nutritional Information for Fluffernutter Bars Recipe
Calories
When indulging in Fluffernutter Bars, it’s good to know what you’re consuming. Each serving contains approximately 290 calories. This makes them a delightful treat, but it’s wise to enjoy them in moderation. The combination of peanut butter, sugars, and chocolate contributes to the calorie count, providing a rich and satisfying dessert experience.
Protein
Fluffernutter Bars also offer a decent amount of protein, with about 5 grams per serving. The creamy peanut butter is the star here, as it is a great source of plant-based protein. This can help keep you feeling fuller for longer, making these bars not just a sweet treat but also a satisfying snack option.
Sodium
In terms of sodium, each serving of Fluffernutter Bars contains around 150 milligrams. This is a moderate amount, especially considering that the bars are not overly salty. However, if you’re watching your sodium intake, it’s always a good idea to be mindful of portion sizes. Enjoying these bars as an occasional treat can fit well into a balanced diet.
FAQs about Fluffernutter Bars Recipe
Can I make Fluffernutter Bars ahead of time?
Absolutely! Fluffernutter Bars can be made ahead of time, making them a great option for parties or gatherings. You can bake them a day or two in advance. Just make sure to store them properly to keep them fresh. Once cooled, place the bars in an airtight container. This will help maintain their chewy texture and delicious flavor. When you’re ready to serve, simply cut them into squares and enjoy!
How should I store Fluffernutter Bars?
To keep your Fluffernutter Bars fresh, store them in an airtight container at room temperature. They can last for about 4-5 days. If you want to keep them longer, consider refrigerating them. Just remember to let them come to room temperature before serving, as this will enhance their flavor and texture. You can also freeze the bars for up to three months. Just wrap them tightly in plastic wrap and place them in a freezer-safe container. When you’re ready to enjoy, thaw them in the fridge overnight.
Advertisement
Can I substitute ingredients in the Fluffernutter Bars Recipe?
Yes, you can definitely substitute ingredients in the Fluffernutter Bars recipe! If you have dietary restrictions or preferences, there are plenty of options. For instance, you can use almond butter or sunflower seed butter instead of peanut butter. If you’re looking for a lower sugar option, consider using a sugar substitute. Additionally, you can swap out the mini marshmallows for vegan marshmallows if you’re making a vegan version. Just be sure to adjust the quantities accordingly to maintain the right texture.
What is the best way to cut Fluffernutter Bars?
Cutting Fluffernutter Bars can be tricky, especially when they are soft and gooey. To achieve clean cuts, first, let the bars cool completely in the pan. Once cooled, use a sharp knife to cut them into squares. For even better results, you can warm the knife slightly under hot water, then dry it before cutting. This helps the knife glide through the bars without sticking. If you prefer, you can also use a pizza cutter for quick and easy slicing!
Conclusion on Fluffernutter Bars Recipe
In conclusion, Fluffernutter Bars are a delightful treat that brings together the classic flavors of peanut butter, marshmallow, and chocolate in a fun and easy-to-make dessert. Whether you’re baking for a special occasion or just craving something sweet, this recipe is sure to satisfy your taste buds. With simple ingredients and straightforward steps, you can whip up a batch of these delicious bars in no time.
Moreover, the versatility of the Fluffernutter Bars recipe allows for various adaptations. From gluten-free to vegan options, everyone can enjoy this sweet delight. Plus, with the tips and serving suggestions provided, you can elevate your dessert experience and impress your family and friends.
So, gather your ingredients, preheat your oven, and get ready to enjoy the warm, gooey goodness of Fluffernutter Bars. They are perfect for sharing, but you might just want to keep them all to yourself! Happy baking!